ZENworks 11 SP3 Troubleshooting Full Disk Encryption
This document provides troubleshooting guidelines for common problems related to ZENworks 11 SP3 Full Disk Encryption. If, after completing the troubleshooting steps, the problem is not resolved, you should contact Novell Technical Support for additional help.
1.0 Windows PE Emergency Recovery Disk (ERD) isn’t working
-
Make sure you have installed the correct WAIK architecture (32-bit vs 64-bit)
-
If you have manually created the ERD, use the PowerShell script provided in the Cool Solutions “Windows Powershell script to create a Windows PE emergency recovery disk for ZENworks Full Disk Encryption” article.
-
Try burning the ERD to a DVD rather than a CD.
2.0 Resetting an Opal drive
Resetting an Opal drive wipes all data from the drive and returns it to its original state.
-
Make sure you know the drive’s Physical Security ID (PSID). The PSID is a unique 32-character alphanumeric string printed on the drive’s label.
-
Boot the device using an Emergency Recovery Disk.
For information about creating an ERD, see “Windows Powershell script to create a Windows PE emergency recovery disk for ZENworks Full Disk Encryption”.
-
When the Recovery application is launched, click > to exit the application.
-
In the Command Prompt window, change to the x:\Program Files\FinallySecure directory.
-
Run the TOPAL utility to reset the drive:
topal -rtp 0
If the drive is not drive 0, replace 0 with the correct drive number.
-
Follow the prompts to enter the PID and reset the drive.
3.0 Can’t apply Full Disk Encryption to an Opal drive
-
Are you using a supported drive? Because of differences in the way manufacturers implement Opal technology, some Opal drives might not work. For a list of supported drives, see ZENworks 11 SP3 Full Disk Encryption Supported Self-Encrypting Drives.
-
Is the drive not accepting a new Full Disk Encryption policy? In versions prior to 11.3.1, new policies were being corrupted on the drive’s dCARD. This is fixed in 11.3.1. The only solution to this issue is to reset the drive to its original state and start over. Resetting the drive wipes all data on the drive. To reset the drive:
-
Make sure you know the drive’s Physical Security ID (PSID). The PSID is a unique 32-character alphanumeric string printed on the drive’s label.
-
Boot the device using an Emergency Recovery Disk.
-
When the Recovery application is launched, click > to exit the application.
-
In the Command Prompt window, change to the x:\Program Files\FinallySecure directory.
-
Run the TOPAL utility to reset the drive:
topal -rtp 0
If the drive is not drive 0, replace 0 with the correct drive number.
-
Follow the prompts to enter the PID and reset the drive.
-
4.0 The ZENworks PBA is not booting to the Windows operating system
Symptoms: After logging in to the PBA, the user encounters a black screen or GRUB error and the device does not boot the operating system.
After pre-boot authentication occurs, the BIOS settings must be correctly set for Windows. With older or unusual hardware configurations, the standard ZENworks PBA boot method and Linux kernel configuration used to provide the BIOS settings might not work, resulting in hardware that does not function correctly or is not recognized by Windows.
To resolve this issue, you need to repair the device’s master boot record (MBR) so that the device boots directly to the operating system. You need to then modify the Direct Media Interface (DMI) file provided by ZENworks Full Disk Encryption so that it includes the correct settings to boot the device.
-
Repair the device’s MBR:
-
Windows XP: Boot the device from a Windows XP installation disk. Press R to use the Recovery Console. Enter the number that corresponds to your operating system (it will usually be 1) and then enter the Administrator password. Type fixmbr, type y. When finished, type exit to close the Recovery Console and boot to Windows.
-
Windows 7: Boot the device from a Windows 7 installation disk. When the Windows 7 splash screen displays, click . After the scan completes, select the Windows installation to repair and continue. If you are prompted to repair the problem automatically, select . When the System Recovery Options dialog is displayed, click the option, then enter bootrec.exe /fixmbr at the command prompt. You should see a success message after running the command. Type exit to exit out of the command prompt and continue to boot into Windows.
If you don’t have a Windows 7 installation disk, you can use a Windows 7 system recovery disk. To create the disk on a working Windows 7 machine, click > > > .
-
Windows 8: Boot the device from a Windows 8 installation disk. When the Windows 8 splash screen displays, click . On the next screen, select , then select . From the Advanced options, launch a command prompt, then enter bootrec.exe /fixmbr. When the operation is finished, reboot the device.
If you don’t have a Windows 8 installation disk, you can use a Windows 8 system recovery disk.
-
-
Modify the dmi.ini file settings:
The dmi.ini file provides the boot method to be used to transition from the Linux kernel to the Windows operating system. The file contains a default boot setting and a list of known hardware configurations that require different boot settings. The default setting is applied unless the device’s hardware configuration is in the list. The dmi.ini file’s default setting and first few entries are shown below:
[default]
KICKSTART=FAST

[FUJITSU SIEMENS,LIFEBOOK C1110]
DMI_SYS_VENDOR=FUJITSU SIEMENS
DMI_PRODUCT_NAME=LIFEBOOK C1110
KICKSTART=BIOS

[LENOVO,20021,2959]
DMI_SYS_VENDOR=LENOVO
DMI_PRODUCT_NAME=20021,2959
KICKSTART=BIOS

[LENOVO,0831CTO]
DMI_SYS_VENDOR=LENOVO
DMI_PRODUCT_NAME=0831CTO
KICKSTART=KEXEC
KERNEL_PARAM=pci=snb-enable-ahci-to-legacy
You need to discover the correct settings for your device and add an entry to the dmi.ini file. This discovery is a trial and error process; you will need to try different settings until one enables the machine to boot successfully.
-
On the device, open a command prompt with Administrator privileges, change to the c:\windows\nac\sbs directory, then run the dmiconfig dump command to see the device’s current dmi.ini settings.
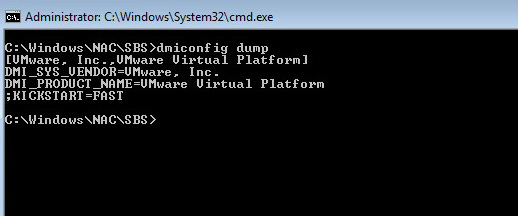
-
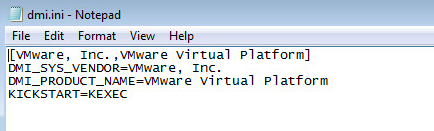
Create a new dmi.ini text file on your desktop and copy the results from the dmiconfig dump into the file. Edit the last line to remove the semicolon and change the KICKSTART value to another boot option (listed below), as shown in the following example:
Finding the correct setting is a trial and error process. The possible dmi settings to try are:
Setting
Example
KICKSTART=BIOS
[VMware, Inc.,VMware Virtual Platform]
DMI_SYS_VENDOR=VMware, Inc.
DMI_PRODUCT_NAME=VMware Virtual Platform
KICKSTART=BIOS
KICKSTART=KEXEC
[VMware, Inc.,VMware Virtual Platform]
DMI_SYS_VENDOR=VMware, Inc.
DMI_PRODUCT_NAME=VMware Virtual Platform
KICKSTART=KEXEC
KICKSTART=FAST
[VMware, Inc.,VMware Virtual Platform]
DMI_SYS_VENDOR=VMware, Inc.
DMI_PRODUCT_NAME=VMware Virtual Platform
KICKSTART=FAST
KICKSTART=KEXECKERNEL_PARAM=pci=snb-enable-ahci-to-legacy
[VMware, Inc.,VMware Virtual Platform]
DMI_SYS_VENDOR=VMware, Inc.
DMI_PRODUCT_NAME=VMware Virtual Platform
KICKSTART=KEXEC
KERNEL_PARAM=pci=snb-enable-ahci-to-legacy
KICKSTART=KEXECKERNEL_PARAM=pci=snb-enable-ahci-to-legacyKERNEL=/boot/bzImage-acpi
[VMware, Inc.,VMware Virtual Platform]
DMI_SYS_VENDOR=VMware, Inc.
DMI_PRODUCT_NAME=VMware Virtual Platform
KICKSTART=KEXEC
KERNEL_PARAM=pci=snb-enable-ahci-to-legacy
KERNEL=/boot/bzImage-acpi
-
In the c:\windows\nac\sbs directory, make a backup copy of the current dmi.ini file, then copy your edited dmi.ini file to the directory.
-
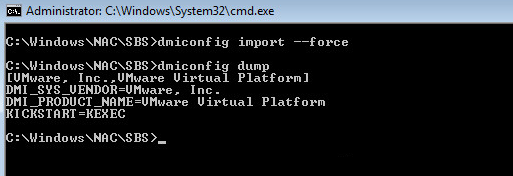
Open a command prompt with Administrator privileges, change to the c:\windows\nac\sbs directory, then run the dmiconfig import --force command to import the settings from the new dmi.ini file. Run dmiconfig dump to verify the change.
-
Reboot the device. If the device fails to boot to the Windows operating system, repair the MBR, then repeat the above process using another setting.
-
After you find the correct setting, you can edit your Full Disk Encryption policy to add it to the policy’s dmi.ini file (ZENworks Control Center > > Full Disk Encryption policy details > tab > ).
-
5.0 The ZENworks Endpoint Security service (ZESService) is crashing
-
Check to see if the device is using the Intel IRRT driver. This driver causes the device to crash and is not supported. If the device is using the driver:
-
Disable the driver through the device’s adapter settings.
-
Reboot the device to BIOS and change from IRRT to AHCI mode.
-
6.0 Full Disk Encryption won’t install on a ZENworks-imaged Windows XP device
Full Disk Encryption creates a 100 MB partition on the device when the policy is first applied. On Windows XP devices that have been imaged by ZENworks, Full Disk Encryption can’t create the partition unless there is unallocated disk space.
-
Use a partition management tool to designate at least 120 MB as unallocated disk space, then apply the Full Disk Encryption policy again.
7.0 Legal Notices
Novell, Inc. makes no representations or warranties with respect to the contents or use of this documentation, and specifically disclaims any express or implied warranties of merchantability or fitness for any particular purpose. Further, Novell, Inc. reserves the right to revise this publication and to make changes to its content, at any time, without obligation to notify any person or entity of such revisions or changes.
Further, Novell, Inc. makes no representations or warranties with respect to any software, and specifically disclaims any express or implied warranties of merchantability or fitness for any particular purpose. Further, Novell, Inc. reserves the right to make changes to any and all parts of Novell software, at any time, without any obligation to notify any person or entity of such changes.
Any products or technical information provided under this Agreement may be subject to U.S. export controls and the trade laws of other countries. You agree to comply with all export control regulations and to obtain any required licenses or classification to export, re-export, or import deliverables. You agree not to export or re-export to entities on the current U.S. export exclusion lists or to any embargoed or terrorist countries as specified in the U.S. export laws. You agree to not use deliverables for prohibited nuclear, missile, or chemical biological weaponry end uses. Please refer to the Novell International Trade Services web page for more information on exporting Novell software. Novell assumes no responsibility for your failure to obtain any necessary export approvals.
Copyright © 2015 Novell, Inc. All rights reserved. No part of this publication may be reproduced, photocopied, stored on a retrieval system, or transmitted without the express written consent of the publisher.
For Novell trademarks, see the Novell Trademark and Service Mark list.
All third-party trademarks are the property of their respective owners.