About NetWare Migration Wizard
Novell NetWare Migration Wizard is designed to help you transfer the identity of one server to another server. This is what is referred to as a server hardware upgrade. (If you want to add a new server with a new name into your network, you wouldn't use the Migration Wizard; you would use the NetWare server installation program.) Migration Wizard is an ideal tool for moving existing NetWare data onto faster, more reliable server hardware.
NetWare Migration Wizard is a Windows*-based program that you install and run on a workstation. With the Migration Wizard, you model your migration project using simple drag-and-drop procedures before you actually perform the migration. This helps prevent errors from interrupting your data migration and allows you to correct mistakes before they happen.
You can also take advantage of this modeling capability to reorganize the data on your server and even resize volumes, if needed. However, Migration Wizard is best suited for migrations requiring a minimal amount of volume reorganization.
As you work through the modeling phase of NetWare Migration Wizard, all of your decisions are recorded in a migration project file. At any time during the modeling process, you can save the project file, exit the utility, and then restart Migration Wizard and resume from where you left off.
After the modeling phase is completed, you can proceed with the actual migration. This process is divided into four basic steps:
- Step 1: Copy File System Data
Using the data contained in the migration project file, Migration Wizard copies the files and folders (or even entire volumes) you selected from the source server to a newly installed destination server. All file system data, including meta-data such as file trustees, ownerships and attributes, is copied from the old machine to the new one.
- Step 2: Edit Configuration Files
During this step, Migration Wizard presents configuration files such as autoexec.ncf and startup.ncf side-by-side so you can easily copy commands and settings from the source server's configuration files to matching files on the destination server.
- Step 3: Begin NDS/eDirectory Migration
The NDS/eDirectory files are transferred from the old server to the new one without any additional work on your part. After the migration, the eDirectory partitions that existed on the old server will exist on the new server. This is because the Migration Wizard backs up the entire eDirectory database on the source server and then restores it on the destination server.
- Step 4: Finish NDS/eDirectory Migration
After the source server's file system and NDS/eDirectory database are migrated to the destination server, the source server is automatically brought down and the destination server reboots and assumes the name and identity of the source server on your existing network.
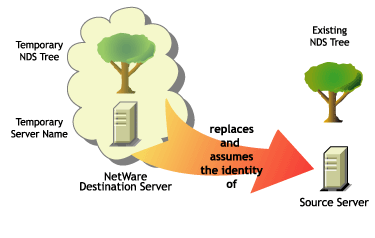
Before you can migrate your data, you must first install a destination NetWare server in a temporary eDirectory tree. A temporary eDirectory tree is simply a tree that contains one server with a basic installation of NetWare and no additional products installed (other than SMSTM or any other default products).
Migration Wizard automatically modifies the destination server's autoexec.ncf file to include the source server's name and internal IPX number/server ID. You don't have to modify these manually. Because the server's identity has been transferred from one physical server to another, you won't need to upgrade any client applications that may be doing drive mappings or running applications based on the server name. However, you will have to manually change the IP address of the destination server to match that of the source server.
Migration Wizard does not migrate any products and services that are running on the source server. After the migration is complete, you will need to re-install all applications on the destination server and reconfigure them, if necessary.