Novell AppArmor Powered by Immunix 1.2 Administration Guide
Novell® AppArmor Powered by Immunix is designed to provide easy-to-use application security for both servers and workstations. Novell AppArmor is an access control system that lets you specify per program which files the program may read, write, and execute. AppArmor secures applications by enforcing good application behavior without relying on attack signatures, so can prevent attacks even if they are exploiting previously unknown vulnerabilities.
Novell AppArmor consists of:
-
A library of AppArmor profiles for common Linux* applications describing what files the program needs to access.
-
A library of AppArmor profile foundation classes (profile building blocks) needed for common application activities, such as DNS lookup and user authentication.
-
A tool suite for developing and enhancing AppArmor profiles, so that you can change the existing profiles to suit your needs and create new profiles for your own local and custom applications.
-
Several specially modified applications that are AppArmor enabled to provide enhanced security in the form of unique subprocess confinement, including Apache.
-
The Novell AppArmor–loadable kernel module and associated control scripts to enforce AppArmor policies on your SUSE® Linux system.
NOTE: Some distributions of SUSE Linux include a version of AppArmor that enforce policies for a limited set of programs. These policies can be modified to suit your particular environment using the included AppArmor tool set. To create AppArmor profiles for additional programs, an upgrade to the full version of AppArmor is required.
Documentation Conventions
The following typographical conventions are used in this manual:
- Menu Items, Field Names, and Screen Titles in GUIs
-
When using GUIs, field names, menu and screen titles, and field values are shown as .
- Keys
-
Key names are listed as they appear on your keyboard, as in Enter and Esc.
- Command
-
Linux commands (and other operating system commands, when used) are represented this way. This style should indicate to you that you can type the word or phrase on the command line and press Enter to run the command.
Example
Command Environment
To use ls to view the contents in the current directory, enter ls in a terminal window.
- Filename
-
Filenames, directory names, paths, and RPM package names are represented this way. This style should indicate that a particular file or directory exists by that name on your Linux system.
- Placeholders
-
Replace placeholder with the actual value that matches your setup.
- Examples, Notes, and Warnings
-
Examples use Example: when appropriate. Notes and pertinent information are shown with a Note or Warning flag, as in:
NOTE: Notes highlight information that might help better understand previous paragraphs. Warnings provide important information that might seriously affect the integrity of the product or your data.
- Computer Output
-
When you see text in this style, it indicates text displayed by the computer on the command line. You see responses to typed commands, error messages, and interactive prompts for your input during scripts or programs shown this way.
Example
Computer Output
Use the ls command to display the contents of a directory:
$ ls
Desktop  about.html       logs
Mail     backupfiles      mail
- Trademarks
-
A trademark symbol (®, etc.) denotes a Novell trademark. An asterisk (*) denotes a third-party trademark.
Understanding This Guide
For installation instructions, please refer to the separate Novell AppArmor Powered by Immunix 1.2 Installation and QuickStart Guide.
- Immunizing Programs
-
Describes operation of Novell AppArmor Powered by Immunix.
- Selecting Programs to Immunize
-
Describes the types of programs that should have Novell AppArmor profiles created for them.
- Building Novell AppArmor Profiles
-
Describes how to use the Novell AppArmor tools to immunize your own programs and third-party programs that you may have installed on your SUSE Linux system. It also helps you to add, edit, or delete profiles that have been created for your applications.
- Managing Profiled Applications
-
Describes how to perform Novell AppArmor profile maintenance, which involves tracking common issues and concerns.
- Profiling Your Web Applications Using ChangeHat Apache
-
Enables you to create subprofiles for the Apache Web server that allow you to tightly confine small sections of Web application processing.
- Support
-
Indicates support options for this product.
- Glossary
-
Provides a list of terms and their definitions.
Getting Started with Novell AppArmor
Novell AppArmor Powered by Immunix (Novell AppArmor) provides you with technologies to protect your applications from their own vulnerabilities by creating Novell AppArmor profiles for applications on your SUSE Linux system.
Novell AppArmor Installation
After installing SUSE Linux, including the required packages, you are ready to install Novell AppArmor. Refer to the Novell AppArmor Powered by Immunix 1.2 Installation and QuickStart Guide for detailed installation steps.
After Novell AppArmor is installed, you are ready to use it to manage Novell AppArmor profiles. You can do this through the graphical user interface (GUI) or by using the command line (refer to Section 3.4, Building Novell AppArmor Profiles Using the Command Line Interface).
Launching Novell AppArmor through the YaST GUI
SUSE Linux offers the utility YaST. Using YaST, you can launch the Novell AppArmor interface. This is the recommended method for a novice Linux user. For the other available methods, refer to Section 3.2, Building and Managing Novell AppArmor Profiles.
-
To start YaST, select from the SUSE menu.
YaST is launched as shown in Novell AppArmor Basics, below. You can refer to this section to navigate in Novell AppArmor.
NOTE: Alternately, you can launch the YaST GUI by opening a terminal window then entering yast2 while logged in as root.
Novell AppArmor Basics
Novell AppArmor enables you to manage profiles through a simple user interface.
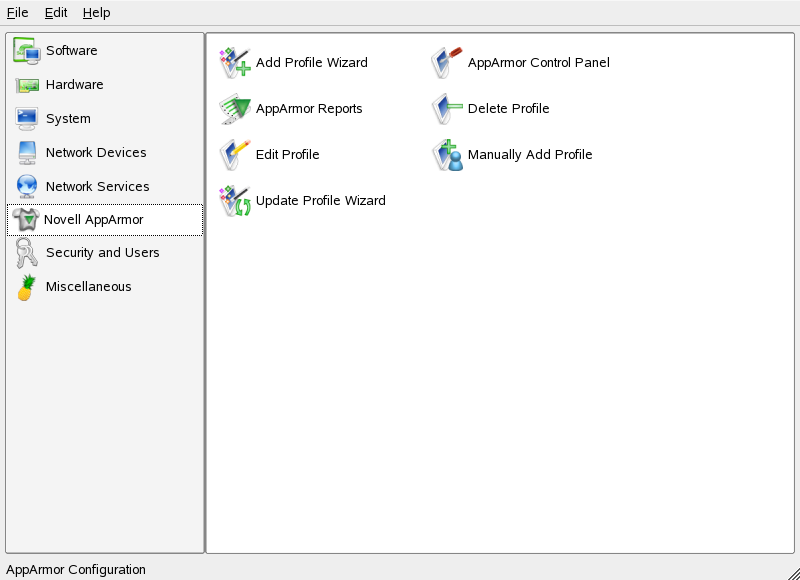
In the YaST Control Center, click in the left pane. The right from then shows the different Novell AppArmor configuration option. Select the appropriate Novell AppArmor configuration option by clicking the corresponding icon.
Depending on the configuration option you select, refer to one of the following locations in this guide:
- Add Profile Wizard
-
For detailed steps, refer to Section 3.3.1, Adding a Profile Using the Wizard.
- AppArmor Reports
-
For detailed steps, refer to Section 4.3, Reports.
- Edit Profile
-
Edit an existing Novell AppArmor profile on your system. For detailed steps, refer to Section 3.3.3, Editing a Profile.
- Update Profile Wizard
-
For detailed steps, refer to Section 3.3.5, Updating Profiles from Syslog Entries.
- AppArmor Control Panel
-
For detailed steps, refer to Section 3.3.6, Managing Novell AppArmor and Security Event Status.
- Delete Profile
-
Delete an existing Novell AppArmor profile from your system. For detailed steps, refer to Section 3.3.4, Deleting a Profile.
- Manually Add Profile
-
Add a Novell AppArmor profile for an application on your system without the help of the wizard. For detailed steps, refer to Section 3.3.2, Manually Adding a Profile.