21.1 About the Novell XML Editor

The Novell XML Editor lets you create, edit, and validate XML files.You can edit XML files in either the Source or Tree editor. You can customize the certain behaviors, such as code completion, in the Preferences tab.

The Novell XML editor is built on the Web Standard Tools (WST) project architecture.

21.1.1 Creating XML Files

You use the New XML File Wizard to create new XML Files. The wizard can create an empty XML file or a generated XML file based on an XML schema or DTD. Generated files contain skeleton XML data that is generated based on a given root element and an XML Schema or DTD.

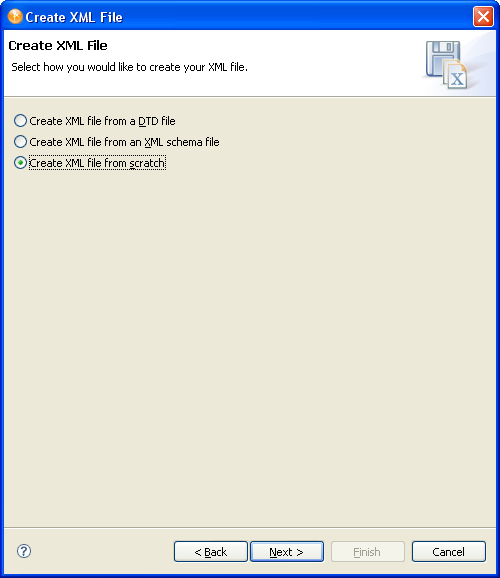
To launch the New XML File Wizard:

  1. Select File > New > More Projects.

  2. Open the XML Folder, select XML then select Next.

  3. Choose one of the source options on which you want to base the new XML file.
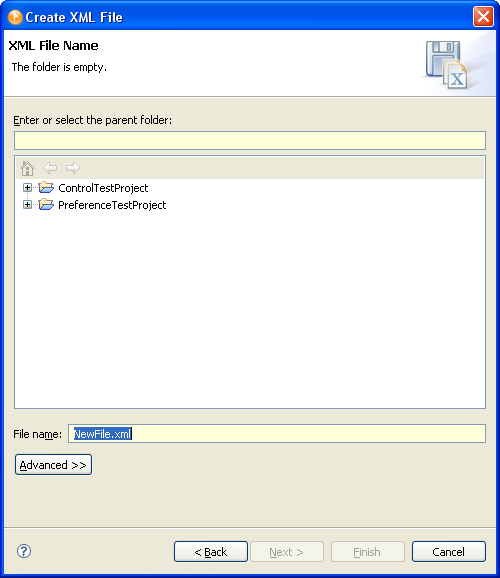
    Option

    Description

    Create XML file from a DTD file

    Generates an XML document containing a root element and a skeleton based on a DTD that you either import or choose from an existing catalog entry.

    Create XML File from an XML schema file

    Generates a skeleton XML document containing a root element and skeleton based on a schema that you either import or choose from an existing catalog entry.

    Create XML File from scratch

    Creates an XML document containing the XML Declaration with the version and encoding attributes set to 1.0 and UTF-8 by default.

  4. Click Next. The wizard prompts you to supply the name and location for the new file.

  5. Fill in the fields as follows:

    Field

    Description

    Enter or select Parent Folder

    Specify where the wizard should create the new file.

    File Name

    Specify the name of the new file.

    Advanced>>

    Click this button if you want to specify that the new XML file should link to another file in the file system.

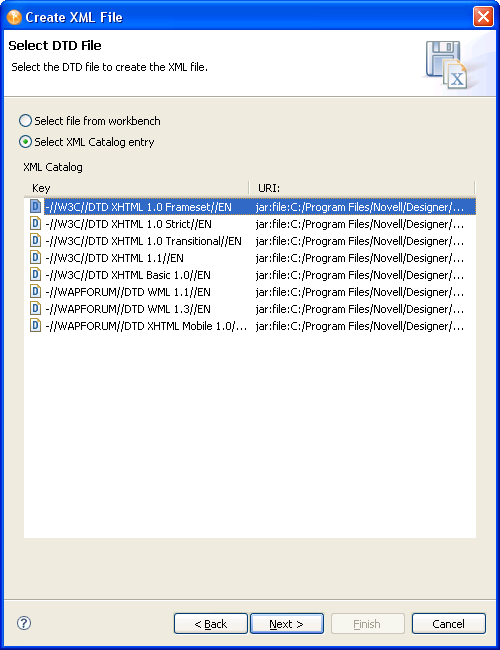
  6. If you chose to create the file from scratch, click Finish, otherwise click Next. You are prompted for the catalog entry (shown below) or Schema or DTD.

  7. Fill in the fields as follows, then click Next:
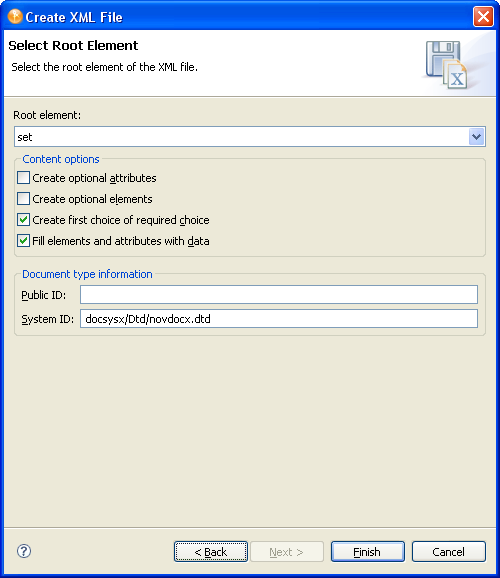
    Field

    Description

    Select file from workbench

    If you choose this option, you must select from a list of DTDs or schemas in your workspace. You can also choose to import a new schema into your project if the schema is not available.

    Select XML catalog entry

    Choose one of the XML Catalog entries from the list. You can edit this list in the Preferences > Web and XML > XML Catalogs.

  8. Click Next. You are prompted to specify the Root Element.

  9. Fill in the fields as follows:

    Field

    Description

    Root element

    Choose or type the new document’s root element.

    Create optional attributes

    Select if you want the wizard to generate optional attributes.

    Create optional elements

    Select if you want the wizard to generate optional elements.

    Create first choice of required choice

    Select if you want the skeleton XML to always contain the first choice in a required choice. If this is not selected, no elements are inserted for the choice.

    Fill elements and attributes with data

    Select if you want the wizard to generate dummy data in the file for elements and attributes.

    The generated XML inserts the node name as the data of the elements

    Public ID

    Specify the file’s Public ID

    System ID

    Specify the file’s System ID.

  10. Click Finish.

You can launch the editor by double-clicking an existing XML file.

21.1.2 Validating Files

You can validate your XML files using the right-mouse menu in the Source editor. If any validation errors or warnings occur, they are displayed in the Problems view.

21.1.3 Outline View

The editor provides an Outline view containing a tree that displays the structure of the XML document including its nodes are the elements, attributes, text nodes, comments, and so on from the document.

The Outline tree is closely connected to the Source editor and the Tree editor. When you edit a document in either the Source or Tree editor, the Outline tree updates automatically. If the editing results in a document that isn't well-formed, the structure displayed in the tree might seem odd. But the structure corresponds as closely as possible to the well-formed parts of the document.

Editing or generally moving the cursor in the Source Editor or changing the selection in the Tree editor expands and selects the corresponding node (if possible) in the Outline tree. This makes it possible to easily locate the current place in the document.

In a similar fashion, selecting a node in the Outline tree moves the cursor in the Source editor to the textual position of the node (if the Source editor is active) or change the selection in the Tree editor (if the Tree editor is active). The Outline view provides structural editing capabilities such as inserting and removing nodes.

21.1.4 XPath Navigator

The XPath Navigator view supports context-sensitive editing of XPath expressions and syntax highlighting. It automatically attaches to the currently selected XML editor and uses its Document node as the evaluation context. The namespace context shows all namespaces in scope on its document element.

The view consists of two parts—an editor pane and a results table. When the user types an expression in the editor pane and pauses for 0.5 seconds, the result is shown in the table. If the result is a node list, each row in the table displays an icon for the node type, a short description of the node, and the location of the node in the text (line numbers). Selecting a row in the table selects the text of the corresponding node in the XML editor. However, this is only supported in the Source Editor.

Typing Ctrl-Space, '/', '[' or '(' triggers code-completion—the expression is evaluated up until the cursor location, and insertable elements are shown in a drop-down box.