18.2 Checking In a Project To a Version Control Server
-
In the Project view, right-click a project name, then click .
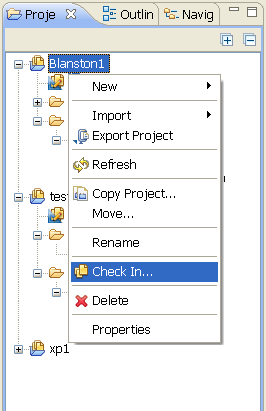
You can also select the icon
 on the main toolbar.
-
If the project you are checking in already exists on the version control server, skip to Step 8.
or
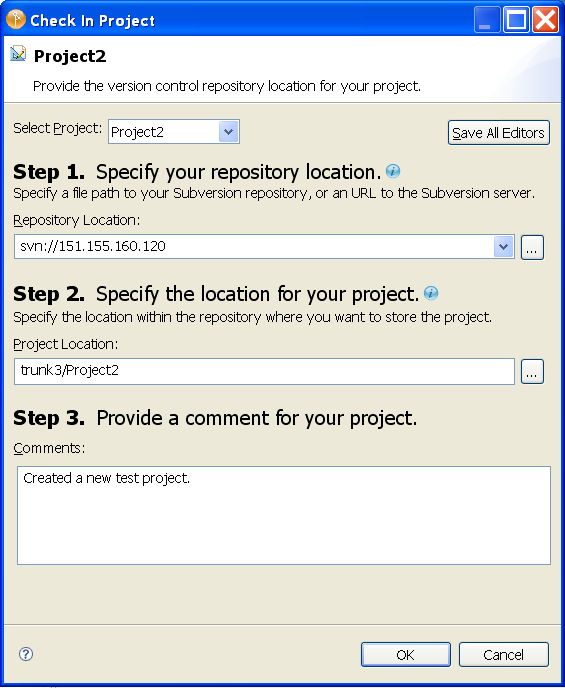
If the project you are checking in does not exist on the version control server, you see the Check In Project page displayed. Continue with Step 3.
-
If you have multiple projects in the Project view and you clicked the icon, select the project you want to check into the version control server from the drop-down list. If you select from the Project view, you won’t see the list.
-
Under , provide a URL pointing to where you want the project to reside on the version control server. The Check In Project page gives three examples:
-
c:/subversionrepo
-
http://subversionserver.mycompany.com
-
svn://localhost
-
https://subversionserver.mycompany.com/svn/myrepository
The list of supported protocols includes:
-
svn
-
http
-
https
-
file
-
svn+ssh
You can click the button to browse for folders that are saved either locally or on a network drive. You can also create a new folder from the Browse For Folder page.
-
-
Under , type the folder name that will contain this project on the version control server.
You can also click the button to bring up the Version Control Server Browser page. This browser helps you determine the correct URL where projects are stored and only shows base folders and corresponding projects.
The base folder cannot be a directory of a Designer project. However, the base folder can contain multiple projects as subdirectories. You create base folders through an external svn client.
-
(Optional) Under , type a comment concerning the project, then click .
Whenever you perform an operation that affects the contents of the server, you are prompted for a comment. Comments are useful when keeping track of the changes you make from one session to another.
-
(Optional) If you have made changes to more than one project in the Modeler view, you need to save those changes before checking a project into version control.
-
Select to bring up the Save Resources page, which allows you to save all open projects.
-
On the Save Resources page, click . You are returned to the Check In Project page.
-
-
Provide authentication to the Subversion server if required.
Depending on the type of security you have set up, you might need to supply SSH authentication, SSL client certificate authentication, or basic HTTP authentication.

-
If you are updating an existing project on the version control server, add new information to the Comment section of the Check In Project page.
If you are updating a project, you see the selected project, the object’s children that have changes to be checked in, and objects that depend on the project and need to be checked in. If you choose to check in a single object, you only see that object in the Check-in page.

-
If you have more than one project open in the Modeler view, click to choose which project you want to save to version control.
-
(Optional) If you have made changes to more than one project in the Modeler view, you need to save those changes before checking a project into version control.
-
Select to bring up the Save Resources page, which allows you to save all open projects.
-
On the Save Resources page, click . You are returned to the Check In Project page with an updated list of what is being checked in.
-
-
Click to commit the files to the version control server. When the files are committed, click to close the Commit page.
