7. Policy & Simulation: What's New
(Home) Previous
Next
1. Simulate Next Policy Set
The Output page of the policy simulator was enhanced to allow simulation
of the next policy set without returning to the Simulator Input page.
This new feature allows the output from the simulation of one policy
set to be used as input for the next policy set. For example, the
output document from a simulation of the input transformation policies
can be used as input for the schema mapping policies.
To simulate the next policy set from the output page, select the
Next button at the bottom of the Simulator page. Note that the Next
button is disabled if the current policy set is the Publisher
Notify Filter or the Subscriber Output Transformations. These policy sets
are at the end of the Publisher and Subscriber channels.
The next policy set in the flow of operation depends on the policy set that is
currently being simulated. For example, if you just simulated the Publisher
Event Transformation policies, the next policy set would be the Publisher Sync
Filter. Likewise, if the current policy set was the Subscriber Creation policies,
the next policy set would be the Subscriber Placement policies.
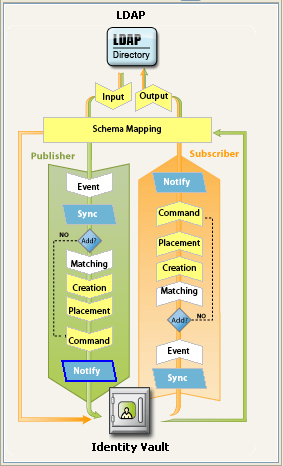
The document operation type also affects the next policy set. The Identity Vault engine
skips the Matching, Creation and Placement policy sets for any document that
does not contain an Add operation. The simulator was designed to perform the same function.
For example, if the input document is an Add operation, the next policy set
for the Publisher Sync Filter is the Publisher Matching policy set. However, if
the input document contains a Modify operation, the next policy set would be
the Publisher Command policy set. This is illustrated in the above image. Note the
"Add?" decision box in the Publisher and Subscriber channels.
The Back button on the Output Wizard page returns to the Input Wizard page,
allowing you to repeat the simulation for the current policy set. The Finish and
Cancel buttons were replaced by a Close button, since they performed the same function--to close the simulator.
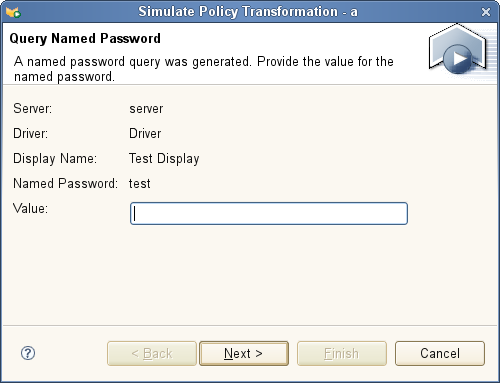
2. Simulate Named Password Queries
This version of the Simulator allows you to simulate named password
queries that are generated by a policy. The query displays the server and driver
along with the named password name and its display name. The value entered
into the Value text field is returned as the value of the named password.
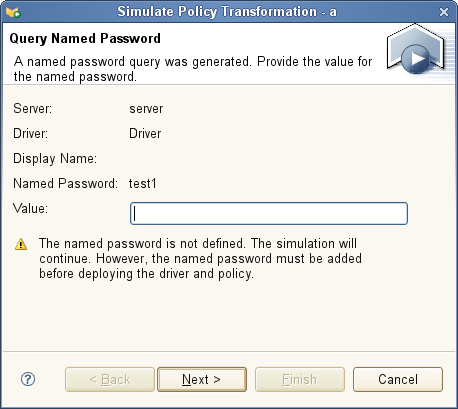
You see a warning message if the generated named password query
attempts to read a named password that is not defined for the designated
server and driver. The simulation will continue. However, the user is
informed that the named password must be added to the driver before it can be
deployed. Once deployed, the Identity Vault engine generates an error if the
policy attempts to read an undefined named password.
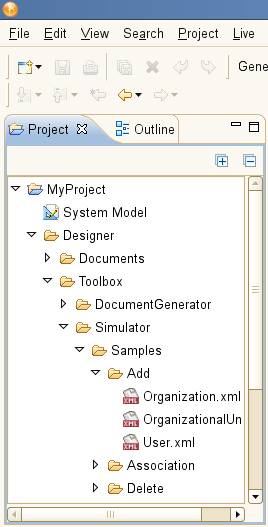
3. Saving Simulation Documents in Project
This version of Designer allows you to save simulator input and response documents
in the Designer project. The simulation documents can still be saved anywhere in the file system;
however, saving the documents in the project provides the following
benefits:
- Documents are include in project export/import operations
- Documents may be placed under version control
- Documents can be edited and managed from the Project view
|
Previous versions of Designer included sample simulation input and output
documents. These sample documents where located in the Policy plug-in under
the Designer installation directory. When browsing for an input document in
the simulator, a new dialog prompts you to import the sample documents into
the project. This dialog is displayed at least once for each project when the
you select the Import an XDS input document from a file option on the
simulator tool bar.
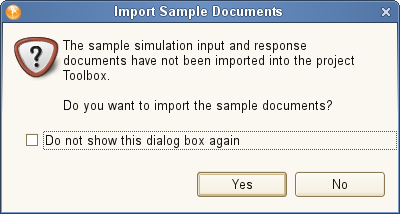
Selecting Yes imports the simulator sample documents into the project
tool box under the Simulator\Samples directory. Once the samples are imported,
the prompt is no longer displayed.
Selecting No and leaving the Do not show this dialog box again unchecked
will not import the documents into the project, but you are prompted
again the next time you browse for an input document. Checking the
Do not show this dialog box again does not import the samples and the prompt
is never again displayed for the project.
The sample documents are imported into the project tool box, which can be viewed
and managed from the Project view. Initially the documents are organized
under a Samples directory, with sub-folders for each document type. Once imported,
however, you are free to rename, reorganize or delete any of the folders or files
within the Simulator directory. The tool box also allows you to create or import
other folders and documents from the file system into the project.
4. New DS Trace Features
Two User Preferences have been added in order to configure the Live DS Trace feature. Users can click on
Configure Trace toolbar icon to open Preferences page.

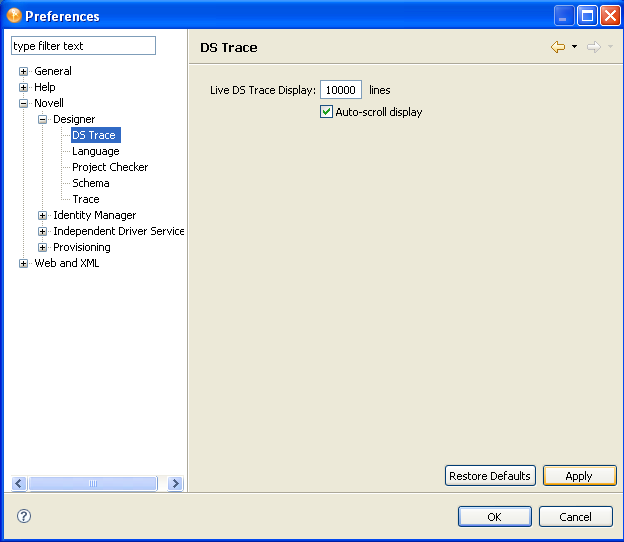
You can configure the following options in Preferences page:
- Set the number of lines to displayed in Live DS Trace log window.
The default buffer size is 1000 and maximum buffer size is 10000.
- Enable / Disable auto-scrolling in Live DS Trace log window. By default
auto-scroll option is enabled.
|
5. New Mapping Table Features
The new mapping table features are as follows:
- The Edit Column icon is displayed to the right of Column Name
-
The Column Type (Case Sensitive, Case Insensitive, Numeric) is displayed along with Column Name in the table
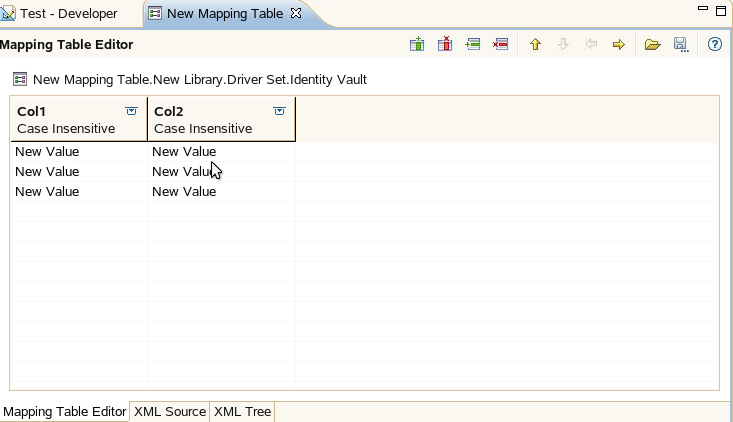
- In addition, Project Checker will also identify the following errors in the mapping table:
- Duplicate Column Names
- Empty Column Names

- There are new toolbar icons for import and export actions

- Add Column action creates a column with unique name;
column_new-1, column_new-2, etc
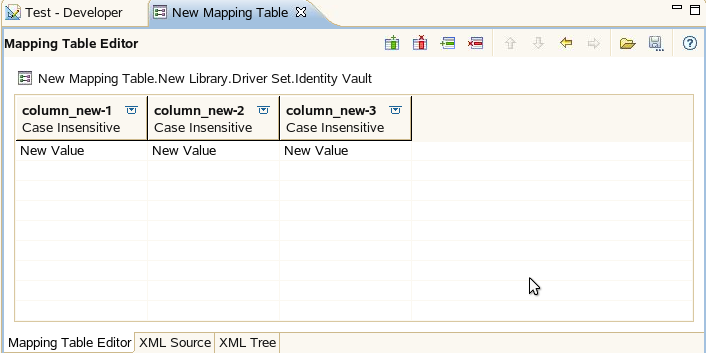
- When you edit a column name and it is the same as another column name, an error dialog is displayed.
The dialog remains displayed until you enter a valid, unique column name.
|
6. Enhanced XML Validation in Policy Editors
Designer now validates the data in the xml editor tab in all policy editors ie. filter editor, policy builder, schema map editor against the DTD for the corresponding policy on save and displays
errors in the "Policy XML Validation" dialog. You may go ahead and change the xml based on the suggestions given or you can ignore
them. If you want to ignore these changes everytime, you can disable the "Validate XML on save" option.
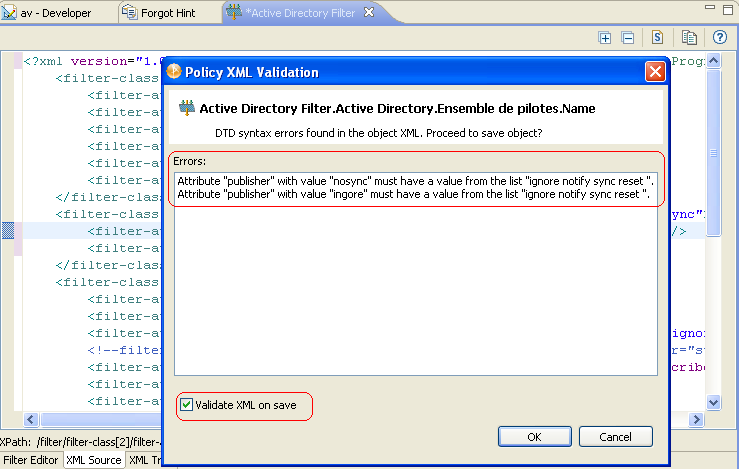
If you want to change the "Validate XML on save" setting for all Policy Editors, you can go to the Novell > Identity Manager > Configuration > Prompts preference page.

(Home) Previous
Next