4.4 Installing and Setting Up Dynamic File Services in a Windows Server 2003 Cluster
You must install Dynamic File Services on each node in turn in order to lay down the information that is stored locally on each server. Specify the same path for the destination folder on a shared drive when you install on each node.
IMPORTANT:The Windows cluster configuration, management, terminology, and tools can vary depending on the version of Windows Server you are running and on how you set up your cluster and cluster resources. Adjust the instructions in this section as needed for your cluster environment.
For all issues related to Windows cluster configuration and management, see the Microsoft documentation for your Windows Server operating system in the Microsoft TechNet Library.
The following installation description assumes a failover cluster with two Windows Server 2003 nodes named Node1 and Node2. Modify the procedure as necessary if you have more nodes. Repeat the steps for Node2 on the additional nodes.
-
Section 4.4.2, Installing and Setting Up Dynamic File Services on Node1
-
Section 4.4.3, Adding the Dynamic File Service, Shares, and Shared Disks to the Cluster Group
-
Section 4.4.4, Moving the Cluster Resource from Node1 to Node2
-
Section 4.4.5, Installing and Setting Up Dynamic File Services on Node2
4.4.1 Setting Up a Cluster Group and Resource for the Installation Destination Folder’s Shared Disk
Before you install Dynamic File Services on Node1, set up the cluster and create a cluster group for the shared disk where you want to install Dynamic File Services. Use the guidelines in Section 4.1, Planning the Installation in a Windows Cluster.
IMPORTANT:It is beyond the scope of this guide to provide detailed instructions about Windows cluster resources configuration, management, and best practices. To illustrate the process, this section provides one possible scenario.
-
Use the Windows Cluster Administrator tool to set up a two-node cluster.
-
In the Windows Cluster Administrator tool, select > > , then create a cluster group.
You can use any name for the cluster group.
-
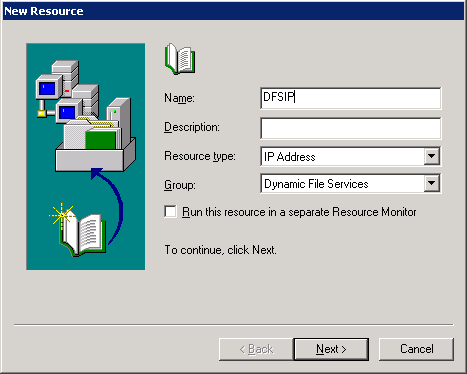
In the cluster group, create an IP address resource, click , then assign a unique IP address for the group.
-
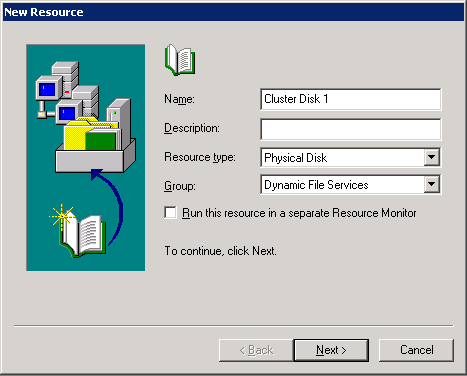
In the cluster group, create a resource for the shared physical disk where you want to install the Dynamic File Services software, such as S:\.
-
Continue with Section 4.4.2, Installing and Setting Up Dynamic File Services on Node1.
4.4.2 Installing and Setting Up Dynamic File Services on Node1
Use the following procedure to install and set up DynamicFS on the currently active node (Node1).
-
Log in to Node1 as the Administrator user or as a user with Administrator privileges.
In an Active Directory environment, log in as a domain user who also has Active Directory Domain Administrator rights.
-
Install Dynamic File Services software by using the option, and specify the following settings:
-
Allow an exception for the Dynamic File Services port in the firewall: Enable this option in order to remotely manage pairs and policies on this server from another computer. It is enabled by default.
-
Service port: Specify the port number (default 8999) to use for the remote management communications.
-
Destination folder: Click to locate and select the destination folder on a shared device where you want to install the software, then click .
For example, specify the as S:\Dynamic File Services. The program files, data files, and log files are installed in the same folder.
For detailed installation instructions, see Section 3.1, Installing Dynamic File Services.
-
-
Verify that the Service Controller is started and that the Service is running.
The icon appears in the notification area. Right-click the icon to view the Service status.
-
(Optional) Right-click the icon, select , then register the license key.
The Service operates in Evaluation Mode until you register a license key. You can apply the key now or later. After the product is installed in the cluster, a user with Administrator privileges can register the license key from any node where Dynamic File Services is active. You register the license key only once in the cluster. For information, see
Registering the License Key
in the Dynamic File Services 2.1 Administration Guide. -
Set up the DynamicFS administrator users for Node1 by adding their usernames as members of the Dynamic File Services group.
The user who installs Dynamic File Services is automatically added to the group. For information, see
Setting Up Administrators in a Domain
in the Dynamic File Services 2.1 Administration Guide.IMPORTANT:You later assign the same users to the Dynamic File Services group on each node.
-
Stop the Dynamic File Service and exit the Service Controller:
-
Log in as the Administrator user or as a user with Administrator privileges.
-
Right-click the icon in the notification area, then select to disable the Dynamic File Service.
-
Right-click the icon in the notification area, then verify that the Dynamic File Service status is .
-
Right-click the Service Controller icon in the notification area, then select .
-
-
Continue with Section 4.4.3, Adding the Dynamic File Service, Shares, and Shared Disks to the Cluster Group.
4.4.3 Adding the Dynamic File Service, Shares, and Shared Disks to the Cluster Group
After you install Dynamic File Services on the shared cluster disk, you must add the following resources and dependencies to the cluster group that you created in Section 4.4.1, Setting Up a Cluster Group and Resource for the Installation Destination Folder’s Shared Disk:
-
The Dynamic File Service.
-
Cluster shares for the primary paths in pairs.
You can add shares for primary paths now or later as needed.
-
Shared disks that you want to use for pairs and policies.
You can add shared disks for pairs now or later as needed.
Use the guidelines in Section 4.1, Planning the Installation in a Windows Cluster.
IMPORTANT:It is beyond the scope of this guide to provide detailed instructions about Windows cluster resources configuration, management, and best practices. To illustrate the process, this section provides one possible scenario.
To add the Service, shared disks, and cluster shares to the Dynamic File Services cluster group for a Windows Server 2003 cluster:
-
Use the Windows Cluster Administrator tool to create cluster-managed network shares for the Dynamic File Services folder on the shared disk and the folders that you plan to use as primary paths in DynamicFS pairs.
For example, set up the following shares:
Cluster-Managed Network Shares
Sample Value
Share for the S:\Dynamic File Services path
DYNAMICFS_SHARE
Share for S:\DATA, which will be used as the primary path for DATA_PAIR
DATA_SHARE
Share for K:\PROJECTS, which will used as the primary path for PROJECTS_PAIR
PROJECTS_SHARE
-
In the Windows Cluster Administrator tool, add a to the cluster where you installed the software:
-
Right-click the Dynamic File Services group that you have created, then select .
-
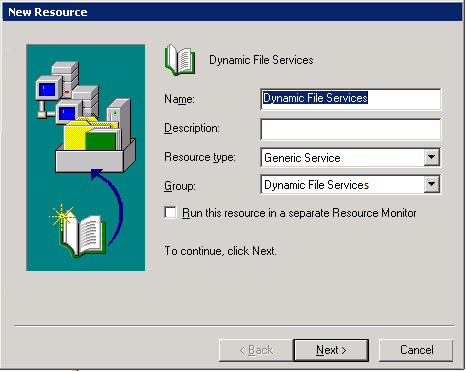
On the New Resource page, specify the following values:
-
Name: Type the name of this service resource, such as Dynamic File Service.
-
Resource type: From the drop-down list, select .
-
Group: From the drop-down list, select the cluster group that you created for the shared disk in Section 4.4.2, Installing and Setting Up Dynamic File Services on Node1.
-
-
Click .
-
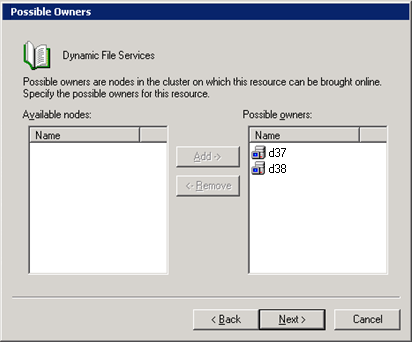
On the Possible Owners page in the list, select the cluster nodes where you want to use this resource, click to move them to the list, then click .
-
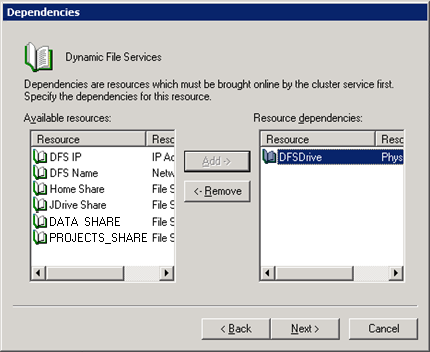
On the Dependencies page in the list, select the IP address and the physical shared disk resource where you installed Dynamic File Services, click to move them to the list, then click .
You can also add other shared disks that you plan to use for pair paths.
-
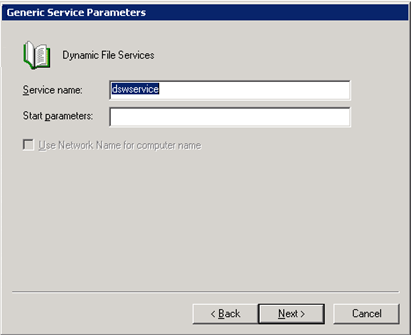
On the General Service Parameters page, type the filename of the Dynamic File Service executable program without the file extension (dswservice), then click .
-
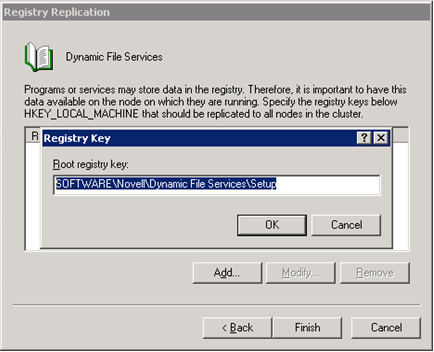
On the Registry Replication page, click , type SOFTWARE\Novell\Dynamic File Services\Setup as the , then click .
The InstallID key value allows the license to be decrypted on any active node.
-
Click .
-
-
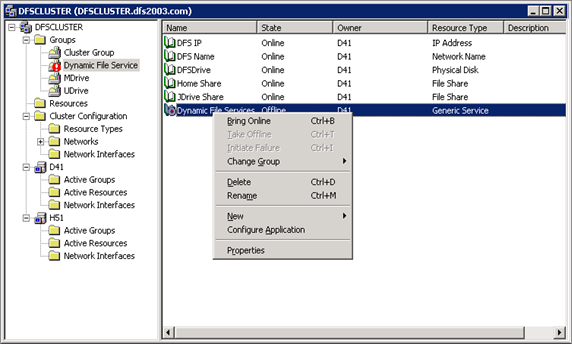
Use the Windows Cluster Administrator tool to add the following resources in the cluster resource:
Resource Type
Description
Sample Values
File Share
A share for the S:\Dynamic File Services path
DYNAMICFS_SHARE
Domain Share
The domain-level cluster share for the virtual cluster server
NDFSCLR
File Share
Share for S:\DATA, which will be used as the primary path for DATA_PAIR
DATA_SHARE
File Share
Share for K:\PROJECTS, which will used as the primary path for PROJECTS_PAIR
PROJECTS_SHARE
-
Verify that the cluster resource works by right-clicking it, then selecting .
-
Use the Windows Cluster Administrator tool to specify dependencies for the Dynamic File Service cluster resource:
-
In the DynamicFS Group cluster resource, take the Dynamic File Service resource offline.
-
Open the Properties page for the Dynamic File Service cluster resource, then select the tab.
-
Specify the other resources in the DynamicFS Group as dependencies for the Dynamic File Service resource.
The Dynamic File Service resource is not started until all of the other resources in the DynamicFS Group are started and are online.
-
Click or to save your changes.
-
In the DynamicFS Group cluster resource, bring the Dynamic File Service resource online.
-
-
Continue with Section 4.4.4, Moving the Cluster Resource from Node1 to Node2.
4.4.4 Moving the Cluster Resource from Node1 to Node2
-
On Node1, take the resource offline. In the Windows Cluster Administrator tool, right-click the cluster Dynamic File Services group, then select .
-
In the Windows Cluster Administrator tool, use the option to move the cluster group from Node1 to Node2.
-
On Node2, ensure that the same drive letters are used to mount the shared disks for software and program date on Node2 that were used for Node1, such as S:\.
-
Continue with Section 4.4.5, Installing and Setting Up Dynamic File Services on Node2.
4.4.5 Installing and Setting Up Dynamic File Services on Node2
Use the following procedure to install DynamicFS on the currently active node (Node2).
-
Log in to Node2 as the Administrator user or as a user with Administrator privileges.
In an Active Directory environment, log in as a domain user who also has Active Directory Domain Administrator rights.
-
Install DynamicFS by using the option.
The settings that were specified during the installation on Node1 are retrieved automatically from the Windows Registry on Node2, and are populated in the Custom fields. Do not modify the settings.
-
Set up the DynamicFS administrator users for Node2 by adding their usernames as members of the Dynamic File Services group for this node.
IMPORTANT:Assign the same users to the Dynamic File Services group that you used on Node1.
-
(Optional) On Node2, use the option of the Windows Cluster Administrator tool to move the shared drive from Node2 to Node1.
-
Bring the Service resource online.
-
Continue with Section 4.5, Creating Pairs and Policies in a Cluster.