3.6 Installing NetIQ eDirectory on Windows
This section contains the following information:
3.6.1 Installing or Updating NetIQ eDirectory 8.8 on a Windows Server
You can install eDirectory 8.8 for Windows without the Novell Client. If you install eDirectory 8.8 on a machine already containing the Novell Client, eDirectory will use the existing Client, or update it if it is not the latest version.
-
At the Windows server, log in as Administrator or as a user with administrative privileges.
-
To resolve tree names, make sure that SLP is correctly configured on your network and that SLP DAs are stable.
For more information, see one of the following:
-
If you have Autorun turned off, run setup.exe from the windows folder in the eDirectory 8.8 SP8 CD or from the downloaded file.
-
Click Install.
The installation program checks for the following components before it installs eDirectory. If a component is missing or is an incorrect version, the installation program automatically launches an installation for that component.
-
NICI 2.7
For more information on the Novell International Cryptographic Infrastructure (NICI), see the Novell International Cryptographic Infrastructure 2.7 Administration Guide.
You might have to reboot the server after the NICI installation. If the installer displays a message saying that you need to reboot your server before continuing, click OK to reboot. The eDirectory installation will continue after the reboot.
-
Novell Client for Windows
IMPORTANT:The Novell Client is updated automatically if you have an older version of the Client already installed on the machine. For more information on the Client, see the Novell Client for Windows online documentation.
-
-
Click Next.
-
View the license agreement, then click I Accept.
-
Select a language for the installation, then click Next.
-
Specify or confirm the installation path, then click Next.
-
If the installation folder does not already exist, and you want the installer to create the folder for you, click Yes.
-
Specify or confirm the DIB path, then click Next.
-
If the DIB folder does not already exist, and you want the installer to create the folder for you, click Yes.
-
(New installations only) Select an eDirectory installation type, then click Next.
-
Install eDirectory into an Existing Tree incorporates this server into your eDirectory network. The server can be installed into any level of your tree.
-
Create a New eDirectory Tree creates a new tree. Use this option if this is the first server to go into the tree or if this server requires a separate tree. The resources available on the new tree will not be available to users logged in to a different tree.
-
-
Provide information in the eDirectory Installation screen, then click Next.
-
If you are installing a new eDirectory server, specify a Tree name, Server object context, and Admin name and password for the new tree.
-
If you are installing into an existing tree, specify the Tree name, Server object context, and Admin name and password of the existing tree.
-
If you want to use IPv6 addresses, select Enable IPv6.
NOTE:If you do not enable IPv6 addresses during the installation process, and then decide to use them later, you must run the setup program again.
-
If you are upgrading an eDirectory server, specify the Admin password.
NOTE:In eDirectory 8.8 and later, you can have case sensitive passwords for all the utilities. For more information, see the NetIQ eDirectory 8.8 SP8 What’s New Guide.
For information on using dots in container names, see Installing into a Tree with Dotted Name Containers.
-
-
(New installations only) In the HTTP Server Port Configuration page, specify the ports to use for the eDirectory administrative HTTP server, then click Next.
IMPORTANT:Make sure that the HTTP stack ports you set during the eDirectory installation are different than the HTTP stack ports you have used or will use for NetIQ iManager. For more information, see the iManager 2.7 Administration Guide.
-
(New installations only) In the LDAP Configuration page, specify which LDAP ports to use, then click Next.
For more information, see Communicating with eDirectory through LDAP.
-
Specify whether to configure the SecretStore module. By default, the Configure SecretStore option is selected.
-
Select the NMAS login methods you want to install.
See Installing NMAS Server Software and Installing NMAS Client Software for more information.
-
Click Next.
-
Click Finish to complete the eDirectory installation.
-
When the installer completes the installation, click Done.
NOTE:After you install eDirectory, we recommend you exclude the DIB directory on your eDirectory server from any antivirus or backup software processes. Use the eDirectory Backup Tool to back up your DIB directory.
For more information about backing up eDirectory, see Backing Up and Restoring NetIQ eDirectory,
in the NetIQ eDirectory 8.8 SP8 Administration Guide.
3.6.2 Server Health Checks
With eDirectory 8.8, when you upgrade eDirectory, a server health check is conducted by default to ensure that the server is safe for the upgrade.
Based on the results obtained from the health checks, the upgrade will either continue or exit as follows:
-
If all the health checks are successful, the upgrade will continue.
-
If there are minor errors, the upgrade will prompt you to continue or exit.
-
If there are critical errors, the upgrade will exit.
See Section B.0, eDirectory Health Checks for a list of minor and critical error conditions.
Skipping Server Health Checks
To skip server health checks, disable server health checks when prompted in the installation wizard
For more information, see Section B.0, eDirectory Health Checks.
3.6.3 Communicating with eDirectory through LDAP
When you install eDirectory, you must select a port that the LDAP server monitors so that it can service LDAP requests. The following table lists options for various installations:
|
Installation |
Option |
Result |
|---|---|---|
|
eDirectory 8.8 |
Clear text (port 389) |
Selects port 389. |
|
eDirectory 8.8 |
Encrypted (port 636) |
Selects port 636. |
|
eDirectory 8.8 |
Require TLS for simple bind |
Keeps (on the LDAP Group object) a parameter asked about during installation. |
Port 389, the Industry-Standard LDAP Clear-Text Port
The connection through port 389 is not encrypted. All data sent on a connection made to this port is clear. Therefore, a security risk exists. For example, LDAP passwords can be viewed on a simple bind request.
An LDAP Simple Bind requires only a DN and a password. The password is in clear text. If you use port 389, the entire packet is in clear text. By default, this option is disabled during the eDirectory installation.
Because port 389 allows clear text, the LDAP server services Read and Write requests to the Directory through this port. This openness is adequate for environments of trust, where spoofing doesn't occur and no one inappropriately captures packets.
To disallow clear passwords and other data, select the Require TLS for Simple Bind with Password option during installation. As part of default configuration, the ports numbers for clear text and SSL are set to 389 and 636.
Scenario: Require TLS for Simple Bind with Password Is Enabled: Olga is using a client that asks for a password. After Olga enters a password, the client connects to the server. However, the LDAP server does not allow the connection to bind to the server over the clear-text port. Everyone is able to view Olga's password, but Olga is unable to get a bound connection.
The Require TLS for Simple Bind with Password discourages users from sending observable passwords. If this setting is disabled (that is, not checked), users are unaware that others can observe their passwords. This option, which does not allow the connection, only applies to the clear-text port.
If you make a secure connection to port 636 and have a simple bind, the connection is already encrypted. No one can view passwords, data packets, or bind requests.
Port 636, the Industry-Standard Secure Port
The connection through port 636 is encrypted. TLS (formerly SSL) manages the encryption. By default, the eDirectory installation selects this port.
A connection to port 636 automatically instantiates a handshake. If the handshake fails, the connection is denied.
IMPORTANT:This default selection might cause a problem for your LDAP server. If a service already loaded on the host server (before eDirectory was installed) uses port 636, you must specify another port.
Installations earlier than eDirectory 8.7 treated this conflict as a fatal error and unloaded nldap.nlm. The eDirectory 8.7.3 onwards installation loads nldap.nlm, places an error message in the dstrace.log file, and runs without the secure port.
Scenario: Port 636 Is Already Used: Your server is running Active Directory. Active Directory is running an LDAP program, which uses port 636. You install eDirectory. The installation program detects that port 636 is already used and doesn't assign a port number for the NetIQ LDAP server. The LDAP server loads and appears to run. However, because the LDAP server does not duplicate or use a port that is already open, the LDAP server does not service requests on any duplicated port.
If you are not certain that port 389 or 636 is assigned to the NetIQ LDAP server, run the ICE utility. If the Vendor Version field does not specify NetIQ, you must reconfigure LDAP Server for eDirectory and select a different port. For more information, see Verifying That the LDAP Server Is Running
in the NetIQ eDirectory 8.8 SP8 Administration Guide.
Scenario: Active Directory Is Running: Active Directory is running. Clear-text port 389 is open. You run the ICE command to port 389 and ask for the vendor version. The report displays Microsoft*. You then reconfigure the NetIQ LDAP server by selecting another port, so that the eDirectory LDAP server can service LDAP requests.
NetIQ iMonitor can also report that port 389 or 636 is already open. If the LDAP server isn't working, use NetIQ iMonitor to identify details. For more information, see Verifying That the LDAP Server Is Running
in the NetIQ eDirectory 8.8 SP8 Administration Guide.
3.6.4 Installing NMAS Server Software
NetIQ Modular Authentication Service (NMAS) server components are installed automatically when you run the eDirectory installation program. You will need to select the login methods you want to install.
Select the login methods that you want to install into eDirectory by checking the appropriate check boxes. When you select a login method, a description of the component appears in the Description box. For more information on login methods, see “Managing Login and Post-Login Methods and Sequences” in the NetIQ Modular Authentication Services 3.3 Administration Guide.
Click Select All if you want to install all the login methods into eDirectory. Click Clear All if you want to clear all selections.
The NDS login method is installed by default.
3.6.5 Installing NMAS Client Software
The NMAS client software must be installed on each client workstation where you want to use the NMAS login methods.
-
At a Windows client workstation, insert the eDirectory 8.8 CD.
-
From the NMAS directory, run nmasinstall.exe.
-
Select the NMAS Client Components check box.
Optionally, you can select the NICI check box if you want to install this component.
-
Click OK, then follow the on-screen instructions.
-
Reboot the client workstation after the installation completes.
3.6.6 Installing into a Tree with Dotted Name Containers
You can install a Windows server into an eDirectory tree that has containers with dots in the names (for example, O=netiq.com or C=u.s.a). Using containers with dotted names requires that those dots be escaped with the backslash character. To escape a dot, simply put a backslash in front of any dot in a container name.
You cannot start a name with a dot. For example, you cannot create a container named “.netiq” because it starts with a dot (‘.’).
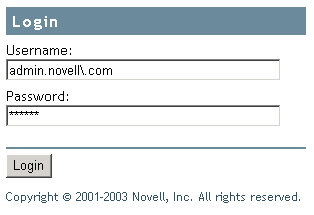
IMPORTANT:If your tree has containers with dotted names, you must escape those names when logging into utilities such as iMonitor, iManager, and DHost iConsole. For example, if your tree has “netiq.com” as the name of the O, enter username.netiq\.com in the Username field when logging in to iMonitor (see Figure 3-1).
Figure 3-1 iMonitor Login Screen
3.6.7 Unattended Install and Configure to eDirectory 8.8 SP8 on Windows
eDirectory 8.8 SP8 automates the eDirectory installation and upgrade so that eDirectory is installed or upgraded silently on Windows servers without human intervention.
On Windows, the unattended installation of eDirectory uses predefined text files that facilitate the unattended installation or upgrade. You can perform either of the following setup using the unattended installation of eDirectory:
-
Standalone installation or upgrade of eDirectory depending on whether it is a complete installation of eDirectory or not. The standalone upgrade process upgrades only the installed files.
-
Configuration of installed eDirectory. If you install eDirectory, a complete configuration of eDirectory is performed. Otherwise, when you upgrade eDirectory, the installer only configures the upgraded files.
-
A combination of both installation or upgrade and configuration of eDirectory. It can either be installation and configuration of eDirectory or an upgrade and configuration of only the required files.
For more information on how to mention the setup for unattended installation, refer to the section Adding Features to the Automated Installation.
Prerequisites
-
Ensure Microsoft Visual C++ 2005 and Microsoft Visual C++ 2012 Redistributable Packages are installed. Install them manually from the vcredist_x86.exe, vcredist_x64.exe, and vcredist2k12_x64.exe files located at eDirectory\Windows\x64\redist_pkg.
-
Ensure NICI is installed:
32-bit: eDirectory/Windows/x64/nici/NICI_w32.exe
64-bit: eDirectory/Windows/x64/nici/NICI_w64.exe
-
Set to program mode:
Run Windows/SysWOW64/novell/nici/set_server_mode.bat
The following sections discuss various features that can be used to configure the unattended installation, including the install location, no display of splash screens, port configurations, additional NMAS methods, stopping and starting SNMP services, etc.
Response Files
Installing or upgrading to eDirectory 8.8 SP8 on Windows operating system can be made silent and more flexible by using a response file for the following:
-
Complete unattended installation with all required user inputs
-
Default configuration of components
-
Bypassing all prompts during the installation
A response file is a text file containing sections and keys, similar to a Windows.ini file. You can create and edit a response file using any ASCII text editor. The eDirectory upgrade reads the installation parameters directly from the response file and replaces the default installation values with response file values. The installation program accepts the values from the response file and continues to install without prompts.
Response.ni File Sections and Keys
The eDirectory 8.8 SP8 installation requires changes to the sections in the response file to add information about the eDirectory instance to be installed, including the tree name, administrator context, administrator credentials (including user name and passwords), installation locations, etc. A full list of the keys and their default values is available in the sample response.ni file that is delivered with the eDirectory installation.
NOTE:You should use the provided response.ni file available at eDirectory\windows\x64\NDSonNT\response.ni in the eDirectory installation.There are essential parameters and set by default in this file. When editing the response.ni file, ensure that there are no blank spaces between the key and the values along with the equals sign ("=") in each key-value pair.
Installation Syntax
You can also use a response file for two scenarios in an upgrade:
-
To provide the values of the tree parameters and to configure an unattended installation.
-
To input values during an upgrade.
IMPORTANT:You provide the administrator user credentials in the response.ni file for an unattended installation. Therefore, you should permanently delete the file after the installation to prevent the administrator credentials from being compromised.
Adding Features to the Automated Installation
Most details for configuring the eDirectory Installer have default setting for the manual installation. However, during unattended installation, each configuration parameter must be explicitly configured. This section discusses the basic settings to be configured, irrespective of any sequence of installation or additional features.
eDirectory Server Details
Regardless of whether it is an upgrade or a primary/secondary server installation, the details of the server being installed or upgraded must be provided to the Installer. Most of this information is configured in two tags, [NWI:NDS] and [Initialization].
[NWI:NDS]
-
Upgrade Mode: This key applies only to a server upgrade. Though not essential, set this parameter to False for fresh installations. For an upgrade, you can either set it to True or to Copy.
-
Server Context: This is the complete DN of the server object (server name), along with the container object. For example, if the server being installed is EDIR-TEST-SERVER, the value for this parameter will be EDIR-TEST-SERVER.Netiq if the Server container is “Netiq”.
-
mode: The type of setup on eDirectory. The three types of setup are:
-
install: Performs installation of eDirectory or an upgrade of the required files.
-
configure: Configures eDirectory. If you only perform an upgrade of the required files, then the installer only configures the upgraded files.
-
full: Performs both installation and configuration of eDirectory. This type of installation can either be installation and configuration of eDirectory or an upgrade and configuration of only the required files.
By default, the mode key is set to full.
NOTE:If you opt for the full setup mode, then while uninstalling eDirectory you cannot opt for individual deconfiguration and uninstallation option.
-
-
Tree Name: For a primary server installation, this is the name of the tree that needs to installed. For a secondary server installation, this is the tree to which this server must be added.
-
Server Name: The name of the server that is being installed.
-
Server Container: Any server added to a tree has a server object containing all the configuration details specific to the server. This parameter is the container object in the tree to which the server object will be added. For primary server installations, this container will be created with the server object.
-
Admin Login Name: The name (RDN) of the Administrator object in the tree that has full rights, at least to the context to which this server is added. All operations in the tree will be performed as this user.
-
Admin Context: Any user added to a tree has a user object that contains all the user-specific details. This parameter is the container object in the tree to which the Administrator object will be added. For primary server installations, this container will be created with the server object.
-
Admin password: The password for the Administrator object created in the previous parameters. This password will be configured to the Administrator object during primary server installations. For secondary server installations, this needs to be the password of the Administrator object in the primary server that has rights to the context to which the new server is added.
-
NDS Location: The eDirectory install location in the local system where the libraries and binaries are copied. By default, eDirectory is installed into C:\Novell\NDS unless it is changed in the response file.
-
DataDir: Until eDirectory version 8.8, the DIB was installed inside the NDS location as a subfolder. Later, administrators were given the option to provide a different DIB location, because there might be too much data stored in the DIB to fit into the NDS location. Currently, by default the DIB is installed in the Files subfolder inside the NDS location, but administrators can change this parameter and provide a different location.
The following is a sample of text in the response file for all the basic parameters described above:
[NWI:NDS]
Upgrade Mode=copy
Tree Name=SLP-TEST
Server Name=NDS-LDAP-P2-NDS
Server Container=Netiq
Server Context=NDS-LDAP-P2-NDS.Netiq
Admin Context=Netiq
Admin Login Name=Admin
Admin Password=netiq
NDS Location=E:\Novell\NDS
DataDir=E:\Novell\NDS\Files
You can also configure two additional parameters:
-
Installation Location: This is the same as the NDS Location configured in the previous section. This location is used by the Installer while copying files to the install location, and the other location is used by the components to refer to the base eDirectory installation while they are configured. The default value is C:\Novell\NDS, if not specified in the response file.
For example:
[Novell:DST:1.0.0_Location]
Path=file:/C:\Novell\NDS
-
System Location: The eDirectory Installer requires access to the system folder to copy DLLs and to access system-specific files during installation. This parameter must be configured with the path to the system folder of the machine where the server is installed.
For example:
[Novell:SYS32_DST:1.0.0_Location]
Path=file:/C:\Windows\system32
Adding NMAS Methods
eDirectory supports installation of multiple NMAS methods, both during install and upgrade. During manual installations, you can select the NMAS methods to install and configure. This can also be achieved in automated installations.
The NMAS-related configuration settings are provided inside the [NWI:NMAS] tag. The tag has two keys to be configured, and both are mandatory:
-
Choices: This key informs the eDirectory installation component on the number of NMAS methods that need to be installed.
-
Methods: This key lists the NMAS method options that need to be installed. Currently, there are 12 supported NMAS methods. The method names and their types are as follows:
Table 3-1 NMAS Methods
Method Name
Method Type
CertMutual
Certificate mutual login method
Challenge Response
The NetIQ challenge response NMAS method
DIGEST-MD5
Digest MD5 login method
GSSAPI
SASL GSSAPI mechanism for eDirectory. Authentication to eDirectory through LDAP using a Kerberos ticker
NDS
NDS login method (default)
Simple Password
Simple password NMAS login method
NOTE:The method names should exactly match those listed in the above table, as options to the Methods key. The Installer matches the exact string (with case) for choosing the NMAS methods to install.
The NDS NMAS method is mandatory and will be installed automatically if no NMAS methods list is provided. However, if you are creating an explicit list, do not remove this method from the list.
If the NMAS methods are configured using this methodology in the response file, eDirectory shows a status message while installing, without prompting for user input.
The following is sample text in the response file for choosing the NMAS methods:
[NWI:NMAS]
Choices=12
Methods=X509 Advanced Certificate,CertMutual,Challenge Response,DIGEST-MD5,Enhanced Password,Entrust,GSSAPI,NDS,NDS Change Password,Simple Password,Universal Smart Card,X509 Certificate
HTTP Ports
eDirectory listens on preconfigured HTTP ports for access through the Web. For example, iMonitor accesses eDirectory through Web interfaces. They need to specify certain in order to access the appropriate applications. There are two keys that can be set prior to installation to configure eDirectory on specific ports:
-
Clear Text HTTP Port: The port number for the HTTP operations in clear text.
-
SSL HTTP Port: HTTP port number for operations on the secure socket layer.
The following is sample text in the response file for configuring HTTP port numbers:
[eDir:HTTP]
Clear Text HTTP Port=8028
SSL HTTP Port=8030
LDAP Configuration
eDirectory supports LDAP operations. It listens for LDAP requests in clear text and SSL, on two different ports. These ports can be configured in the response file prior to installation so that when eDirectory is started, it listens on these configured ports.
There are three keys in the [NWI:NDS] tag that configure the LDAP ports:
-
LDAP TLS Port: The port on which eDirectory should listen for LDAP requests in clear text.
-
LDAP SSL Port: The port on which eDirectory should listen for LDAP requests in SSL. You can also use a key to configure whether eDirectory should mandate secure connections when bind requests send the password in clear text.
-
Require TLS: Whether eDirectory should mandate TLS when receiving LDAP requests in clear text.
The following is sample text in the response file for LDAP configuration:
[NWI:NDS]
Require TLS=No
LDAP TLS Port=389
LDAP SSL Port=636
Language Settings
The eDirectory Installer language settings configure the locale and set the display language.
There are currently three locale options that can be set during installation: English, French and Japanese. Each has a specific key in the [Novell:Languages:1.0.0] tag that can be set to True/False prior to the start of installation.
-
LangID4: English. Setting this to True configures the English locale during installation.
-
LangID6: French. Setting this to True configures the French locale during installation.
-
LangID9: Japanese. Setting this to True configures the Japanese locale during installation.
These options are mutually exclusive, which is easily enforced in manual installation via radio buttons. In unattended installations, you need to ensure only one of them is set to True.
The following is sample text in the response file for configuring an English locale:
[Novell:Languages:1.0.0]
LangID4=true
LangID6=false
LangID9=false
Status messages about the configuration of each component are displayed in message boxes throughout the installation. By default, these messages are in English. You can also change the display language during installation by using the DisplayLanguage key in the [Initialization] tag.
-
DisplayLanguage: This key is in the [Initialization] section. Its parameters configure languages.The following is sample text in the response file for configuring English as the display language:
[Initialization]
DisplayLanguage=en_US
Configuration Mode Settings
If the setup mentioned in the mode key is configure, then ensure that you do not change the RestrictNodeRemove value of the ConfigurationMode key in the [Initialization] section.
Controlling Automated Installation
The response file can also be edited to control the flow of automated installation.
Stopping SNMP services
This feature is specific to an eDirectory installation on Windows. Most Windows servers have SNMP configured and running. When eDirectory installs, the SNMP services need to be brought down and restarted after the installation. With manual installations, the Installer prompts the user on-screen to stop the SNMP services before continuing the installation. This prompt can be avoided during automation by setting the key in the[NWI:SNMP] tag:
-
Stop service: Set the value to Yes to stop the SNMP services without prompting. The status of is displayed on-screen.
The following is sample text in the response file for stopping SNMP services:
[NWI:SNMP]
Stop service=yes
SLP Services
eDirectory uses SLP services to identify other servers or trees in the subnet during installation or upgrade. If SLP services are already installed on your server, and you want to replace them with the version that ships with the current version of the eDirectory (or use your own SLP services), you can set appropriate keys in the [NWI:SLP] tag to uninstall and remove the existing SLP services.
The following is sample text in the response file for uninstalling and removing SLP services:
[EDIR:SLP]
Need to uninstall service=true
Need to remove files=true
Primary/Secondary Server Installation
eDirectory Installer provides options for the unattended install of a primary or a secondary server, into a network. There are three keys that help the Installer decide whether it is a primary or a secondary server installation.
-
New Tree: Use this key in the [NWI:NDS] tag and set it to Yes for a new tree installation, or No for a secondary server installation.
-
ExistingTreeYes: This key is in the [Novell:ExistingTree:1.0.0] tag. Set it to True/false. Set this to False for a new tree or primary server installation and set it to True for a secondary server in an existing tree.
-
ExistingTreeNo: This key also is in the [Novell:ExistingTree:1.0.0] tag. Although it seems to be redundant to the previous key, the Installer refers to both keys, so both of them must be configured properly. Set this one to True for a new tree or primary server installation and set it to False for adding a secondary server in an existing tree.
For example, the keys for installing a primary server in a new tree would be as follows:
[NWI:NDS]
New Tree=Yes
[Novell:ExistingTree:1.0.0]
ExistingTreeYes=false
ExistingTreeNo=true
and for a secondary server installation into an existing tree:
[NWI:NDS]
New Tree=No
[Novell:ExistingTree:1.0.0] ExistingTreeYes=true ExistingTreeNo=false
Preconfigured Unattended Installation
All user-specific configuration details can be edited in the response file. However, there are certain parameters that should not be changed. These are for file copy and component information specific to the eDirectory components to be installed. Make sure these parameters in the response file are not modified. Do not change them from the values in the eDirectory release.
Install as Service Tag: eDirectory runs as a service in Windows. It is mandatory that this parameter is always set to Yes to make sure that eDirectory is installed as a service.
[NWI:NDS]
Install as Service=Yes
Selected Nodes Tag: This tag lists the components that are installed in eDirectory, along with information in the profile database that contains more information about the component, including source location, destination copy location, and component version. These details in the profile database are compiled into a .db file that is delivered in the eDirectory release.
[Novell:NOVELL_ROOT:1.0.0]
File Copy Tag: This tag contains keys for display settings that are handled in the next section, including the file copy profile information:
overWriteNewerFile=false
overWriteNewerFilePrompt=true
copyToRemoteDestination=true
These options specify the response from the eDirectory Installer in scenarios such as file write conflicts, file copying decisions, etc.
Silent Installation Parameters
This section describes parameters that need to be set for the Installer to run unattended.
[NWI:NDS]
Prompt=false
The [NWI:NDS] section describes eDirectory configuration details such as tree name and server name. If you don't want the Installer to prompt for values for these parameters, set this parameter to False.
[Selected Nodes]
Prompt=false
If you don’t want the Installer to prompt for the destination copy location, version details, etc. for all components configured with the eDirectory, set this parameter to False in the [Selected Nodes] tag.
[Novell:NOVELL_ROOT:1.0.0]
Prompt=false
If you don’t want the Installer to prompt for yes/no questions, or for other decisions with parameters in this section, set this parameter to False in the [Selected Nodes] tag.
[Novell:ExistingTree:1.0.0]
Prompt=false
If you don’t want the Installer to prompt for deciding whether is it a new tree installation, or for adding a secondary server to an existing tree, set this parameter False in the [Selected Nodes] tag.
[Initialization]
InstallationMode=silent
SummaryPrompt=false
prompt=false
The InstallationMode key must always be explicitly set to Silent for unattended installations.
Status and Image Displays
During installation, there are various images and status information displayed. Most images contain information on what version of eDirectory is installed, what components are installed, a welcome screen, license files, customization options, a status message indicating the component currently being installed, percentage complete, etc. Some applications that intend to embed eDirectory might not want eDirectory displaying these images.
All image and status display details are configured in the [Novell:NOVELL_ROOT:1.0.0] tag, including configuration information for the welcome page, close page, summary page, license agreement page, language page, custom choices page, wizard page, welcome page. There are corresponding on/off parameters for each of these configurations.
For example:
-
The welcomeScreen parameter is controlled by showWelcomeScreen=true/false.
-
The summaryScreen parameter is controlled by allowSummary=true/false.
-
The licenseAgreementScreen parameter is controlled by allowLicenseAgreement=true.
-
If the progress bar shouldn't be displayed, use allowStatusBar=false.
-
If the final page that reports successful installation is not required, set [eDirCloseScreen]Silent=true.
Most of the details are preconfigured in the response file that ships with eDirectory. If you need modifications, change the parameters in this tag.
Unattended Installation of eDirectory using Response File
Launching the eDirectory Installer on Windows is easy. The install.exe delivered in the eDirectory release is invoked in the command line with a few additional parameters.
Depending on the setup mode you have mentioned, use either of the following commands:
NOTE:The nopleasewait option used in the commands ensures that the status window for installation, upgrade, or configuration is not displayed.
Install
<Unzipped Location>\windows\x64\NDSonNT>install.exe /silent /nopleasewait /template=<Response file>
For example, D:\builds\eDirectory\windows\x64\NDSonNT>install.exe /silent /nopleasewait /template=D:\builds\eDirectory\windows\x64\NDSonNT\response.ni
Configure
<Windows Drive>\Program Files\Common Files\novell>install.exe /silent /restrictnoderemove /nopleasewait /template=<Response file>
For example, c:\Program Files\Common Files\novell>install.exe /silent /restrictnoderemove /nopleasewait /template=D:\builds\eDirectory\windows\x64\NDSonNT\response.ni
A combination of installation or upgrade and configuration of eDirectory
<Unzipped Location>\windows\x64\NDSonNT>install.exe /silent /nopleasewait /template=<Response file>
For example, D:\builds\eDirectory\windows\x64\NDSonNT>install.exe /silent /nopleasewait /template=D:\builds\eDirectory\windows\x64\NDSonNT\response.ni