3.1 Reading Mail
If you are not already viewing mail, switch to the mail tool by clicking the Mail shortcut button, or press Ctrl+1. To read a message, select it in the message list; if you'd like to see it in its own window, either double-click it, press Enter, or press Ctrl+O.
HINT:To read mail with the keyboard, you can click the Spacebar to page down and press Backspace to page up while reading an e-mail. Ensure that you use the keys when message list is enabled.
Navigate the message list by using the arrow keys on the keyboard. To go to the next and previous unread messages, press the period (.) or comma (,) keys. On most keyboards, these keys are also marked with the > and < symbols, which is a convenient way to remember that they move you forward and backward in your message list. You can also use the right square bracket (]) for the next unread message, and the left square bracket ([) for the previous unread message.
3.1.1 Magic Spacebar For Reading Mail
With Magic Spacebar, you can easily read the unread messages in all the mail folders. You can read mail, scroll through mail and switch folders by using the Spacebar on your keyboard.
To enable Magic Spacebar:
-
Click , then select Mail Accounts.
-
Select the Enable Magic Spacebar check box.
When you are in the Mail view, the Spacebar has the following behavior:
-
When you press the Spacebar for the first time, it takes you to the next unread message.
-
If the message is more than one screen long, the Spacebar works as the Page Down key.
-
If you press the Spacebar after you reach the bottom of the page, it takes you to the next unread message.
-
If there are no more unread messages in the mailbox, pressing the Spacebar takes you to the next unread message in the next folder.
-
If new messages arrive in a number of folders, the Spacebar toggles between those folders. This feature allows you to switch to the next unread message in a different folder without clicking the folder.
3.1.2 Checking for New Mail
To check your mail, click Send/Receive in the toolbar. If you haven't created any mail accounts yet, the setup assistant asks you for the information it needs to check your e-mail. For information on creating mail accounts, see Section 2.1, Starting Evolution for the First Time.
If this is your first time checking mail, or you haven't asked Evolution to store your password, you are prompted for the password. Enter your password to download your e-mail.
If you get an error message instead of mail, you probably need to check your network settings. To learn how to do that, see Section 9.4.4, Mail Header Preferences, or ask your system administrator.
3.1.3 New Mail Notification
Evolution can notify you of new e-mail. When you receive a new mail in your inbox, a blinking icon appears on the Switcher. You can also view a blinking icon  in the notification area that disappears when you open the new e-mail. Mouse over the icon to view the notification message.
To enable this feature, select , then select the Mail Notification check box. You can configure the plug-in by specifying the following in the Plugin Manager.
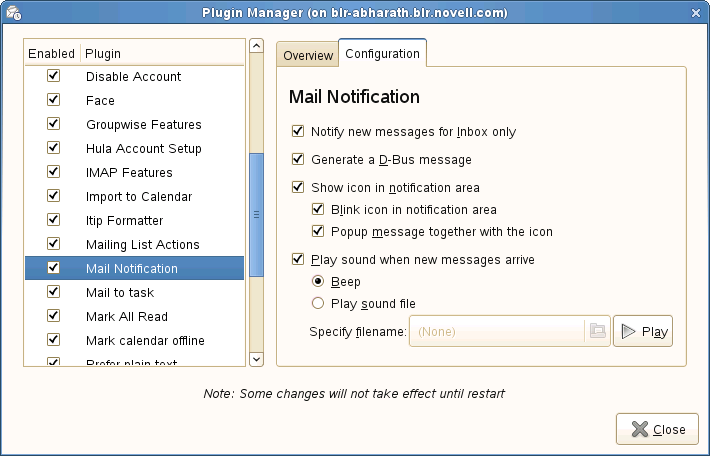
Table 3-1 Mail Notification
To specify the sound file you want to play:
-
Click None to open the Select Sound File browser window.
-
Browse to find the sound file of your choice.
-
Click Open to select the sound file.
-
Click Play to confirm the selection.
3.1.4 Vertical View Versus Classical View
Evolution provides you vertical view in addition to the classical view. In the vertical view, message preview pane is located at the right side of the message list when compared to the Classical view where the message preview pane is placed below the message list. Vertical View enables you to use the extra width of the wide screen monitors.
Vertical View: To switch to vertical view
-
Click View > Preview > Vertical View
In Vertical view, default message list contains a double line compressed headers, which enables you to consume the extra width in the preview column.The compressed columns have Sender Name and Email, Attachment Icon, Date and Subject in the second line.

Classical View: To switch to classical view,
-
Click View > Preview > Classical View
3.1.5 Collapsible Message Headers
Evolution compresses the TO, CC, BCC headers of received mail and shows only limited addresses. You can set the limit of the number of addresses to be displayed in the preview pane.

Use the following procedure to set the limit of addresses to be displayed:
-
Click Edit > Preferences
-
Select Mail Preferences
-
Check “Shrink To/CC/Bcc headers to column” to limit the address
-
Enter the limit in the field.
You can expand the message headers by click the  icon or the ’...’ in the message preview pane. To collapse click
  icon in the preview pane.
3.1.6 Sharing Mailboxes with Other Mail Programs
If you want to use Evolution and another e-mail client, such as Mutt, at the same time, use the following procedure:
-
Download your mail in the other application as you would normally.
-
In Evolution, click Edit > Preferences, then click Mail Accounts. Select the account you want to use to share mail and click Edit. Instead of Edit, you might want to create a new account just for this source of mail by clicking New.
-
Under the Receiving Mail tab, select the type of mail file that your other mail application uses, then specify the full path to that location. A typical choice would be mbox files, with the path /home/username/Mail/.
-
Click OK.
You can only use one mail client at a time. The mail files are locked by the mail program that is currently using them, so the mail files can't be accessed by any other mail program.
3.1.7 Working with Attachments and HTML Mail
If someone sends you an attachment, Evolution displays a file icon at the end of the message to which it is attached. Text, including HTML formatting and embedded images appears as part of the message, rather than as a separate attachment. Attachments are also listed under the address list. To view the attachments, click the arrow to expand the attachment window. To open an attachment, double-click it. Click the Save All button to save all the attachments.
Saving or Opening Attachments
If you get an e-mail message with an attachment, Evolution can help you save the attachment or open it with the appropriate applications.
Evolution shows a right-arrow icon, the number of attachments, and a Save or Save All button to save all the attachments. Click the right-arrow icon to show the attachment bar.
To save an attachment to disk:
-
Click the down-arrow on the attachment icon, or right-click the attachment icon in the attachment bar, then click Save As.
-
Select a location and name for the file.
-
Click OK.
To open an attachment using another application:
-
Click the down-arrow on the attachment icon or right-click the attachment icon in the attachment bar.
-
Select the application to open the attachment.
-
Click OK.
The options available for an attachment vary depending on the type of attachment and the applications your system has installed. For example, attached word processor files can be opened in OpenOffice.org or another word processor, and compressed archive files can be opened in the File Roller application.
Inline Images in HTML Mail
When someone sends you HTML mail that includes an image in the body of the message (for example, the welcome message in your Inbox), Evolution displays the image inside the message. You can create messages like this by using the Insert Image tool in the message composer. Alternately, just drag an image into the message composition area.
Some images are links in a message, rather than being part of the message. Evolution can download those images from the Internet, but does not do so unless you request it. This is because remotely Servered images can be slow to load and display, and can even be used by spammers to track who reads the e-mail. Not automatically loading images helps protect your privacy.
To load the images for one message:
-
Click View > Load Images.
To set the default action for loading images:
-
Click Edit > Preferences, then click Mail Preferences.
-
Click the HTML Mail tab.
-
Select one of the items: Never Load Images Off the Net, Load Images in Mail From Contacts, or Always Load Images Off the Net.
-
Click Close.
If you use an HTTP proxy as in many large organizations, Evolution must be able to find it through the gnome-vfs subsystem before it can load images from the Internet.
To set your proxy in KDE:
-
Click the menu icon > System > Configuration > Yast.
-
Click Network Services, then click Proxy.
-
Specify your proxy settings (if you don't know your proxy settings, contact your ISP or system administrator).
-
Click Finish, then click Close.
To set your proxy in GNOME:
-
Click System > Administrative Settings (enter your root password if needed).
-
Click Network Services, then click Proxy.
-
Specify your proxy settings (if you don't know your proxy settings, contact your ISP or system administrator).
-
Click Finish, then click Close.
3.1.8 Using Evolution for News
USENET newsgroups are similar to mail, so it is often convenient to read news and mail side by side. You can add a news source, called an NNTP server, the same way you would add new e-mail account, selecting USENET News as the source type. The news server appear as a remote mail server, and each news group works like an IMAP folder. When you click Send/Receive, Evolution also checks for news messages.
When you create a news group account, you are not subscribed to any groups. To subscribe to a news group:
-
Click Folder > Subscriptions.
-
Select your NNTP account, select the groups you want to subscribe to, then click Subscribe.
-
Click Close.
3.1.9 Deleting Mail
Evolution allows you to delete unwanted messages. To delete a message, select it and press the Delete key, or click the delete tool in the toolbar, press Ctrl+D, or right-click the message, then click Delete.
When you press Delete or click the Trash folder, your mail is not actually deleted, but is marked for deletion. Your e-mail is recoverable until you have expunged your mail. When you expunge a folder, you remove all the mail that you have marked for deletion.To show deleted messages, uncheck Hide Deleted Messages option from the View menu. You can view the messages strike off for later deletion. You can also find deleted messages in your Trash folder.
To permanently erase all the deleted messages in a folder, click Folder > Expunge or press Ctrl+E.
Trash folders in GroupWise, local and IMAP accounts are actually virtual search folders that display all messages you have marked for later deletion. Hence, emptying Trash is nothing but expunging deleted mails from all your folders in the account.
However, this is not true for the Trash folder on Exchange servers, which behaves just the same as it does in Outlook. It is a normal folder with actual messages in it. For more information about search folders, see Section 4.6, Using Search Folders.
3.1.10 Undeleting Messages
You can undelete a message that has been deleted but not expunged. To undelete a message, select the message, click Edit > Undelete.
If you have marked a message for deletion, undeleting it unmarks it, and the message is removed from the Trash folder.