|  |
 |
 |
 |
 |
 |
 |
 |
 |
LDAP Connect User's Guide
CHAPTER 4
An action is similar to a programming statement in that it takes input in the form of parameters and performs specific operations. It's an atomic unit of execution in a Composer component, the same way an expression is in Java or ECMAScript.
The list of actions you create in your component is called an Action Model. The Action Model is the logical core of your integration app: It is where data mapping, data transformation, and data transfer between directories and XML documents occurs. It's the ordered list of statements that comprise your app.
Some of the actions available in Composer are data-specific; others involve control flow constructs like looping, conditional branching, exception vectoring, etc. The LDAP Connect provides two main LDAP-related actions: Create DSML and Execute DSML. The usage of these actions will be described in detail in the sections to follow.

DSML (Directory Services Markup Language) is an XML grammar for presenting LDAP queries and storing responses to queries. In some respects, it takes the place of LDIF, which is a text-based file interchange format for LDAP queries and objects.
In Composer, when you want to query a directory using DSML, you have two choices:
If you have a ready-to-go DSML file (perhaps received as input from the servlet that triggered your service), you can use it in an Execute DSML action. Composer will use the DSML to form the appropriate LDAP query, and execute that query against the target directory server.
If you do not have a readymade DSML query document, use a Create DSML action. Composer will create the necessary DSML for you.
In the latter case, you will use point-and-click UI tools to choose the parameters for your query; Composer will then build a DSML DOM that uses your param values and display it in a DOM window. You can drag or drop data into or out of that DOM window just as with any other Composer DOM window.
When a query result comes back from the server, it comes back to your component as DSML. You can specify the target DOM for this information (Output, Temp, etc.) and you can manipulate this DOM, once again, just as you would any other DOM.
The following illustration will give some idea of the overall structure of a DSML request and response.

In this case, the response document has been mapped to Output, but it could just as easily have been mapped to Temp or some other DOM.
DSML mimics the mnemonics and operational linguistics of LDAP, so that operations specified in DSML map very closely to LDAP SDK method signatures. So for example, every response contains an element called resultCode, with XML attributes of code and desc. The code attribute value is zero on success, or else (on failure) is one of the result code values shown in Appendix B of this documentation (i.e., which in turn come from Novell's JLDAP SDK). The desc value is a string representing the plaintext explanation of what caused the error (such as "Invalid DN Syntax," which is associated with a result code of 34).

It is possible to accumulate multiple requests within a single DSML document so that on a single server query, the server can be told to perform a series of Add operations, or Add and Delete operations, etc., in batchwise fashion.
The way this is done is to construct multiple back-to-back Create DSML actions, all of them mapping to the same root node (batchRequest) in the same document (typical Input). Each time a Create DSML action executes, it appends a new request to the specified root node. The DOM will continue to grow as necessary. Finally, this DOM is submitted as a single query when an Execute DSML action occur (presumably at the end of the list of Create DSML actions). The request executes as a batch; and a batch response is produced.
When a query response contains more than one search result, the results are accumulated under a searchResultEntry element node in the response document.
It is possible for a response to contain multiple results even if the request involved only one Create DSML action, since Search requests often use filters that contain wildcards, resulting in multiple "hits."
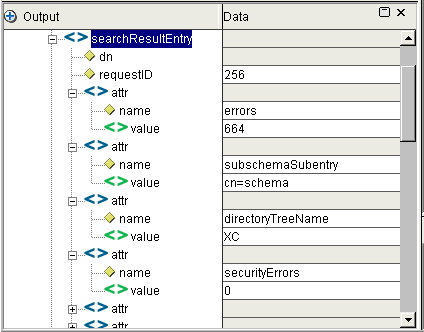
In the example shown above, there are numerous attr elements under the searchResultEntry element. The original query, which used wildcards, asked for an array of attributes. That's what was returned. Notice the many name-value pairs.
The Create DSML Action supports the following LDAP operations:
Compare—produces a boolean value based on a comparison of values (often useful for verifying the existence of a particular object or object type in a directory, so as to facilitate logical operations like "if this container doesn't already have an attribute called `paymentHistoryRef', modify the schema to add such an attribute")
These operations are shown in the Create DSML Request dialog's pull-down menu, under DSML Action:
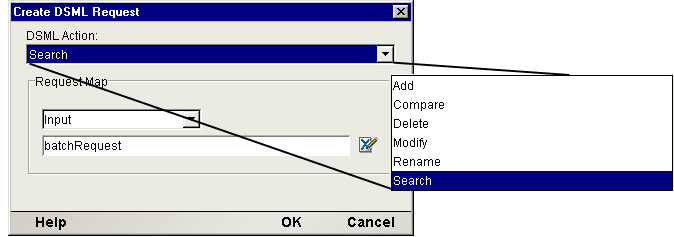
Each of these options will be discussed in turn.
 To construct a Create DSML Action that performs an Add request
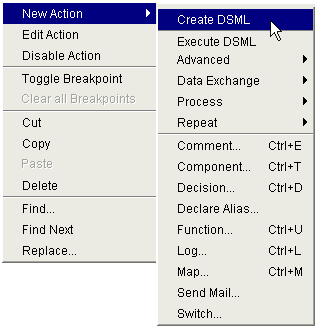
Right-mouse-click inside the action-model pane (or use Composer's Action menu, in the main menubar) and select New Action > Create DSML from the menu, as shown here:
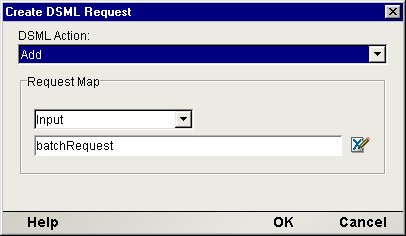
In the dialog that appears, choose Add from the pull-down menu.
Use the pull-down menu under Request Map to specify a target DOM (or target Message). The menu will be prepopulated with the names of DOMs (Messages) you specified when you originally created the component.
In the text field underneath the DOM-name pull-down menu, enter an XPath expression representing the target node for the creation of the request. (In most cases, you can simply accept the default value of batchRequest.)
IMPORTANT: If you are going to pass this DOM straight through as a DSML query, do not change the root node's name. The root must be called batchRequest in order for this to remain a valid DSML document.
Dismiss the dialog by clicking OK. You should see the tabs in the Native Environment Pane update. Also, a new action with the label "Create DSML Add Request" will appear in the action model.
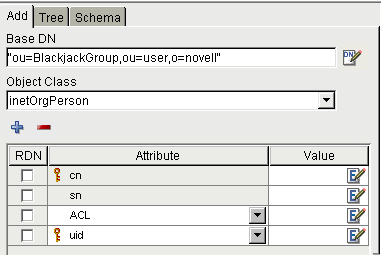
In order for this action to create a meaningful DSML request, it needs to know the Base DN of the Add request (representing the target node of the directory tree) as well as the Object Class of the new entity being added. You will supply this information in the Add tab of the Native Environment Pane (as shown above). Select the Add tab if it is not already selected.
Enter a quoted string next to Base DN, representing the name of the container object in which the Add will take place.
NOTE: Composer will help you build this reference: Click the DN icon to the right of the text-entry field to bring up the Expression Builder dialog. This dialog contains a tree representation of the directory like that available in the Tree tab of the Native Environment Pane. As you doubleclick items in the picktree, Composer automatically generates an appropriately formatted DN string for the target tree node.
Using the (prepopulated) pull-down menu under the label Object Class, choose the object type that applies to the object you will be adding to the tree. When you do this, the table of Attributes in the bottom part of the tab automatically updates to show the required naming attributes of the object-class in question.
The bottom portion of the panel will be prepopulated with Attributes (but not values) appropriate to the container or Object Class in question. Some attributes are required for the object class in question; these are shown with a solid-colored background. Some attributes (whether they're required or merely optional) are eligible for use as naming attributes; these are shown with a small vertical key icon.
NOTE: The key iconology and background shading are available only when the LDAP server in question is powered by Novell eDirectory. In all other cases, items in the Attribute list are shown in plain-text form.
All possible combinations of visual hints are shown in the illustration below:
The cn and sn attributes are required for the inetOrgPerson object. This is indicated by the solid background shading in the cn and sn cells (as well as by the fact that these two attributes cannot be deleted from the Attribute column).
Two additional attributes, in this example, have been added by the user (via the blue "plus sign" button): Those attributes are ACL and uid. Note that they have white backgrounds, indicating that they are not required attributes for the object class in question.
The uid attribute (as well as the required cn attribute) has a key icon next to it, indicating that uid can be used as a naming attribute for an instance of inetOrgPerson. (That is, the uid or User ID field can be part of the person's Distinguished Name and Relative Distinguished Name.)
NOTE: A hover-help tip explains the status of any item if you let the mouse linger over the item:
To designate an attribute for use as part of the item's Relative Distinguished Name, check the RDN checkbox to the left of the attribute in question. The mere presence of a key doesn't make the attribute part of the new entry's RDN: You must check the checkbox.
If you wish to add members to the list of attributes, click the plus sign (+) icon to add Attribute cells. (Then choose an attribute from the pulldown menu that appears in the new cell.) To remove any entry, just click into (apply focus to) the entry in question and click the minus sign (-) to remove it.
Be sure to associate a Value with each Attribute. The value you enter must be a valid ECMAScript string, or an expression that will evaluate to a string. If you are entering literal data, you should wrap the value in quotation marks (i.e., enter "John" rather than just John).
NOTE: You may optionally click the `E' icon (at the right) to bring up the Expression Builder dialog, and from there, you can either type or doubleclick on picktree items to build an expression interactively.
Suppose you have set up a container (an organizationalUnit object) called user under o=mondocorp.
Now suppose you are interested in adding a new inetOrgPerson named Joey Jacobs to the user object. You also want to store certain additional information about Joey, including a UserID value and the name of Joey's assistant. To add the new entry to the directory, you would construct a Create DSML action (in Add mode) as described previously, setting up your Native Environment Pane to look something like this:
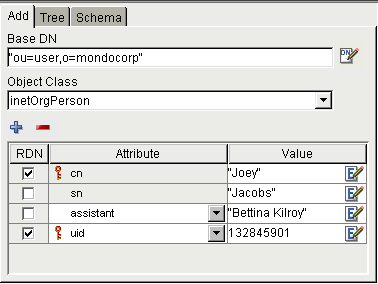
These settings say: "Add an inetOrgPerson with common name (cn) of Joey and surname (sn) of Jacobs, with the assistant and uid values shown, to the user organizationalUnit (ou), in the organization container called mondocorp."
The checkboxes indicate which pieces of information to use in forming the new entry's Relative DN. In this example, the new RDN will be cn=Joey,uid=132845901 and it will go under the container whose Base DN is ou=user,o=mondocorp, so the new entry's full distinguished name would be:
cn=Joey,uid=132845901,ou=user,o=mondocorp
When the Create DSML action executes, it will create DSML for this request and put it in Input (or whichever DOM you specified in the Create DSML Request dialog). The request still hasn't been issued to the server, however. To do that, you'll need to create an Execute DSML action. (If your request is in the Input DOM, just add an Execute DSML action and accept the defaults in the dialog.) Your action model will look like:

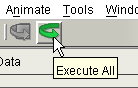
Test the actions by clicking the Execute All button in the Composer main toolbar:
The actions will execute and you should see the Output DOM populate. A result code of 0 in the Output means that operation was a success.
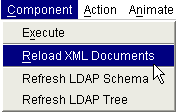
To verify that the operation was, indeed, a success, go to the main menu and choose Component > Reload XML Documents:
Now click the Execute All toolbar icon again (re-run the component). You should see an error message in the Output DOM this time:
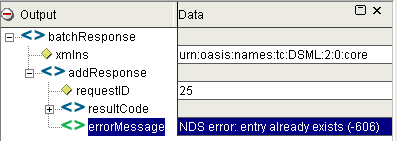
The errorMessage element contains a message to the effect that the entry you're trying to make already exists, indicating that the original test of the action model was successful (Joey Jacobs was added to the tree).
NOTE: This illustrates an important principle of X.500 directory architecture, which is that no two siblings (instance objects on the same level of the tree) can have the same identity. In other words, you can't add the same object twice, as we tried to do here. You will get an error on the second Add.
You can also verify Adds by using a third-party LDAP client—such as a web browser—to query the directory.
Most web browsers are LDAP clients and will honor the ldap:// URL protocol. If you wanted to verify the add request that was carried out in the foregoing example, you could simply type the following URL into the address window of Microsoft Internet Explorer:
ldap://[server-domain]/ou=user,o=mondocorp?cn?sub?objectClass=inetorgperson
The URL in effect says "Using the ldap: protocol, go to the server at [server-domain] and bind anonymously to the user container, then search the subtree under that container for inetOrgPerson objects and retrieve the attribute values corresponding to cn (common name)."
If you make MSIE go to this URL, an Address Book window will open, showing the search result:
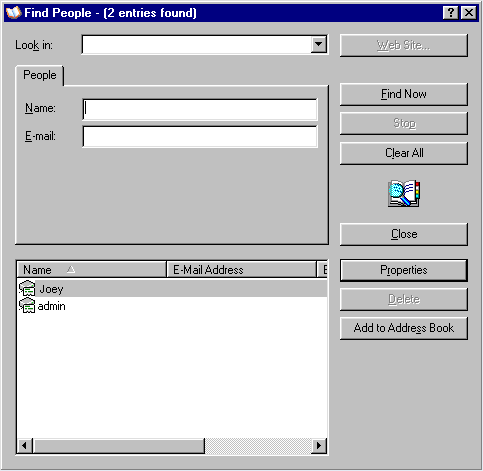
Indeed, a new entry with common name John appears in the list.
The Compare operation is valuable when you are trying to test a directory entry for existence. The procedure for setting up a Compare request is similar to that for doing an Add (as discussed above).
To construct a Create DSML Action that performs a Compare request
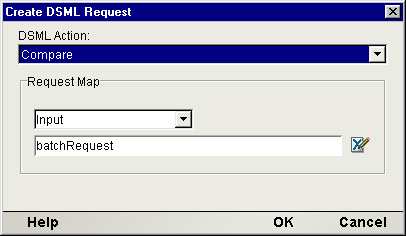
Right-mouse-click inside the action-model pane (or use Composer's Action menu, in the main menubar) and select New Action > Create DSML from the menu.
If you are in doubt as to what to put for Request Map values, accept the defaults shown. Click OK, and the action will be added to the action model.
Click the Compare tab in the Native Environment Pane if it is not already the frontmost tab.
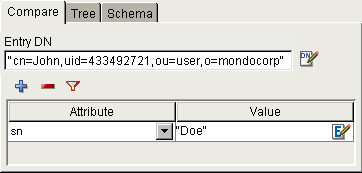
Next to Entry DN, enter the distinguished name of the object against which you will be making comparisons. (Include quotation marks around this string as shown in the illustration below.)
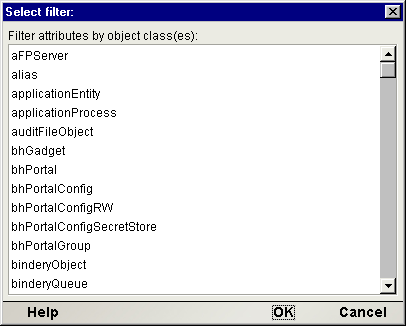
Click the small funnel-shaped Filter icon (next to plus and minus icons). A dialog with a scrolling list will appear.
Select (highlight by single-clicking) the object class corresponding to the entry whose existence you want to test.
In the Attribute-Value table in the lower part of the Native Environment Pane, use the pull-down menu to select an attribute name. This list of attributes corresponds to the allowable attributes for the object class you selected in the preceding step.
Click the plus-sign icon as needed to add more entries to the Attribute-Value table. (Optional)
For each Attribute name, enter a corresponding value under Value.
NOTE: The Value should be wrapped in quotation marks if it is not a programmatic (ECMAScript) expression.
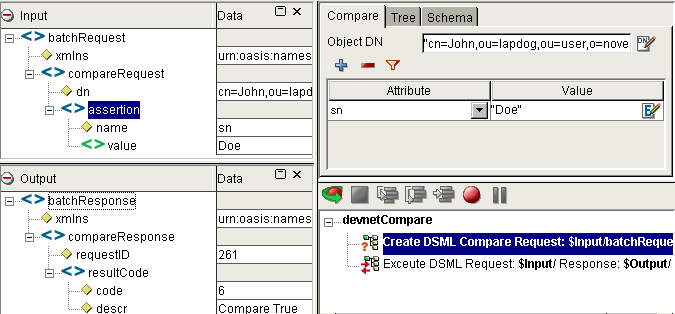
In the Add request example previously, we added John Doe to a container node called lapdog in a test directory. (Refer to that example for setup details.) To test for the existence of an entry with common name John and surname Doe, in the organizationUnit object called lapdog, one would
Add an Execute DSML action to the action model (accepting the defaults in the Execute DSML setup dialog)
Run the action model either in step-through (animation) mode or by using the Execute All button in Composer's main toolbar
The following graphic shows what the component windows look like after executing the model:
The Delete operation is useful for removing entries from a directory.
The procedure for setting up a Delete request is similar to that for doing an Add (as discussed previously).
To construct a Create DSML Action that performs a Delete request
Right-mouse-click inside the action-model pane (or use Composer's Action menu, in the main menubar) and select New Action > Create DSML from the menu.
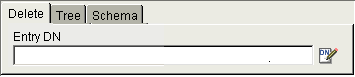
Click the Delete tab in the Native Environment Pane to bring it forward, if it is not already the frontmost tab.
In the Delete tab, next to Entry DN, enter the unique DN (distinguished name) of the entry you wish to delete.
The action is now ready to use. Executing it will append an appropriate request to the DSML target document.
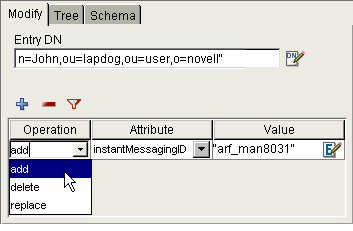
The Modify operation is useful for adding, deleting, or replacing values in a directory. For example, if your directory already contains an entry for John Doe but does not contain an entry for his instant messaging ID, you could use the "add" flavor of the Modify request to add his IM handle to the directory. This is illustrated in the following procedure.
To construct a Create DSML Action that performs a Modify request
Right-mouse-click inside the action-model pane (or use Composer's Action menu, in the main menubar) and select New Action > Create DSML from the menu.
Click the Modify tab in the Native Environment Pane to bring it forward, if it is not already the frontmost tab.
In the Modify tab, next to Entry DN, enter the unique DN (distinguished name) of the entry you wish to modify.
Click the small funnel-shaped Filter icon (next to plus and minus icons). A Select Filter dialog with a scrolling list will appear.
In the scrolling list, click on the object class corresponding to the entry you want to modify.
In the Modify tab of the Native Environment Pane, click the plus-sign icon to add an Operation to the Operation-Attribute-Value table.
Select the type of operation you wish to perform (add, delete, or replace) from the pull-down menu as shown above.
In the Attribute column, use the pull-down menu to choose the attribute that corresponds to the one whose value you intend to add, delete, or replace. (The attribute list is prepopulated with attributes that are appropriate to the object class you chose in the Select Filter dialog earlier.)
In the Value column, enter the appropriate value for the attribute.
The action is now ready to use. Executing it will append an appropriate request to the DSML target document.
The Rename operation can either rename or move an entry in a directory, depending on how it is used.
The screenshot in the following procedure illustrates changing the common name (cn) for someone named John to a cn of Johann.
To construct a Create DSML Action that issues a Rename request
Right-mouse-click inside the action-model pane (or use Composer's Action menu, in the main menubar) and select New Action > Create DSML from the menu.
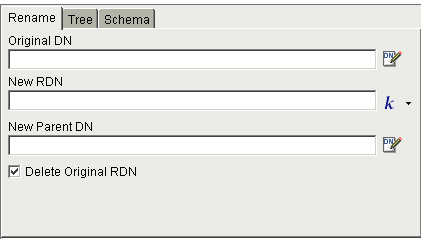
Click the Rename tab in the Native Environment Pane to bring it forward, if it is not already the frontmost tab.
In the Rename tab, next to Old DN, enter the unique DN (distinguished name) of the entry you wish to rename or move.
Next to New RDN, enter the new relative DN for this entry. (You do not need to use quotation marks around the value if the k icon is showing at the right. See the explanation of this icon in the procedure for Add, above.)
Optionally enter a new parent-container DN next to New Parent DN, if you are moving the entry.
Optionally check the Delete Old RDN checkbox if you are moving the entry to a new location and don't want to keep the old copy in the old location.
The Search operation can be used to retrieve data from a directory. LDAP defines a query filter syntax involving logical operations that can be combined to build complex conditional search criteria. The syntax is covered in RFC 2254 and won't be recapitulated here since Composer can automatically generate the correct expression syntax for you based on your use of UI controls. (See below.)
NOTE: If you are familiar with the rule-builder GUIs offered in e-mail clients for constructing mail filtering conditions, the same principles (and GUI metaphors) apply here.
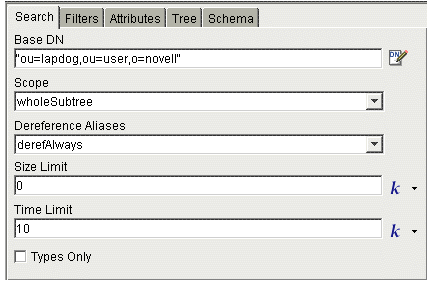
To construct a Create DSML Action that issues a Search request
Right-mouse-click inside the action-model pane (or use Composer's Action menu, in the main menubar) and select New Action > Create DSML from the menu.
Click the Search tab in the Native Environment Pane to bring it forward, if it is not already the frontmost tab.
In Base DN, enter the distinguished name of the container object where you want the search to start. (Be sure to wrap this string in quotation marks.)
For Scope, choose one of the three available values:
baseObject—means to limit the search to the base object (specified in Base DN) only
singleLevel—mean the search will be scoped to the base object plus its immediate (one-level-deep) children
wholeSubtree—means the search will include the base object as well as all children under the Base DN object, no matter how many levels deep the children might be
For Deref Alias, choose one of the following values from the pull-down menu:
derefAlways— means that aliases (entries that contain a pointer to another entry) are always dereferenced, both when finding the starting point for the search, and also when searching the entries beneath the starting entry
derefFindingBaseObject— means that aliases should be dereferenced (resolved) when finding the starting point for the search, but not when searching under that starting entry
derefInSearching— means aliases should be dereferenced when searching the entries beneath the starting point of the search, but not when finding the starting entry
For Size Limit, enter a numeric value representing the maximum number of "hits" the component is willing to receive from the server. (Note that the server may also have its own response-batch-size limits, which can't be controlled from the client, generally speaking.) The default value of zero means there is no limit on the number of items that can be returned and the component will simply block until all results come in.
TIP: Use the flyout menu to select k for constant or ECMA Expression if you want to enter a programmatic (ECMAScript) expression that resolves to a number at runtime. See description under the "Add" procedure further above.
For Time Limit, enter a numeric value representing the maximum number of seconds (not milliseconds) the component is willing to wait while the server processes the request. This tells the server that it should stop searching and return an error Leaving this value blank (or zero) means there is no upper limit on wait time; the client (your component) is content to wait forever.
TIP: Needless to say, it is not a good idea to wait forever. Enter a prudent value here.
Optionally check the Types Only checkbox if you want the search to return the names of any attributes found, but not their associated values.
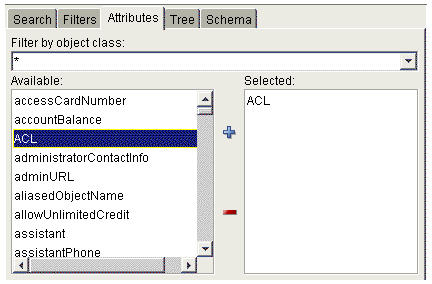
Use the various controls to build rules for filtering the search. (See below.)
The settings in this particular graphic show a rule that says: "objectClass equals organizationalUnit AND surname equals Smith; AND common name does not equal Myrtle."
Use the pull-down menu under Filter by object class to select an object class name, thereby exposing a list of the allowable attribute types for that object class in the Available subpane (lower left).
Use the plus and minus icons to move attribute names from the Attribute column to the Selected column or vice versa.
In this example, the isManager and fullName attributes have been selected from the list of allowable organizationalPerson attributes. What this means is that the search results will contain isManager and fullName attributes (and their values) for the "hits," if any.
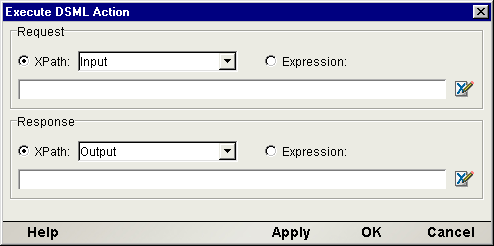
The Execute DSML action converts a DSML-packaged request to a low-level LDAP request, and executes it (synchronously) against the server. It retrieves any response data received from the server and maps it to the XML document of your choice (typically the Output DOM or a Temp DOM).
To set up a valid Execute DSML action, you have to tell Composer where the DSML request document (which should be an in-memory DOM) can be found, and where to map the DSML response that comes back after a request is made.
To create an Execute DSML Action
Right-mouse-click inside the action-model pane (or use Composer's Action menu, in the main menubar) and select New Action > Execute DSML from the menu. A dialog appears.
In some cases, there is no need to alter the default settings in this dialog and you can close the dialog immediately by clicking OK. What this does is tell Composer: "Just use the DSML in Input for the request, and map the response to Output." If this is not what you want, specify the correct Request and Response DOMs (and target nodes) using the radio buttons, pull-down menu controls, and text fields provided. (For example, you might want to map the response to Temp, Temp1, or some other "scratchpad DOM" rather than straight to Output.)
NOTE: These controls will be familiar to you if you have created Map Actions in Composer before. Consult the Composer User's Guide for information on how to specify XPath-to-XPath mappings if you have not done this before.
Click OK to dismiss the dialog. The new Execute DSML action is added to your action model.
In addition to the DSML-related actions described so far, you have all the standard Basic and Advanced Composer actions at your disposal as well. The complete listing of Basic Composer Actions can be found in Chapter 7 of the Composer User's Guide. Chapter 8 contains a listing of the more Advanced Actions available to you.
Copyright © 2003 Novell, Inc. All rights reserved. Copyright © 1997, 1998, 1999, 2000, 2001, 2002, 2003 SilverStream Software, LLC. All rights reserved. more ...