Composer User's Guide
CHAPTER 14
This chapter discusses the registry browsing functionality provided in the exteNd Composer. There are currently three different models in popular use for registry browsing: UDDI, ebXML Registry Services and WSIL. Composer supports all three of these specifications. They are compared briefly below, with reference made to sources of additional information.
The current business registry standard covering Web Services is UDDI (Universal Description, Discovery and Integration), which was designed to give businesses a uniform way to describe their services, discover other companies' services, and understand the methods necessary to conduct e-business in an automated or semi-automated way with remote partners. If you need to learn more about UDDI, the complete standard can be obtained at http://www.uddi.org.
In addition to UDDI, Composer supports ebXML Registry Services. ebXML stands for (Electronic Business using eXtensible Markup Language). The ebXML Registry and Repository, like UDDI, was developed to enable the storing and sharing of information between parties to allow e-business collaboration. Composer's implementation of ebXML is made possible using JAXR (Java XML Registries). The specification for ebXML can be found at: http://www.ebxml.org/specs/#technical_specifications.
Finally, Composer also supports WSIL (Web Services Inspection Language), yet another specification for the discovery and publishing of Web services. In the past few years since its inception, UDDI has been criticized for its lack of moderation and an inadequate quality of service (Web Services Architect, "WSIL: Do we need another Web Services Specification?"). WSIL was designed to be more lightweight and portable, and, in a sense, to pick up where UDDI leaves off. Although this standard has yet to be submitted to one of the standards bodies (W3C and OASIS) it is certainly widely-used and gaining in popularity. To find out more, see http://www-106.ibm.com/developerworks/webservices/library/ws-wsilspec.html.
UDDI, ebXML and WSIL form the basis for the registry management functionality described in the pages below. Familiarity with these standards, as well as a general understanding of the publishing and discovery of web services will be assumed here. Your web service may use one or all of these models, depending on the nature of the application you are developing.
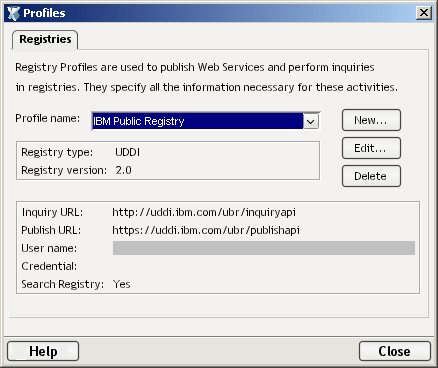
The exteNd Composer incorporates a Registry Manager, accessible via the Registries tab at the bottom of the Composer main navigation frame. There is also a facility for defining registries through the Profiles capability (available via Tools> Profiles... in the Composer main menubar).
The capabilities of the Registry Manager include:
Viewing business information on selected businesses in a given registry
Viewing information on Web Services offered by a given business
Searching for businesses or services within a registry or group of registries, optionally using extended query parameters
Registries are specified by URL and can be local or web-based. You can add or delete registries via the Profiles dialog (Tools menu, Profiles).
Select Tools> Profiles . . . from the exteNd Composer main menubar. The Profiles dialog appears.
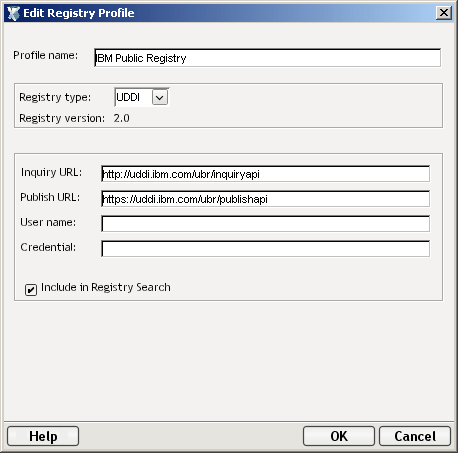
If you are editing an existing entry, select it from the Profile name pulldown menu, then click the Edit button. The Edit a Registry Profile dialog will appear, as shown below. After editing your selection, click on OK to save.
NOTE: If you have changed the name during editing, a new registry is created. If you do not want to keep the old one, then you must delete it.
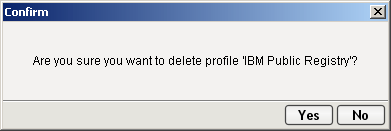
If you are deleting an existing entry, select it from the Profile name pulldown menu, then click the Delete button. A message will appear to confirm if your selection is the one you intend to delete. After deleting your selection, click on Close to save.
 To define a new UDDI or ebXML registry:
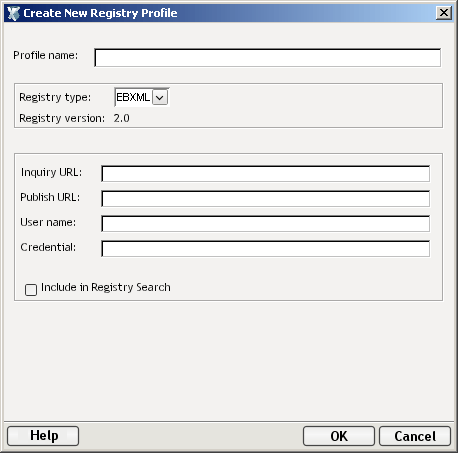
In the Profiles dialog window, click on New. The Create a New Registry Profile dialog will appear.
Enter a name for the profile in the Profile name field (required).
Select the Registry type from the pulldown menu. The choices are: ebXML, UDDI and WSIL (which is described in a separate procedure, since the fields required for WSIL are unique). If you select ebXML or UDDI, the screen will look like the one above.
In the Inquiry URL field, enter the URL through which the registry can be queried (required).
In the Publish URL field, enter the URL via which new services can be published to the registry.
Enter the User name and Credential information, if any, that the registry provider assigned to you for publishing access.
Check the Include in Registry Search checkbox if you wish to include this registry automatically in the default search set.
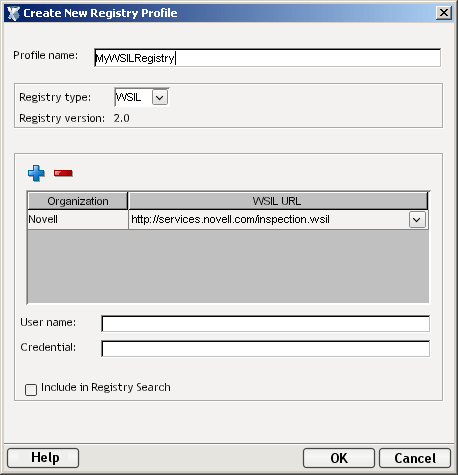
To define a new WSIL registry:
In the Profiles dialog window, click on New. The Create a New Registry Profile dialog will appear.
Type in the fully qualified WSIL URL, ending in "inspection.wsil."
Enter the User name and Credential information, if any, that the registry provider assigned to you for publishing access.
Check the Include in Registry Search checkbox if you wish to include this registry automatically in the default search set.
Once you have defined an ebXML, UDDI or WSIL Registry Profile in the above fashion, you will be able to use it in the Registry Browser tab on the Navigation Pane of the Composer main window. You can also publish services to the registry.
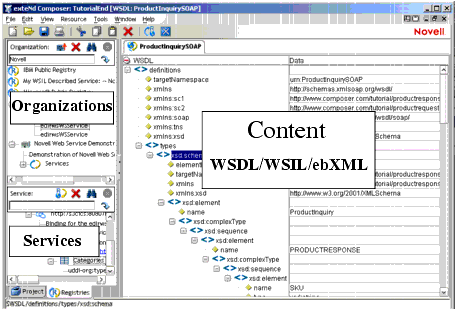
Registry browsing is available via the Registries tab in the Navigation Pane of the Composer main window. There are two subpanels within the navigation pane: one for organizations (top) and one for services (bottom). To the right is the Editor Pane. See illustration.

Context menus, specific to each pane in the Registry Manager, are available when using the Composer.
To view the context menu for Organization, place your cursor in a field in the Organization pane and click the RMB (right mouse button). The context menu appears as shown.
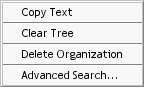
The function of the context menu items are as follows:
Copy Text—Allows you to copy text from the currently selected business tree node to another area or file.
Clear Tree—Allows you to clear the pane of business information that you retrieved from your search.
Delete Organization—Allows you to delete the selected organization from the registry.
Advanced Search—Allows you to set advanced search criteria via the Set Browsing Criteria dialog.
To view the context menu for Services, place your cursor in a field in the service pane and click the RMB (right mouse button). The context menu appears as shown.

The function of the context menu items are as follows:
Copy Text—Allows you to copy text from the currently selected tree node to another area or file.
Clear Tree—Allows you to clear the service pane of information that you retrieved from your search.
Retrieve WSDL—Allows you to retrieve the WSDL for the currently selected service from the registry. This can also be done via the Retrieve button. If the service you selected has no WSDL definition, a message will notify you of this condition.
Delete Service—Allows you to delete a service that you highlighted in either the business or service Registry.
Advanced Search—Allows you to set advanced search criteria via the Set Browsing Criteria dialog.
To view the context menu for Content pane, place your cursor in a field in the pane and click the RMB (right mouse button). The context menu appears as shown.
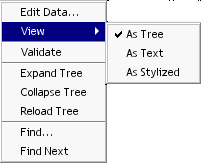
The functions of the context menu items are as follows:
Edit Data—Allows you to change text from the information contained in the pane to another area or file.
View—There are three choices for viewing the information in the Content pane. They are: Tree, Text and Stylized. Click on your preference and the information will appear in the pane as such.
Validate—Runs a validation routine to ensure that your XML is sound.
Expand Tree—Displays all nodes in the pane.
Collapse Tree—Hides all nodes except the root node in the pane.
Reload Tree—Allows you to load the original tree.
Find—Allows you to search, via a dialog box, for a specific word or part of a word within the tree.
Find Next—Allows you to search, via a dialog box, for the next word or part of a word within the tree.
The following illustration shows the location of the various action buttons on the Organization and Service panes. 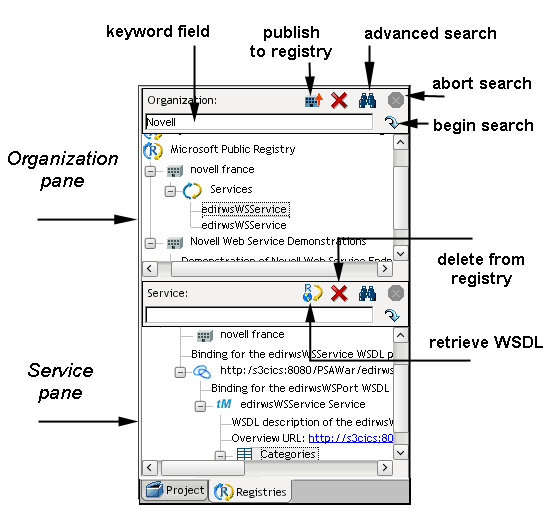
Searching for an organization (or organizations) is a simple matter of entering a complete or partial business name in the text field next to Organization, then clicking on the Search button (or "Go" button, shaped like a downturned arrow). A list of matching organizations will appear in tree-view form, in which each top-level node in the tree is a registry, each child of a registry is an organizationname, and underneath each business is detail information consisting of Descriptions, Categories, and Services. You can also enter a group of organization names separated by a vertical bar (pipe character), which allows you to search for multiple groups of businesses. For example, Silverton|Silicon etc.
To search organizations by keyword
To search on an organization name or partial name (or other keyword), enter text into the keyword field, then click the Go button (which looks like a downturned arrow). The search will begin. Note that while a search is underway, the Abort button (normally greyed out) is red.
Searches can take several minutes. If you want to interrupt a search prematurely, click the Abort button. Partial search results will show up in the Organization pane.
Wait until the search is complete. You will know it is complete when results have shown up in the Organization pane and the Abort button has returned to its normal, greyed-out (disabled) appearance.
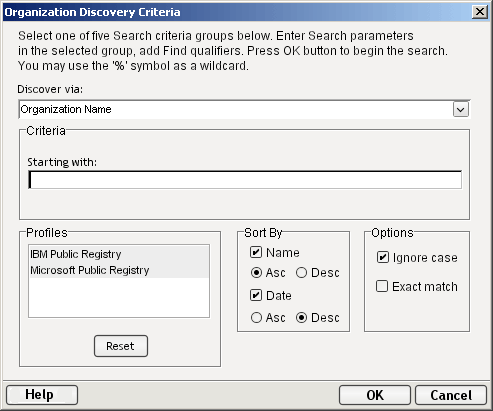
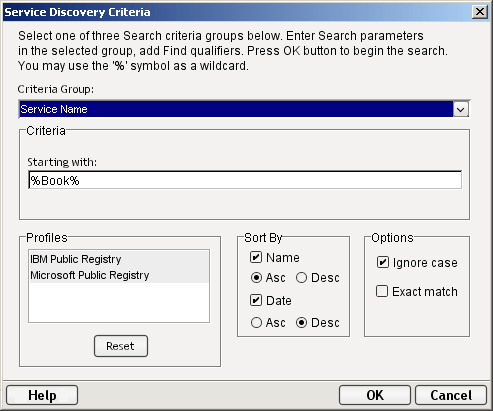
To set advanced search criteria
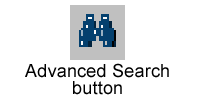
If you want to set advanced search criteria, do not enter anything in the text field; merely click the Advanced Search Button (shaped like binoculars).
You can select only one of the search-criteria groups at a time. The available options are:
Organization Name: Enter enter a complete or partial organization name or list of names separated by a vertical bar (|) in the text field next to Starting with.
Identifier: If you choose this option, a new field called Identifier will appear. From the pulldown list, select one of the following: D-U-N-S, or Thomas Register (catalog names). Enter a key from the catalog (partial or complete) in the text field next to Starting with. This entry can contain numeric values and dashes.
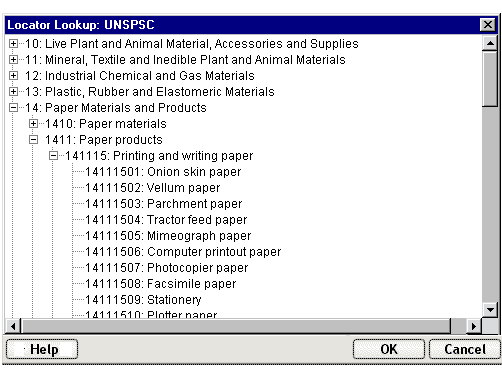
Locator: When you choose this option, a new field called Locator appears. From the pulldown list select one of the following: NAICS (North American Industry Classification System), UNSPSC (United Nations Standard Products and Services Classification) or GEO (geographical). Enter a key from the catalog (partial or complete) in the text field next to Starting with, if you selected NAICS or UNSPSC. This entry can contain numeric values. Enter a country (region) abbreviation for GEO.
Alternatively, click the button at the far right of the control, to bring up a "key picker" in which you can doubleclick full or partial key names from a prepopulated list. See below.
Service Type Name: This allows the search of organizations associated with a particular UDDI tModel. Enter a key word for this tModel in the text field next to Starting with.
Discovery URL: Enter an IP address or portion of an IP address for the URL in the text field next to Starting with.
Select the Registry Profile(s) you want to use for this search. The Profiles box contains a list of Registries from which you can search. Registries you have previously selected in the Profiles dialog box (see description above) will already be highlighted. However, you may override them by selecting or de-selecting one or all of the registries within the list. If you decide to return to your original (default) registries, click the Reset button at the bottom of the dialog pane.
Under Sort By, you. can select how you want to sort—by Name, or by Date—in either Asc (Ascending) or Desc (Descending) order. The most common technique is to sort on Name (alphabetically) by ascending order or on Date (numerically) by descending order. Sorting by Date works within groups of businesses with identical names.
Under Options, you can select Ignore Case and/or Exact Match by clicking in the appropriate checkbox.
After a search, a tree of matching businesses will be built in the Organization pane; the Service subpane will be cleared.
NOTE: Clicking a Service entry in the Organization tree causes that Service's detail information (binding, etc.) to appear in tree form in the lower Service pane. See below.

Searching for a service (or group of related services) is a matter of entering a complete or partial service name or keyword in the text field next to Service, then clicking on the Search button (or "Go" button, shaped like a downturned arrow). A list of matching services will appear in tree-view form, in which each top-level node in the tree is the registry that was searched; each immediate child of a registry is a service name; and children of the service node(s) contain detail information consisting of the Organization name associated with the service, a Description of the service, and bindings for the service.
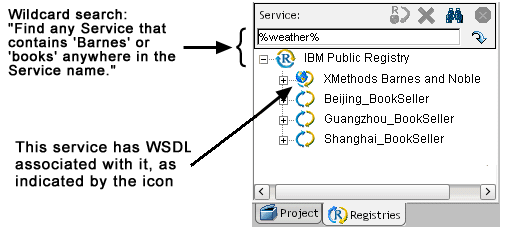
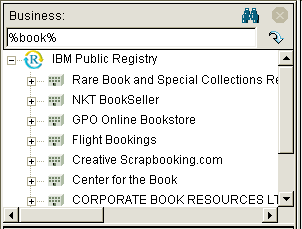
The Composer registry search engine supports the use of the percent sign (%) as a wildcard symbol, meaning one or more of any character. This is a particularly useful tool when you want to search for business or service names that contain a particular word but might not start with that word.
NOTE: The default search logic is "Start With." Thus a search on "Books" will turn up "BooksRUs" but not "ABC Booksellers" nor "Used Books". The way to override this behavior is to search instead on "%Books%", which will turn up all three.
The Composer registry search engine also supports the use of the | symbol as a logical-OR symbol, meaning "look for hits that contain any combination of these words." You can chain together any number of keywords this way. For example:
%Booking% | %Travel% | %Airline%
would return all names that contain at least one of the words, no matter where in the name that word might appear.
To search on a service name or partial name (or other keyword), enter text into the keyword field, then click the Go button (which looks like a downturned arrow). The search will begin. Note that while a search is underway, the Abort button (normally greyed out) is red.
Searches can take several minutes. If you want to interrupt a search prematurely, click the Abort button. Partial search results will show up in the Service pane.
Wait until the search is complete. You will know it is complete when results have shown up in the Service pane and the Abort button has returned to its normal, greyed-out (disabled) appearance.
To set advanced search criteria
If you want to set advanced search criteria, click the Advanced Search Button (shaped like binoculars).
As indicated by the presence of radio buttons, you can select only one of the search-criteria groups at a time. The available options are:
Service Name: Click on the radio button next to Service Name. Enter enter a keyword in the text field next to Starting with.
Locator: If you select this search criteria, a new pulldown menu appears from which you must select a Locator. You have the following choices: : NAICS (North American Industry Classification System), UDDITYPE, UNSPSC (United Nations Standard Products and Services Classification) or GEO (geographical). Enter a key from the catalog (partial or complete) in the text field next to Starting with, if you selected NAICS or UNSPSC. This entry can contain numeric values. Enter a country (region) abbreviation for GEO.
Service Type Name: Allows the search of businesses associated with a particular tModel. Enter a key word for this Model in the text field next to Starting with.
Select the Registry Profile(s) you want to use for this search. The Profiles box contains a list of Registries from which you can search. Registries you have previously selected in the Profiles dialog box (see description above) will already be highlighted. However, you may override them by selecting or de-selecting one or all of the registries within the list. If you decide to return to your original (default) registries, click the Reset button at the bottom of the dialog pane.
Under Sort By, you. can select how you want to sort—by Name, or by Date—in either Asc (Ascending) or Desc (Descending) order. The most common technique is to sort on Name (alphabetically) by ascending order or on Date (numerically) by descending order. Sorting by Date works within groups of businesses with identical names.
Under Options, you can select Ignore Case and/or Exact Match by clicking in the appropriate checkbox.
After a search, a tree of matching services is built in the Service pane; the Organization pane is cleared. Clicking a service node in the lower (Service) tree causes that business's detail information to appear in tree form in the upper (Organization) pane.
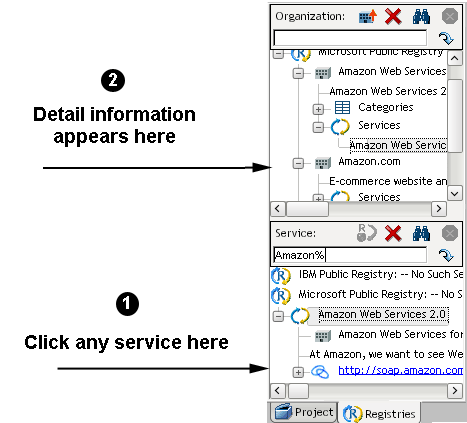
After you have found the service that you searched for, now you can retrieve the WSDL definition for this service from the Registry. Just highlight the desired service node and click the Retrieve WSDL button, or click with the RMB and select Retrieve WSDL from the context menu. If a definition for the service exists, you see the Contents pane fill with the WSDL information in a tree format (see illustration). If no WSDL exists for the service, an alert dialog will appear, advising you of that fact.
NOTE: You can tell whether a given service listing has WSDL or not by looking at the service icon to its left. A ring icon with a globe in it means the service has WSDL. A ring icon with no globe means it is not a WSDL web service.

You can view the information in the Contents Pane as text or in stylized form by simply clicking on the RMB and selecting the view you wish to see.
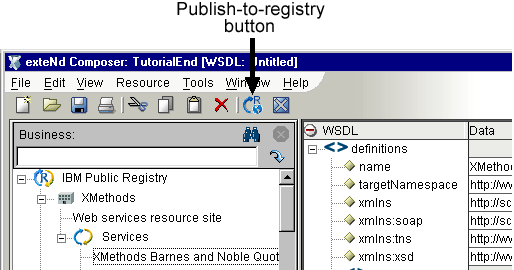
When you have created WSDL using the Composer editor, you can publish it to a registry by following the procedures outlined below.
Click on the Publish to Registry button on the toolbar as shown below.
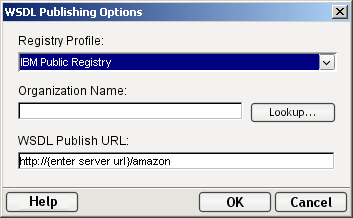
Registry Profile: Select the registry from the pulldown list you wish to publish.
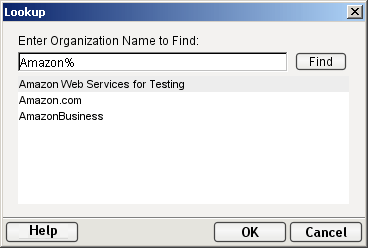
Organization Name: Allows you to lookup organizations and select which one to associate the service with. If you click the Lookup button, the following dialog appears:
WSDL Publish URL: Shows the URL to which the service will be published to. You can edit this if you desire.
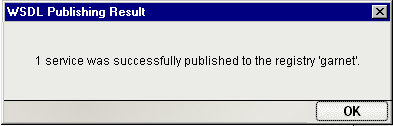
Click OK and if your service was successfully entered into the registry you selected, you will see a message like the one shown below.
Copyright © 2004 Novell, Inc. All rights reserved. Copyright © 1997, 1998, 1999, 2000, 2001, 2002, 2003 SilverStream Software, LLC. All rights reserved. more ...