|  |
 |
 |
 |
 |
 |
 |
 |
 |
HTML Connect User's Guide
CHAPTER 3

As with all exteNd components, the first step in creating an HTML Component is to specify any XML templates needed. For more information, see Creating a New XML Template in the Composer User's Guide.
Once you've specified the XML templates, you can create a component, using the template's sample documents to represent the inputs and outputs processed by your component.
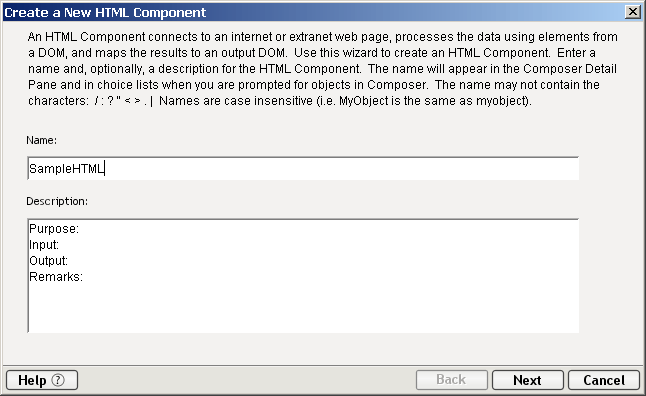
 To create a new HTML Component:
Select File>New> xObject then open the Component tab and select HTML. The Create a New HTML Component Wizard appears.
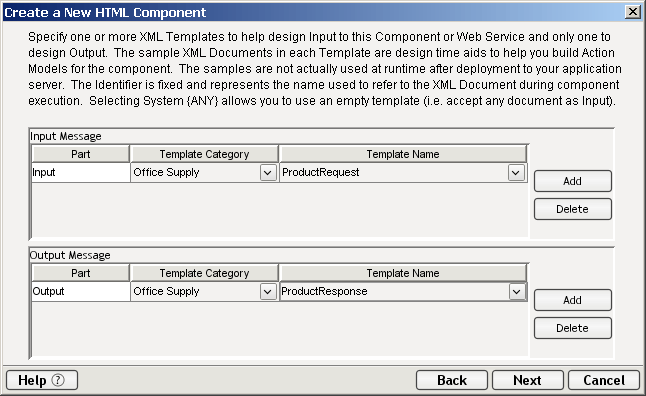
Click Next. The XML Property Info panel of the New HTML Component Wizard appears.
Specify the Input and Output templates (also called Messages).
Type in a name for the template under Part if you wish the name to appear in the Component Editor as something other than "Input" or "Output."
Select a Template Category if it is different than the default category. In the example above, the Office Supply Category has been selected.
Select a Template Name from the list of XML templates in the selected Template Category. In the example above, Product Request has been selected for the Input Template.
To add additional input XML templates, click Add and repeat steps 2 through 4.
To remove an input XML template, select an entry and click Delete.
Select an XML template as an output using the same methods described in the previous step.
NOTE: You can specify an input or output XML template that contains no structure by selecting {System}{ANY} as the Output template. For more information, see "Creating an Output Message without Using a Template" in the Composer User's Guide.
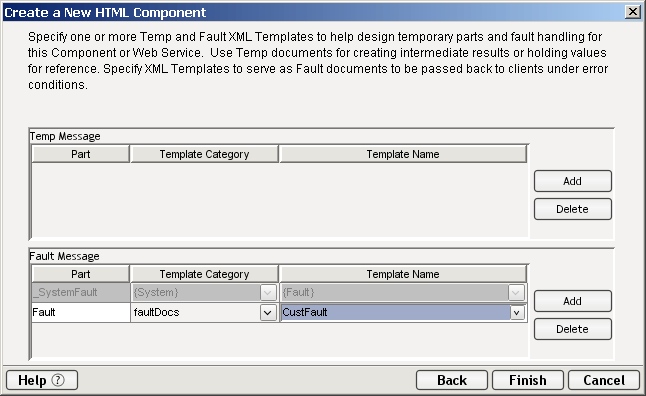
If desired, specify a template to be used as a scratchpad under the "Temp Message" pane of the dialog window. This can be useful if you need a place to hold values that will only be used temporarily during the execution of your component or are for reference only. Under the "Fault Message" pane, select an XML template to be used to pass back to clients when a fault condition occurs.
Under the "Fault Message" pane, select an XML template to be used to pass back to clients when an error condition occurs.
As above, to add additional temp or fault XML templates, click Add and choose a Template Category and Template Name for each. Repeat as many times as desired. To remove an XML template, select an entry and click Delete.
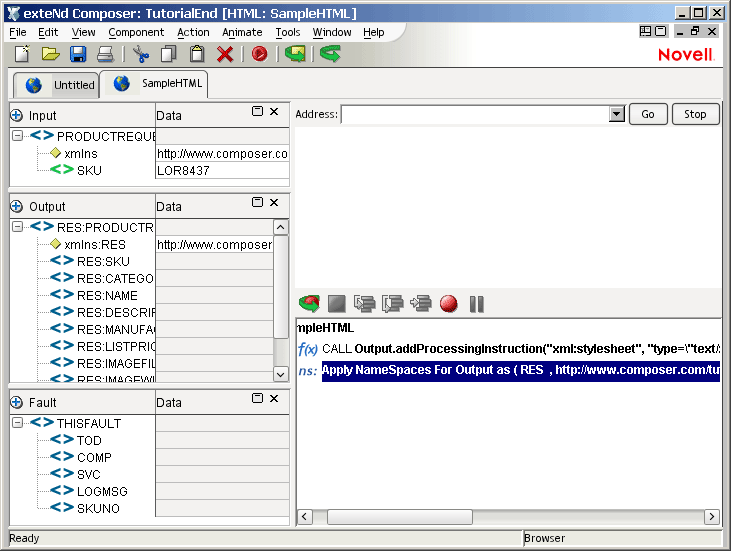
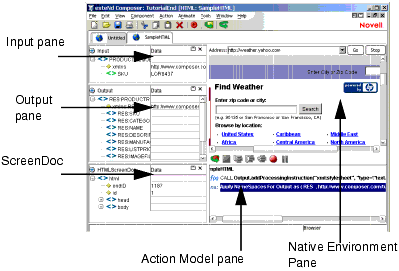
Click Finish. The component is created and the HTML Component Editor appears, as shown below.
The HTML Component Editor includes all the functionality of the XML Map Component Editor. For the HTML Connect, it contains mapping panes for Input and Output XML documents as well as an Action pane.
There are two key differences, however. The first is that the HTML Component Editor also includes a Native Environment Pane common to all Connects. It contains a web browser window with an address line at the top along with two buttons: Go and Stop. The second difference is the addition of an XML DOM called ScreenDoc to the component editor window. This DOM presents an XML document representation of each screen received from the website and is available for reference and creating mapping actions within the component. In addition, the ScreenDoc DOM is available in the expression builder, allowing the user to easily reference a screen field.
From the HTML Native Environment pane, you can perform the following:
Map data from an Input XML document (or other available DOM) and use it as input for an HTML screen field or HTML form. For example, you could drag a SKU number from an input DOM into the part field of an HTML inquiry form, and return data associated with that part number, such as description and price.
Map the data from the HTML screen and put it into an Output XML document (or other available DOM, e.g., Temp, MyDom, etc.).
Build B2B services that interact with secure Web sites using SSL3 and Digital Certificates.
Except for "rich content" pages containing Flash, Quicktime movies, etc. (which will render in non-rich form; Composer will ignore the media elements), the HTML Native Environment Pane functions exactly as you would expect a web browser to function and allows you to do the same sorts of things.

The ScreenDoc DOM is an XML document representation (actually XHTML after the Web page has been processed by Tidy) of the current web page displayed in the browser of the Native Environment pane. All Mapping actions to and from the screen display (including drag and drop) actually reference elements in the ScreenDoc DOM. This provides you with the advantage of being able to see and reference your familiar application screens while at the same time working with them as XML documents.
Each time a web page is received by the component, several things happen simultaneously:
The original HTML Web page is displayed in the Native Environment pane.
The original HTML is processed by Tidy, creating an XHTML version of the web page that is then displayed in the ScreenDoc DOM. You can now use any Action on the ScreenDoc DOM as you would any other XML document.
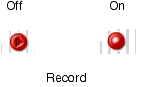
An HTML Action is created (during Record mode only) containing the URI of the received Web page including any parameters sent to the host.
The end result of displaying the Web page as XHTML is that the ScreenDoc DOM can be quite large. Its use is primarily intended for finding hidden fields, verifying fields, parameter field values, and in cases where it is convenient, mapping from the ScreenDoc DOM to the Output DOM using Composer's drag and drop features.
NOTE: Normally it is much quicker and more efficient to map directly to and from the Native Environment pane using drag-and-drop instead of mapping to the ScreenDoc DOM. The XHTML in the ScreenDoc DOM displays all details of the Web page including attributes related to fonts, table attributes, etc. To avoid mapping this irrelevant data, use Drag and Drop when possible, dragging directly to and from the Native Environment Pane.
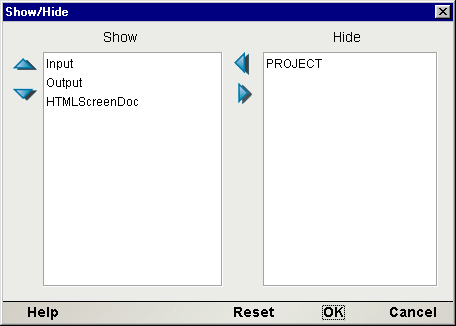
Making the ScreenDoc DOM visible:
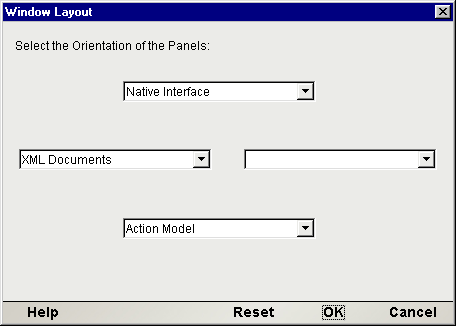
The Window Layout dialog appears and allows you to adjust the placement of the panels in the Window. Use the drop-down arrow in the four different fields, and select the placement of the Panes.
Click OK to close the dialog. Click Reset if you decide to change your settings.
To arrange the view of the XML documents in the component editor:
By using the directional buttons, you can move the Panes from the Invisible column to the Visible Column or vice versa. You can also choose the order in which visible selections appear on the screen.
Click OK to save your settings. Click Reset if you decide to change your settings.
When you are using the HTML Connect editing environment, Composer's main menus have certain commands that are specific to the HTML Connect.
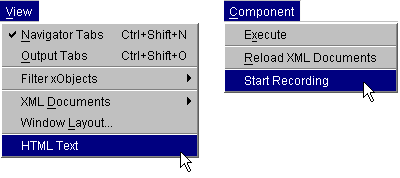
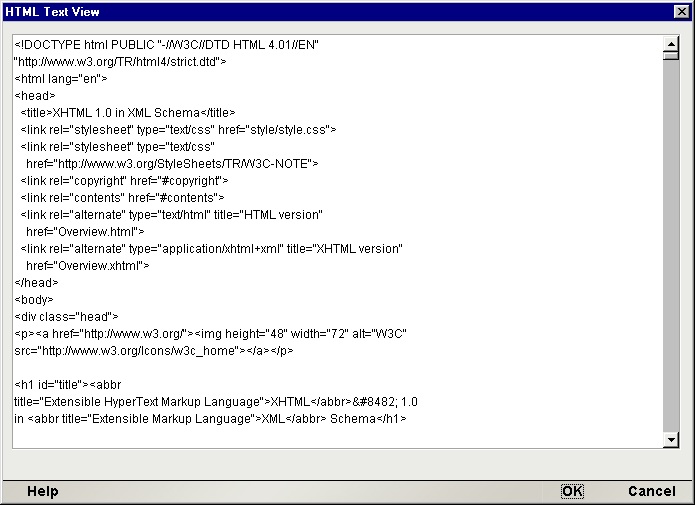
HTML Text—This command brings up a window that displays the HTML code (source code) for the page that is currently displayed in the Native Environment Pane. This is similar to View/Source in Netscape or Internet Explorer. See below.
Start Recording—This command will result in Composer creating actions dynamically as you interact in real time with the Native Environment Pane.
To turn recording off, click the Record button (see next section). The button acts as a toggle.
The HTML Connect puts an additional tool button on the component editor tool bar: the Record button. The Record button results in Composer putting new actions in the Action Model as you interact with HTML screens.
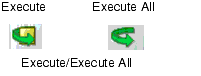
Next to the Record button, you will find Execute/Execute All buttons. These buttons allow you to run selected actions in your component, or the entire action model, respectively.
Copyright © 2004 Novell, Inc. All rights reserved. Copyright © 1997, 1998, 1999, 2000, 2001, 2002, 2003 SilverStream Software, LLC. All rights reserved. more ...