5.3 Scheduling an Appointment
-
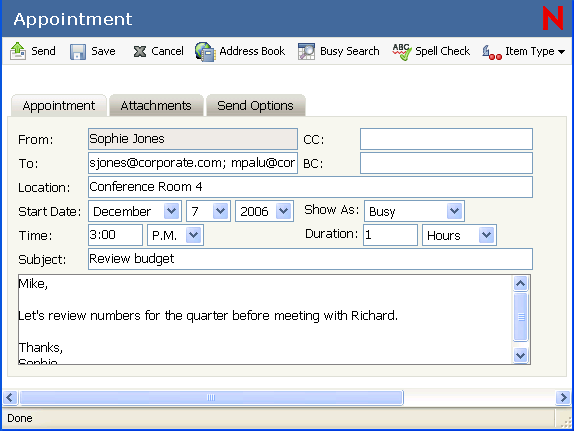
In the GroupWise WebAccess main window, click to display an appointment dialog box.
or
In the Calendar, right-click a day and select
-
Click to add recipients in the , , and fields. If you want to create a personal appointment that displays only in your own Calendar, send the message to yourself, or create a posted appointment.
or
Type a recipient’s address in the , , or field. The address can be a GroupWise user ID, GroupWise full name, or external e-mail address. Separate each address with a comma.
To schedule a resource, such as a conference room, that is available in the address book, add the resource to the field.
-
Type a location for the meeting.
If you added a resource to the field, the location might be filled in automatically.
-
Specify the month, day, year, and beginning time for the appointment, then skip to Step 5.
or
Click to find and insert an appointment time when all the recipients are available.
When you use Busy Search, GroupWise lists times when the users whose schedules were checked are available for an appointment. The time blocks listed might be longer than the duration specified. For example, 8am through 1pm might be listed as an available time. If your meeting has a duration of two hours, you could select from a number of available times, including 8am-10am, 9am-11am, and 11am- 1pm.
To schedule the appointment for one of the times listed, click the time, then skip to Step 6.
-
To set the duration, type a number, then select , , or .
You can use whole numbers or decimal numbers, such as 90 minutes or 1.5 hours.
-
Specify how you want the appointment to appear as. Appointments can appear as , , , or .
-
Type a subject and message.
You can include Web site locations or addresses (URLs) in both the and fields.
-
(Optional) Click to spell check the message. For this feature to work, your browser must be enabled for Java.
-
(Optional) Click to attach files to the appointment. For this feature to work, your browser must support attachments.
-
(Optional) Click to select a security setting (classification), assign a priority (high, standard, low), request a reply, or select to receive return notification.
-
Click or click .