19.5 The Configure Panel Options
The Configure panel lets you set up Web acceleration. It also lets you configure authentication profiles and access control information, fine-tune caching services, and specify how error pages are vended to browsers.
This section explains the following Configure Panel pages and options:
19.5.1 Web Server Accelerator Page
Path: Configure > Web Server Accelerator
Figure 19-23 Web Server Accelerator Page
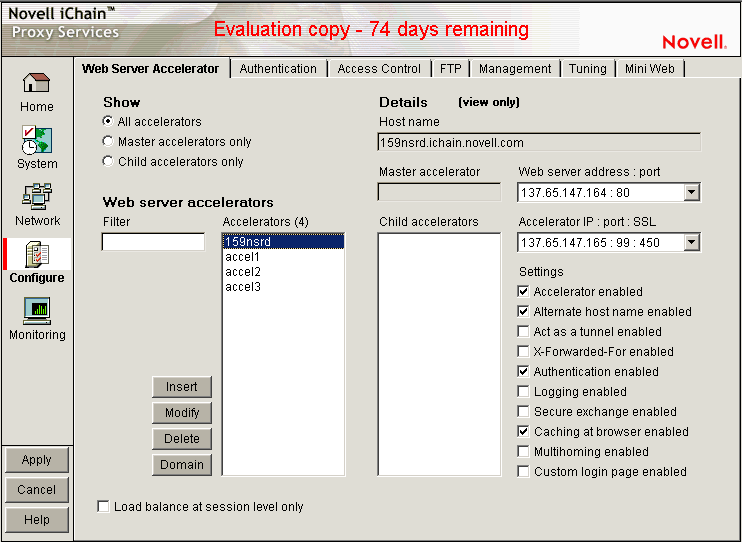
The Web Server Accelerator page lets you add one or more Web server (reverse proxy) accelerators. The proxy server acts as the front end to Web servers on your Internet or intranet and off-loads frequent requests, thereby freeing up bandwidth. Using a Web server accelerator also increases security because the IP addresses of your Web servers are hidden from the Internet. For more information, see Overview of Web Server Acceleration.
Show section: These options allow you to select which accelerators are displayed in the accelerators list.
-
All Accelerators: All accelerators are displayed.
-
Master Accelerators only: Only accelerators that have child accelerators associated with them (multi-homing relationships) are displayed.
Web Server Accelerators section: This section displays a list of accelerators as specified by the radio buttons discussed above. In addition, a filter field is provided to specify which accelerators are displayed in the accelerators list.
-
Filter: By typing characters in the filter field, the list of accelerators is modified according to the filter. Only straight text is used to filter; that is, no wildcards are supported. For example, consider that the list contains four accelerators: Accel1, MyAccel, MyServer, and Zebras. If the letter “a” is typed in the filter list field, only Accel1 would show up in the list. If the letter “m” was then typed, the list would be empty because no accelerators match the pattern “am”. Typing “my” would display MyAccel and MyServer. Typing “mys” would display only MyServer. Typing “z” would display only zebras.
-
Accelerators: This field displays the list of accelerators. The number of accelerators in the list is displayed in parenthesis after the heading.
Details section: Information about the selected accelerator is shown in this section. These fields are all viewable only and cannot be changed or modified on this page. To modify any settings for an accelerator, click Modify after selecting an accelerator in the accelerator list.
-
Host name: The host name of the accelerator and will include the sub-path if one was specified through multi-homing options.
-
Master accelerator: This field will contain the name of the master accelerator of the selected accelerator only if the selected accelerator is the child of that master.
-
Child accelerators — Contains a list of accelerators that are the child accelerators of the selected accelerator.
-
Web server address: port: Contains the accelerator's Web server IP address or DNS name, followed by the Web server port it is using. This is a multiple value field and if multiple values are present, they can be viewed by clicking the down-arrow.
-
Accelerator IP: port: SSL: Shows the accelerator IP address being used, followed by the accelerator port. Also included is the SSL listening port that was specified, whether or not it is actually in use. This is a multiple value field and if multiple values are present, they can be viewed by clicking the down-arrow.
-
Settings: This list of check boxes shows various settings for the accelerator.
For a complete explanation of the settings shown on this page, see Web Server Accelerator Dialog Box.
Load Balance at Session Level Only: Selecting this option causes the proxy server to use the same Web server for all fills during a session. This prevents eBusiness users from needing to log in multiple times. This setting affects all Web server accelerators configured on the proxy server.
For more information on how iChain handles load balancing, see the Novell Technical Information Document.
Web Server Accelerator Dialog Box
Path: Configure > Web Server Accelerator > Insert
Figure 19-24 Web Server Accelerator Dialog Box
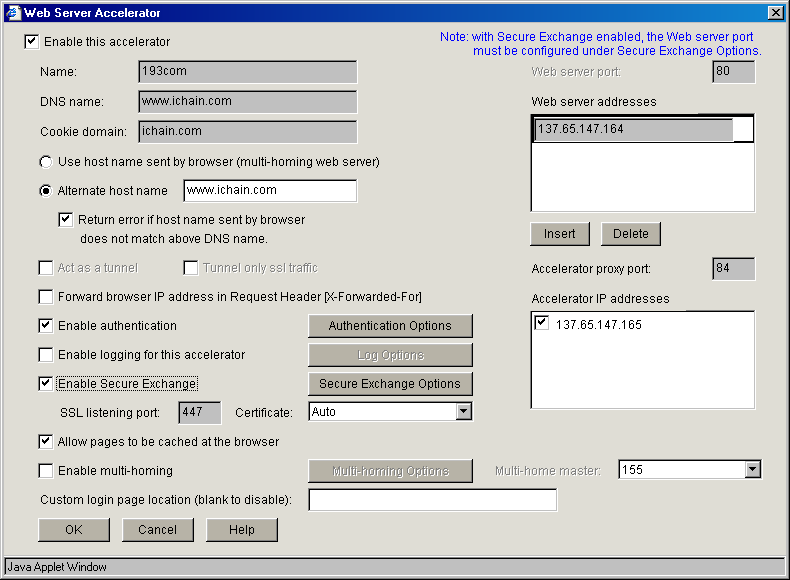
The Web Server Accelerator dialog box lets you create Web server accelerator services for handling requests to Web servers.
Enable This Accelerator: Specifies whether to enable the defined Web server accelerator after you have configured it. The default is Enabled.
Name: Each Web server accelerator service requires a name you create. For example, you can select a name that indicates which Web server is being serviced by the appliance, or alternately, a set of browsers configured to access the Web server accelerator as a proxy server. A valid name consists of a DOS-style, eight-character name with no special characters or spaces.
If logging is enabled, the appliance uses the Web server accelerator name as the directory name that the log files for the Web server accelerator are kept in.
DNS Name: The contents of this field depend on the type of accelerator you are using.
If you are accelerating multiple Web servers for multiple Web sites on the same IP address, you must create a Web server accelerator definition for each DNS name that is used in browser requests. This name must exactly match one of the names in the requests. If your infrastructure supports multi-homing, refer to Section 4.7, Multi-Homing, Path-Based Multi-Homing, and Path-Based Multi-Homing Example for further information.
If you are accelerating multiple Web servers for a single Web site and plan to use path-based multi-homing, you must use the same DNS name in every accelerator definition.
NOTE:If you are changing the DNS name on an accelerator which has authentication enabled, the existing cookie domain might not be valid with the new DNS name if the DNS name is not a subdomain of the cookie domain (resulting in the browser displaying a 403 Forbidden Error message). You can check the cookie domain at Authentication Options > Cookie Domain.
Cookie Domain: In Configure > Web Server > Modify > Authentication Options, there is a Cookie Domain field. Single authentication across two accelerators within the same iChain Proxy Server is not possible when the Cookie Domain is different on each accelerator. The Cookie Domain field can be used to allow single authentication across multiple accelerators where the cookie domain by default would be different for each accelerator. For example, if Accelerator One has a DNS name of www.support.novell.com and Accelerator Two has a DNS name of www.developernet.novell.com, the cookie domains would be support.novell.com for Accelerator One and developernet.novell.com for Accelerator Two. The cookie domains are different for each accelerator, so users are prompted for authentication when accessing Accelerator Two, even if they have already authenticated to Accelerator One. If the cookie domain is changed to novell.com on each accelerator, then users do not need to authenticate again when accessing Accelerator Two if they have already authenticated through Accelerator One. This is not possible if one of the DNS names ends with acme.com and the other DNS name ends with novell.com. Both accelerators need to have a common subdomain for this to work.
NOTE:A cookie is specific to a single authentication profile, so even though the cookie domains are the same, the cookie set by the Accelerator One is not valid for the Accelerator Two if you use different authentication profiles. See Add Authentication Profiles Dialog Box and Section 19.5.3, Using Authentication Profiles for more information about authentication profiles.
Use Host Name Sent by Browser (Multi-homing Web Server): Selecting this option preserves the host name in the HTTP header exactly as it came in the browser request.
Alternate Host Name: Selecting this option causes the specified string to be substituted for the host name in the HTTP header before the request is forwarded to the Web server.
Return Error if Host Name Sent by Browser Does Not Match above DNS Name: Selecting this option causes iChain Proxy Services to match the host name in the DNS header that came from the browser against the DNS name specified in this accelerator definition. If the names don't match, the request is not forwarded to the Web server. Instead, iChain Proxy Services returns an error to the requesting browser.
Act As a Tunnel: Normally an accelerator service processes HTTP requests in order to fill them. However, it is not unusual that some of the traffic coming through the appliance is not HTTP-based.
Web servers often handle SSL connections, and less frequently they might need to let Telnet, FTP, chat, or other kinds of traffic through without attempting to process it.
The Act as a Tunnel option lets you create one or more accelerator services for the specific purpose of tunneling non-HTTP traffic through the appliance to the origin Web server. When the option is selected, the accelerator sets up a tunnel for all incoming traffic.
When you select the Act as a Tunnel option, you have the additional option of having the accelerator service tunnel only SSL traffic.
Tunnel Only SSL Traffic: If you decide to have the accelerator act as a tunnel, you can elect to have it tunnel only SSL traffic. The service then verifies that the address and port being accessed are actually an SSL Web site. If verification fails, the service tears down the connection.
NOTE:The SSL port number for the SSL tunnel is specified via the Accelerator proxy port and not the SSL listening port.
Forward Browser IP address in Request Header [X-Forwarded-For]: X-Forwarded-For headers are used to pass browser ID information along with browser request packets. If the headers are included, Web servers can determine the origin of browser requests they receive. If the headers are not included, browser requests have anonymity.
Selecting the X-Forwarded-For option causes the appliance to either add information to an existing X-Forwarded-For or Forwarded-For header, or to create a header if one doesn't already exist.
Leaving the option deselected causes the appliance to remove X-Forwarded-For headers from any Web accelerator requests passing through the appliance.
Deciding whether to select the option requires that you weigh the desires of browser users to remain anonymous against the desires of Web server owners (e-commerce sites, for example) to collect data about who is accessing their site.
Enable Authentication: Selecting this option causes the appliance to require authentication of users wanting to use its Web server accelerator services. Clicking Authentication Options displays the Add Authentication Profiles dialog box.
Enable Logging for This Accelerator: Causes log files to be kept for this Web server accelerator. Clicking Log Options displays the Log Options dialog box.
Enable Secure Exchange: Selecting this option allows SSL to be used for HTTP requests between the client and the iChain box, and optionally between the iChain box and Web servers. The default is Disabled. Clicking Secure Exchange Options displays the Secure Exchange Options dialog box.
This option must be enabled to use Basic Authentication. See Section 6.2, Enabling Authentication Through the HTTP Authorization Header.
SSL Listening Port: Specifies the port to be used for Secure Exchange communication.
IMPORTANT:iChain Proxy Services requires that each service (including HTTPS) use a unique IP address and port combination. The default HTTPS port is 443. Attempts to enable HTTPS for more than one service on the same IP address and port results in a TCP bind error.
Certificate: This drop-down list displays certificates you have stored on your appliance. System-generated certificates do not appear in the list.
Use this field after you have stored a certificate you created specifically for the Web server accelerator you are creating. This prevents browsers from receiving certificate confirmation messages each time they access the appliance. For more information, see Using iChain to Manage Certificates.
Allow Pages to Be Cached at the Browser: With this option selected, all pages are marked cacheable on the browser. If this option is not selected, all pages are marked non-cacheable on the browser.
Enable Path-Based Multi-Homing: This option is enabled only when you have created another accelerator definition and have not created a standard multi-homing relationship between previously defined accelerators on the iChain Proxy Services appliance. In other words, you don't have multiple accelerators sharing the same accelerator IP address and port.
Multi-homing lets you configure the system so that a multi-homing master accelerator fills general requests from a site's main Web server and routes specific requests to specialized child accelerators that fill from other specialized Web servers. This option lets you create child accelerators for path-based multi-homing configurations.
When you enable path-based multi-homing for the accelerator you are defining, you must also click the Multi-homing Options button and specify settings that the multi-homing master can use to route traffic to the accelerator you are defining. For more information, see Multi-Homing Options Dialog Box.
If you have created multiple accelerators that can function as multi-homing masters, when you select a name in the Multi-home master drop-down list, the DNS Name, Accelerator Proxy Port, and Accelerator IP Addresses selections dynamically change to match the accelerator whose name you have selected. For more information regarding path-based multi-homing, see What Is Multi-Homing?.
Multi-Home Master: This drop-down list contains the names of accelerators you have defined that can function as multi-homing masters, meaning they are not configured as child accelerators to other multi-homing masters.
Custom Login Page Location (blank to disable): The field in the Web Server Accelerator dialog box for the custom login page is populated with the directory from sys:etc\proxy\data, where the login pages can be found. If a user enters NIKE in this field, the user is specifying that the custom login/logout pages are found in sys:etc\proxy\data\nike.
Web Server Port: The port number that the origin Web server is listening on for incoming connections. The default for HTTP is 80 (1 - 65535).
Web Server Addresses: The IP address or local DNS name of each Web server from which the appliance fills the cache for this Web server accelerator. The appliance must be able to fill all requests through any of these names or addresses unless path-based multi-homing is being used.
Accelerator Proxy Port: The port number that the proxy server is listening on for incoming connections. The default for HTTP is 80 (1 - 65535).
Accelerator IP Addresses: For normal accelerator situations, non-path-based multi-homing configurations, and accelerators configured as multi-homing masters, this is the appliance's IP addresses to which DNS resolves the Web server's (or Web site's) DNS name and on which the Web server accelerator listens for incoming connections from the Internet.
For child accelerators in path-based multi-homing configurations, this lists the IP address or addresses to which the multi-homing master forwards browser requests that match the specified path rule.
Log Options Dialog Box
Path: Configure > Web Server Accelerator > Insert (Modify) > Log Options
Figure 19-25 Log Options Dialog Box
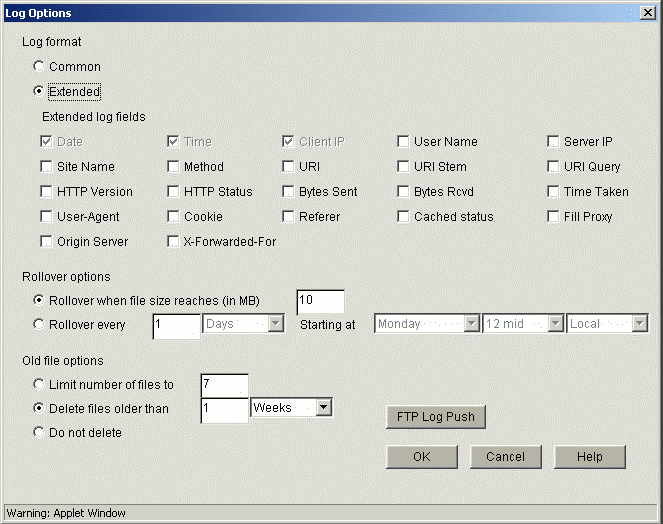
This dialog box contains numerous settings for logging the operations and errors of the iChain Proxy Server.
Common: If this option is selected, only three parameters (Date, Time, and Client IP) are enabled. No others are selectable.
Extended: If this option is selected, all of the Extended log fields are enabled. The Date, Time, and Client IP options are selected by default and cannot be deselected.
Rollover When File Size Reaches (in MB): If this option is selected, the log file rolls over (empties and starts writing from the beginning) after the file reaches the size specified in the edit field.
Rollover Every: If this option is selected, the log file rolls over automatically at a specified time interval or starting at a certain day.
Limit Number of Files To: If this option is selected, the number of old log files kept on the server is limited to the number entered in the edit field.
Delete Files Older Than: If this option is selected, old log files are deleted on the time interval specified.
Do Not Delete: If this option is selected, none of the log files are deleted.
FTP Log Push Button: Launches the FTP Log Push Configuration dialog box.
FTP Log Push Configuration Dialog Box
Path: Configure > Web Server Accelerator > Insert (Modify) > Log Options > FTP Log Push
Figure 19-26 Log Push Configuration Dialog Box
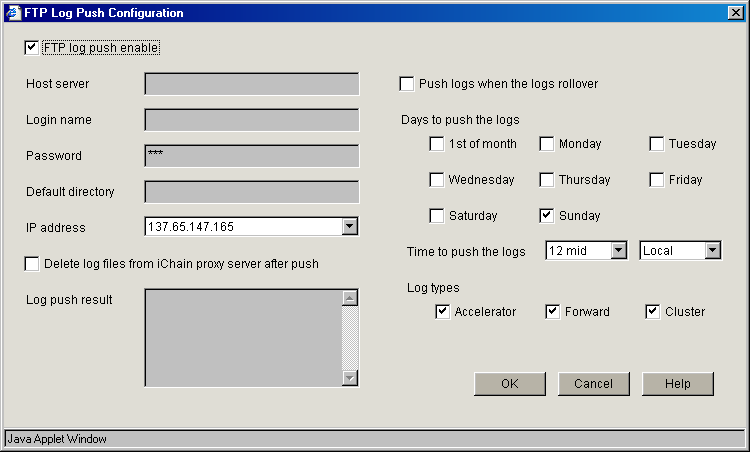
This dialog box enables you to set FTP log push options.
FTP Log Push Enable: If this option is selected, FTP log push is enabled.
Host Server: The name of the host server where the logs are pushed.
Login Name: The user name on the host server to log in as. This user must have appropriate rights to be able to push logs to the server.
Password: The password for the user on the host server.
Default Directory: The directory on the host server where the logs are pushed.
IP Address: The IP address of the host server.
Delete Log Files from iChain Proxy Server after Push: If this option is selected, the logs are deleted from the iChain Proxy Server after they have been pushed to the specified host server.
Log Push Result: The result of the log push.
Push Logs When the Logs Rollover: If this option is selected, the logs are automatically pushed to the host server when they roll over.
Days to Push the Logs: The Logs are pushed to the host server every day that has been selected.
Time to Push the Logs: The logs are pushed to the host server starting at the time specified by these two fields.
Log Types: Select each type of log to push to the host server.
Secure Exchange Options Dialog Box
Path: Configure > Web Server Accelerator > Insert (Modify) > Secure Exchange Options
Figure 19-27 Secure Exchange Options Dialog Box
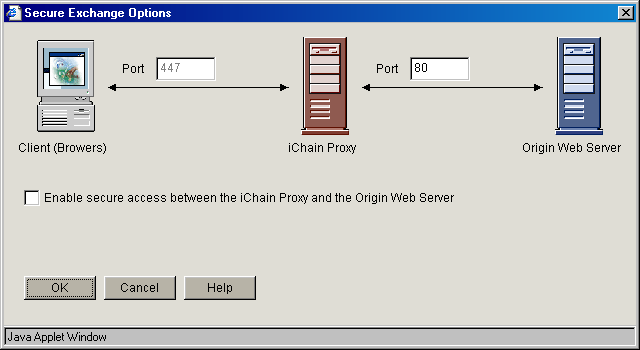
This dialog box provides additional Secure Exchange options.
NOTE:When Secure Exchange is enabled, the Web server port must be configured under Secure Exchange Options.
Port (Client to Proxy): Specifies the port to be used for communication between the client (browser) and the proxy server. The default is port 443.
Port (Proxy to Web Server): Specifies the port to be used for communication between the proxy server and the origin Web server. The default is port 80. When Secure Exchange is enabled, this port must be configured here and not at the Web Server Accelerator dialog.
Enable secure access between the iChain Proxy and the Origin Web Server: If this option is selected, the connection between the proxy server and the origin Web server is secured.
Multi-Homing Options Dialog Box
Path: Configure > Web Server Accelerator > Insert > Enable Multi-homing > Multi-homing Options
Figure 19-28 Multi-homing Options Dialog Box
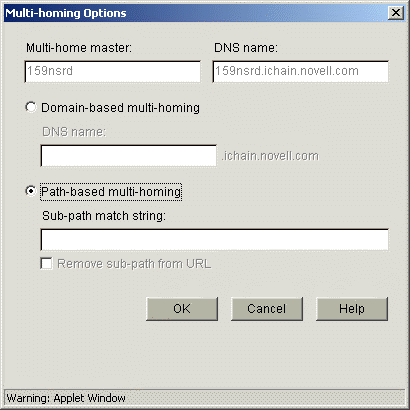
This dialog box lets you specify a string that, if present in the browser request, causes the multi-homing master accelerator to route the request to the child accelerator being defined.
The string match can occur immediately following the DNS name (the Starts With option).
Sub-Path Match String: The string the multi-homing master compares against the browser request. If the string is not found, the multi-homing master accelerator attempts to fill the request through the Web server addresses in its accelerator definition. If the string is found, the multi-homing master accelerator routes the request to the accelerator with the matching string.
Remove Sub-Path from URL: Select this option if the path string doesn't actually appear at the root of the Web server. If this option is selected, the string is stripped from the request before the request is sent to the Web server. This probably indicates that the object is at the root of the Web server. If this option is not selected, the matched string is retained in the request sent to the Web server.
If you enable this option, JavaScript might not function properly. JavaScript can obscure the URL data that iChain needs to access and modify in order to direct requests to backend servers. Because an absolute path reference can occur anywhere in JavaScript, the iChain parser does not parse through JavaScript.
We recommend that you do not use JavaScript applications with the iChain path-based multi-homing services. All other types of iChain accelerators should function correctly.
19.5.2 Add Authentication Profiles Dialog Box
Path: Configure > Web Server Accelerator > Insert or Modify > Enable Authentication > Authentication Options
Figure 19-29 Add Authentication Profiles Dialog Box
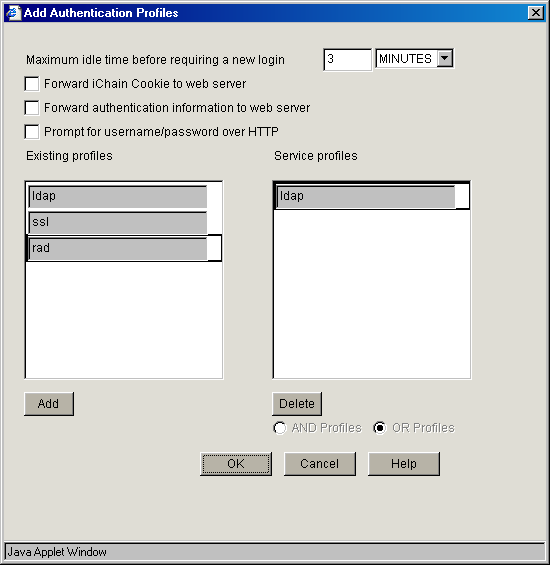
The Add Authentication Profiles dialog box lets you select one authentication profile to authenticate the users of the proxy service from which you accessed this dialog box.
The Existing Profiles list shows all the authentication profiles you have created. See Authentication Dialog Box. The Service Profiles list contains the profile that is active for the proxy service from which you accessed the Add Authentication Profiles dialog box.
Maximum Idle Time Before Requiring a New Login: The period of browser inactivity allowed before the proxy server requests a new login.
Forward iChain Cookie to Web Server: If this option is selected, the iChain cookie is sent to the Web server along with the other data being sent.
Forward Authentication Information to Web Server: If this option is selected, the username and password are sent to the Web server. If you have created OLAC parameters for ICHAIN_UID or ICHAIN_PWD, iChain ignores this option and always sends a basic authentication header to the Web server. For more information about OLAC parameters, see Section 13.2, Using OLAC Custom Header Variables.
Prompt for Username/Password over HTTP: If this option is selected, authentication is done over unencrypted HTTP instead of HTTPS.
Existing Profiles: A list of the authentication profiles you create in Cache > Authentication. For more information, see Authentication Page.
Service Profiles: The authentication profile that is active for the proxy service from which you accessed the Add Authentication Profiles dialog box. List content depends on whether And Profiles or Or Profiles is selected. You add a profile to the list by clicking a profile in the Existing Profiles list, then clicking Add. You remove a profile from this list using the Delete button.
AND Profiles: If this option is selected, the profiles in the Service profiles list are used in conjunction with each other to authenticate to users accessing the Web servers specified by this accelerator.
OR Profiles: If this button is selected, either one of the profiles in the Service profiles list are used to authenticate the users accessing the Web servers specified by this accelerator.
19.5.3 Using Authentication Profiles
There are three classes of authentication profiles:
-
LDAP
-
RADIUS
-
Mutual
You cannot have two or more authentication profiles from the same class in combination. If two or more authentication profiles are provided in an “AND” condition, only one user can be represented from a successful login.
Mutual and RADIUS authentications first try to obtain a username or distinguished name (DN), or some unique information about a user. This data is then used to either search for the specific user or bind to the specific user using an LDAP authentication profile. The end result is that iChain will have a full DN.
A user must be found so that OLAC variables can be obtained and ACLCheck can provide access control for the user. Only the ACLCheck authentication profile is used for OLAC and ACLCheck.
The following table shows the categories of authentication profiles that should be tested:
The following sections describe the various ways you can configure authentication profiles:
The Authentication Process with Mutual Authentication
The data is extracted from the certificate and used to locate a user in an LDAP tree. The LDAP tree that is selected comes from an LDAP authentication profile named ldapcert. If this authentication profile is not found, the LDAP server defined in the aclcheck profile is used. The LDAP authentication profile must have a user and password with rights to read and verify the information within the mutual certificate.
When a mutual authentication profile is only used to authenticate a user, a password is not provided. The username is extracted from searches that are performed with the certificate data and the mapping rules. This means that the password field value is empty if passed to a back-end Web server.
The Authentication Process with RADIUS Authentication
Only a username and token value are needed to log in to a RADIUS server. The LDAP tree that is selected comes from an LDAP authentication profile named ldaprad. If this authentication profile is not found, the LDAP server defined in the aclf profile is used. The LDAP authentication profile needs to have a user and password that has rights to read and verify the username provided in the form. With a properly configured Novell RADIUS server, the full DN is returned with a successful login. This full DN represents the user.
The LDAP password is optional. If a password is provided, the input username and LDAP password are used in a bind () call against the selected LDAP authentication profile. If successful, the user is authenticated. If it is not successful, the user must try again. If the password is not provided, a search is made on the selected LDAP tree to locate the user.
Using LDAP AND Mutual Over HTTP
The user should be prompted for a certificate when a restricted or secure page is hit. The mutual screen is displayed first, followed by the LDAP login screen. Both username values must be the same or the authentication fails.
Using LDAP AND Mutual Over HTTPS
The user should be prompted for a certificate upon initial connection to an accelerator. If required, this could be changed when a restricted or secure page is hit. The LDAP login screen comes up when a restricted or secure page is hit. Both username values must be the same or the authentication fails.
Using LDAP OR Mutual, RADIUS OR Mutual
This configuration raises issues when the user authenticates with mutual authentication and a password is not defined that can be passed to origin Web servers.
Using RADIUS AND Mutual
This configuration is similar to LDAP AND Mutual with the exception that the LDAP password is optional with a RADIUS profile. If a password is provided, then an LDAP bind takes place. The Mutual authentication can use the ldapcert authentication profile and the RADIUS authentication can use the ldaprad authentication profile.
Using LDAP AND RADIUS
This combination forces the user to input the LDAP password. Only one authentication page needs to be presented to the user. The current RADIUS login page lists the LDAP password as optional. The administrator is responsible for configuring it correctly.
Using LDAP OR RADIUS
This combination should give the user the RADIUS login page. The user can either input the username with the token or the username with the LDAP password (either one works). After a RADIUS authentication, the LDAP profile in the combination is used to locate the user within the tree. If the user is not found, the authentication fails.
Using LDAP AND RADIUS AND Mutual
This combination is similar to RADIUS AND Mutual. When the user is located, the LDAP profile is used to validate that the user exists instead of the default aclcheck profile. The main difference is that the LDAP password is required and an LDAP bind takes place.
Using LDAP OR RADIUS OR Mutual
This combination is similar to RADIUS OR Mutual, where once the user is located, the LDAP profile is used to validate that the user exists instead of the default aclcheck profile. The main difference is that the LDAP password is required and an LDAP bind takes place.
Setting Timeouts and Pool Limits for LDAP Profiles
LDAP timeouts and pool limits cannot be set from the Web application; they must be set from the command line. The default limits work in most environments. You can configure the following:
-
Bind Timeout: By default, a bind request can take up to 10 seconds before it times out and returns an error.
-
Search Timeout: By default, a search query can take up to 10 seconds before it times out and returns either partial results or an error.
-
Pool Size: By default, an LDAP server can have 30 open handles between iChain and each LDAP server in the pool. If you have a very busy iChain server and your users are having trouble authenticating or performing LDAP searches, you might want to increase this value. For more information on how to discover whether you need more pool handles, see Diagnosing the Need for More Pool Handles.
These options use the following syntax:
SET authentication <name> ldap <option>=<value>
Replace <name> with the name of an LDAP profile. Replace <option> and <value> with one of the following:
Diagnosing the Need for More Pool Handles
The <n> parameter in the poolsize option specifies the number of handles that each LDAP server in your profile can have. If you have three LDAP servers in a profile and specify poolsize=60, the pool actually has 180 handles for search and bind requests. The search handle gets a bind with the profile user and password, and the bind handle gets a bind with the user identity for that session.
As long as you have two or more LDAP servers in each profile (three is recommended), the default value should be enough. Having only one LDAP server in a profile is not a recommended configuration. Many of the changes in iChain 2.3 SP5 were to improve the failover and load balancing of the LDAP servers. If you use only one LDAP server, iChain has a single point of failure.
If you have only one LDAP server in your profile, 30 handles in the pool might not be enough, especially if you have a busy site. Most authentication requests go through a throttle queue, which is limited to 30 concurrent requests. However, mutual authentication and basic auth authentications do not because of the nature of the protocol. These types of authentications could saturate the pool if the machine is under heavy load. Select one or both of the following methods to determine if your machine is experiencing this problem:
Statistical Counter View
To view whether the pool has been saturated, do the following:
-
At the proxy console screen, select Display LDAP Pool Status.
-
Analyze the data on the new screen. This data should look similar to the following:
[ldap] - Some servers down!
   Username: cn=admin,o=novell - Password is valid
   SIMPLE Bind - port 389
   Servers: 10.10.164.176 10.10.167.176(Down) 10.10.164.175
   Pending LDAP Calls: 0
   Counts: Down=5 Timeout=0 Overflow=0
-
Check to see if your data has a Counts line.
The Counts line only appears when there are problems accessing the LDAP servers.The counters appear when the issues start happening, and they cannot be reset.
-
Analyze the counters in the Counts line.
Down: Indicates the number of times an LDAP server was detected down in the pool.
Timeout: Indicates the number of times the LDAP server did not respond before the timeout limit was reached.
Overflow: Indicates the number of times a handle was requested but not obtained.
-
If the Overflow counter is increasing, you need to increase the number of pool handles.
Dynamic View
To view the pool problem as it is happening, do the following:
-
At the proxy console screen, select Debug Options.
-
Select LDAP Trace Options.
-
Change the trace level to 1.
-
At the proxy console screen, select LDAP Pool Messages.
-
View the trace messages looking for BH (NONE FOUND) and SH (NONE FOUND) messages. The messages have the following format:
<application name>:(poolname-<address>): Get BH (NONE FOUND) SH(NONE FOUND)
-
If you find these messages, you need to increase the number of pool handles.
19.5.4 LDAP Search Query Authentication
There are two LDAP authentication methods for locating a user candidate for login. These methods are very simple to administer and provide common functionality for authentication. The first method builds a list of DN values given a single naming attribute value and a list of contexts. Each of the DN values are tried along with a password using the LDAP bind() operation. The second method performs a search on a single attribute value along with a list of subpaths to search on. If a single user is found, the password is checked against that user using the LDAP bind() operation.
A new feature in iChain 2.3 allows the administrator to set up a search query on more than one single attribute. This feature still searches through a list of subpaths and expects that a single record (user) matches the search criteria. You must know how to express an LDAP search query. See RFC 2254, “The String Representation of LDAP Search Filters,” if you are looking for specifics about building LDAP search strings.
Simple Query Example
The default value for the LDAP search query submits the same query that would be set up for a single attribute search on the cn attribute. This results in a default search query of (&(objectclass=person)(cn=%username%)).
This query has three sections. The first section is the AND logical operator noted as an ampersand (&) value. In LDAP searches, the operators are placed in a prefix notation. In this example, the remaining two sections must return a TRUE result in order for a record to match the search query. The second section of (objectclass=person) is a way to narrow down the search to just person records. Objectclass is an attribute name and person is a specific value.
The last section of (cn=%username%) consists of a search attribute of cn and the value section that expects input from the login form. Any POST variable name can be used. The leading and training % character is used to identify the POST variables that are expected for the search query. In this example, a POST value of username=sam will substitute the value of sam for %username% in the search query.
Figure 19-30 displays the default LDAP search login method:
Figure 19-30 Default LDAP Search Login Method
Multiple Attribute Query
In this example, the user inputs a name that matches either the cn attribute or the mail attribute. The search query is:
(&(objectclass=person)(|(cn=%username%)(mail=%username%)))
If the POST value submitted during a login is username=sam@company.com&password=test, then the LDAP search query is:
(& (objectclass=person)(|(cn=sam)(mail=sam@company.com)))
The %username variables are replaced with the username POST variables that come from the login page. This provides more flexibility in defining how to locate a specific user in the tree.
At a more complex level, if you want to require the user to match both the cn and mail attribute values of a unique user for all authentication requests, you would configure an LDAP query like the following:
(&(objectclass=person)(cn = %username%)(mail=%emailValue%))
The login page sends a POST with the emailValue tag as well as the username tag. In concept, the login page can have additional POST variables that iChain uses for building the LDAP query. This is a simple search-and-replace functionality. Any %tagnames% that do not have a value or are not in the POST request are replaced with no value (cn=).
For a final example, consider the following LDAP search query:(&(objectclass=person)( | (cn=%username)(ssn=%ssn%)(employeeID=%workID%)))
The login page should prompt the user for a username, social security number, and work ID where one of the three values must match the data within a user record.
This flexibility of a complex search query has a price. You must be well-versed in building LDAP queries. The basics of LDAP search queries are not difficult to learn. Complex search queries might require you to add an index so that searching does not compare each of the records in a subtree. Without an index, some searches might take a very long time to complete.
The search query must be well-formed. A validating LDAP query parser is not part of checking the search query input. If you do not place enough matching parentheses, the LDAP server might appear to be down.
19.5.5 Authentication Page
Path: Configure > Authentication
Figure 19-31 Authentication Page
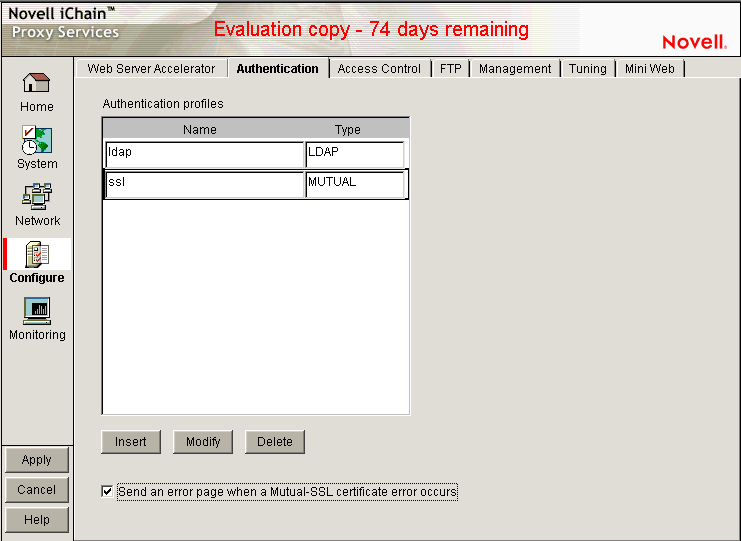
The Authentication page lets you enable the appliance to authenticate users to an LDAP or RADIUS authentication source.
Authentication Profiles List: Lists the authentication profiles you have configured on the appliance using the Authentication dialog box.
Send an Error Page when a Mutual-SSL Certificate Error Occurs: When this option is selected, an error message is sent whenever a Mutual-SSL certificate error occurs during authentication operations.
Authentication Dialog Box
Path: Configure > Authentication > Insert under the Authentication Profiles list
Figure 19-32 Authentication Dialog Box
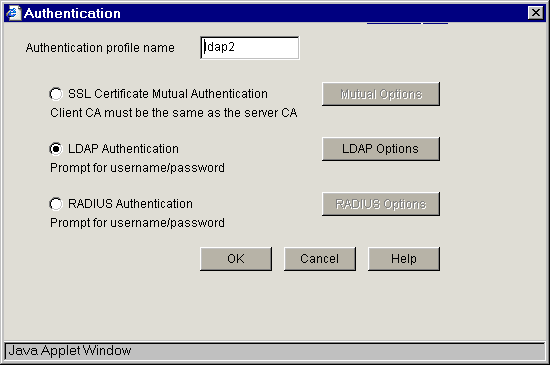
The Authentication dialog box lets you assign an authentication profile name and specify either LDAP or RADIUS as the authentication source.
IMPORTANT:iChain Proxy Services doesn't recognize case differences in profile names. MyProfile and myprofile are, effectively, the same profile name.
Also, iChain Proxy Services partially overwrites and concatenates previously created profiles without warning if a duplicate name is used. Therefore, if you create a profile named MyProfile and later create another profile named myprofile, iChain Proxy Services removes the first name, concatenates parts of the first profile with the second, and uses the second name.
To avoid these problems, ensure that each profile has a unique name.
After selecting the authentication source, you must configure the source by clicking its respective Options button.
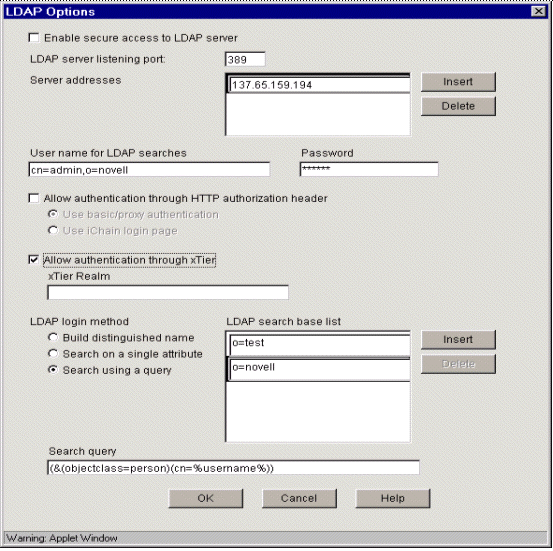
LDAP Options Dialog Box
Path: Configure > Authentication > Insert > LDAP Authentication > LDAP Options
Figure 19-33 LDAP Options Dialog Box
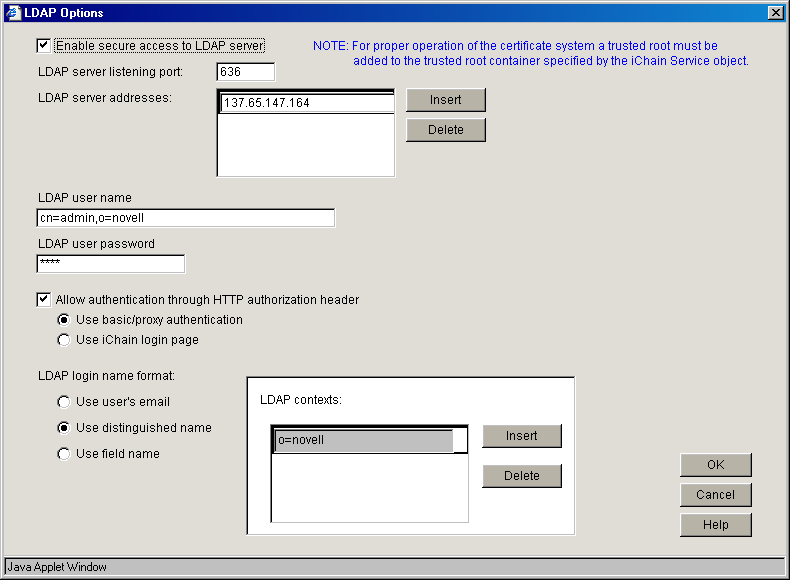
Use the LDAP Options dialog box to configure the appliance so users can authenticate through an LDAP database.
LDAP Server Addresses: The IP addresses of the LDAP servers. Specifying multiple LDAP servers allows for failover LDAP servers. If the first LDAP server cannot be accessed, the next LDAP server on the list is tried, and so on down the list in the order specified. For more information, see Section B.0, Using LDAP Server Load Balancing and Failover.
LDAP Server Listening Port: The port number the LDAP server is listening on for requests from LDAP clients. The default is 389 for normal access. Use 636 for secure access.
Enable Secure Access to LDAP Server: Selecting this option causes the data sent between the LDAP client and the LDAP server to be sent using SSL.
Username: Specify the username to use for accessing the LDAP server.
Password: Specify the password to use for accessing the LDAP server.
LDAP Login Name Format Dialog Box
The contents of this box change depending on the option selected.
Use User's E-Mail: Select this option to have users log in using their e-mail name field in the LDAP database. You must provide one or more contexts in which the LDAP server searches for the e-mail name.
This option is somewhat redundant with Use Field Name because the e-mail name is simply an LDAP field name. E-mail is offered separately because it is used so often.
LDAP Search Base: Click Insert to specify the context of one or more LDAP containers from which the search for the e-mail name should begin.
Use Distinguished Name: Select this option to allow users to authenticate using their LDAP usernames. Users can use either their fully distinguished (full LDAP contexts) LDAP usernames, or you can provide a list of LDAP contexts so users only need to type their usernames.
LDAP Contexts: Contains specific contexts in which the LDAP server looks for usernames. This provides a shortcut to authentication of users by allowing them to type only their LDAP usernames.
The appliance searches each context until it either locates the name or exhausts the search. If duplicate names exist in different contexts, the appliance searches until the correct name/password match is found.
Use Field Name: Select this option to require that users enter a specific LDAP field name.
Field Name: The LDAP field name (such as User ID) through which users can authenticate.
LDAP Search Base: Click Insert to specify the context of one or more LDAP containers. The appliance performs a subtree search in all containers in the list and in their subcontainers.
RADIUS Authentication Dialog Box
Path: Configure > Authentication > Insert > RADIUS Authentication > RADIUS Options
Figure 19-34 RADIUS Options Dialog Box
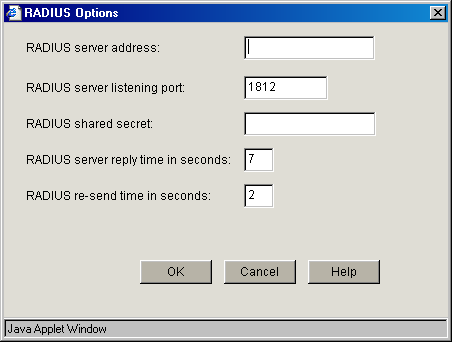
Use this dialog box to specify a RADIUS server the appliance can use for authentication.
NOTE:Port 1812 is the default RADIUS server port; however, the Novell RADIUS server defaults to port 1645. It is possible for a different default port to be specified when the Novell RADIUS server is loaded.
RADIUS Server Address: The IP address of the RADIUS server.
RADIUS Server Listening Port: The port number on which the RADIUS server listens for incoming authentication requests.
RADIUS Shared Secret: The string the RADIUS server uses to verify that the appliance can request authentication of users.
RADIUS Server Reply Time in Seconds: The total time the appliance waits for a response from the RADIUS server before authentication fails. The default is 7 seconds.
RADIUS Resend Time in Seconds: The interval in seconds between appliance requests to the RADIUS server. The default is two seconds. This means that the appliance could send three requests before the 7-second default limit expires and the authentication request fails.
Third-Party RADIUS Server Support
iChain supports RADIUS authentication via the RADIUS server supplied by Novell or a RADIUS server supplied by third-party vendors. The Novell RADIUS server uses Novell eDirectory as the underlying database for storing user objects.
If the Novell RADIUS server is running on the iChain authorization server, it has the ability to indicate the fully distinguished name of the user object that was authenticated via RADIUS. iChain must use the fully distinguished name of the user in order to perform ACL rights selecting when accessing a protected resource. A RADIUS server provided by a vendor other than Novell stores user objects in its own database.
iChain must be able to map this third-party name to a user object stored in eDirectory on the authorization server in order to determine if the user has rights to the protected resource he or she is attempting to access. This is done by performing an LDAP subtree search on the authorization server for the user name entered on the iChain login dialog box. In order to perform this search, two fields must be changed on the ACLCheck authentication profile.
A search base must be specified that identifies an eDirectory container that defines where in the tree to begin the search and the anonymous bind feature must be set to No. This is done by entering the following commands on the iChain Proxy Services console screen:
-
add authentication aclcheck ldap searchbase = container name
-
set authentication aclcheck ldap bindanonymous = no
-
apply
If there is already a value specified for the search base, the set command must be used instead of the add command, as shown below:
set authentication aclcheck ldap searchbase = container name
The container name can specify an eDirectory organization or an organizational unit that appears on the authorization server. For example:
add authentication aclcheck ldap searchbase = o=novell
The implication here is that an eDirectory user object must be created on the authorization server whose CN is the same as the RADIUS user name and it must appear hierarchically in the tree somewhere below the container specified by the search base.
Also verify that iChain has defined an LDAP server, user, and password. This is needed to perform the search base lookup.
For example:
>get authentication aclcheck ldap
authentication aclcheck ldap address = 10.252.3.5
authentication aclcheck ldap bindusername = cn=admin;o=novell
authentication aclcheck ldap bindpassword = password
If the above values are empty, they can be input at the iChain browser GUI > Configure > ACL page.
19.5.6 Access Control Page
Path: Configure > Access Control
Figure 19-35 Access Control Page
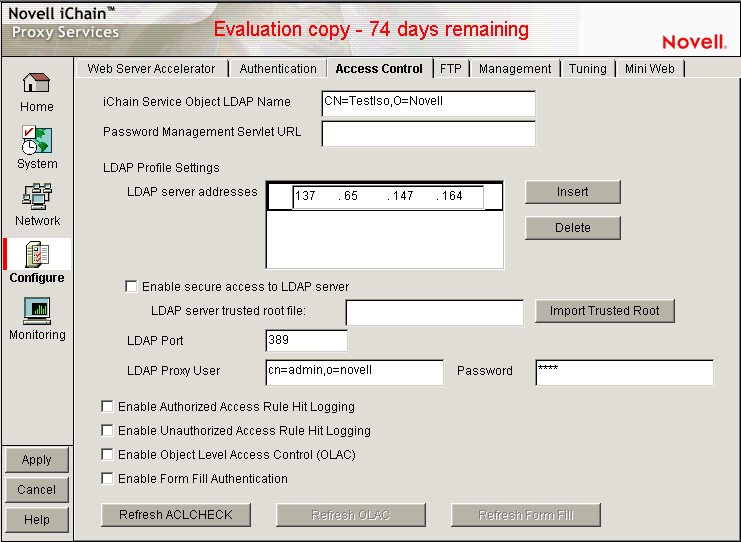
The Access Control page lets you define the parameters necessary to set up access control. This page includes the following fields:
iChain Service Object LDAP Name: Specifies the name of the iChain Service Object (ISO) containing parameter settings defining your iChain domain or infrastructure.
Password Management Servlet URL: Defines the URL of the password management servlet on the iChain Proxy Server. This servlet enables users within your iChain infrastructure to change their passwords. Use the full http URL. For example, http://ichain.provo.novell.com/servlet/iChainPasswordMgr where /servlet/ is the servlet directory of your servlet engine.
NOTE:Novell Technical Support does not support the password management servlets used in the iChain configuration. These servlets are not developed by the iChain development team; therefore, no bugs related to these servlets will be fixed.
The ConsoleOne Password Policy TAB contains options for writing to the ISO object. This means that the password management servlet from forge.novell.com or a custom developed servlet can read password properties from an iChain object. However, Novell Technical Services does not support servlets from forge.novell.com. For more information, see TID 407040.
LDAP Server Addresses: Specifies the IP addresses of the iChain LDAP access control servers. Specifying multiple LDAP servers allows for load-balancing of the LDAP servers. Requests to the LDAP servers for access control are done in a round-robin fashion, meaning, the requests are distributed among multiple LDAP servers to balance the load. For more information, see Section B.0, Using LDAP Server Load Balancing and Failover.
Enable Secure Access to LDAP Server: Selecting this option causes the data sent between the LDAP client and the LDAP server to be sent using SSL.
LDAP Server Trusted Root File: The path on the appliance to a trusted root file that contains the Certificate Authority (CA) used by the LDAP server in the profile you are creating. The system fills this field with information for the trusted root file you create using the Import Trusted Root button. If the LDAP server uses a CA for which you have previously created a trusted root file, you can manually type the path and filename in this field. For example, you might be using the same LDAP server for multiple authentication profiles.
Import Trusted Root: Clicking this button opens the Import Trusted Root dialog box.
Import Trusted Root Dialog Box
Path: Configure > Access Control > Import Trusted Root
Figure 19-36 Import Trusted Root Dialog Box
The Import Trusted Root dialog box lets you create a trusted root file with a .der extension that contains information identifying the Certificate Authority used by the LDAP server.
To create a trusted root file:
-
In the Imported Filename field, type a path and filename for the trusted root file.
The filename can contain up to eight alphanumeric characters. The appliance automatically appends the .der extension if you don't include it.
IMPORTANT:Be sure you use a unique filename for each .der file. The appliance overwrites files without warning if you use duplicate filenames.
Remember that iChain Proxy Services is not case-sensitive, so MyCert.der and mycert.der are, effectively, the same filename.
The path must be a directory path that already exists. You cannot create directories on the appliance.
If you want to list your trusted root files later, use an FTP-accessible directory, such as sys:\etc\proxy\data, as the path. Otherwise, you won't be able to list the files. For a list of FTP-accessible directories, see Limitations of the Appliance's Mini FTP Server.
If you don't include a path with the filename, the proxy server creates the file at the root of the sys: volume. You cannot see the root of the sys: volume using FTP.
-
Export the Certificate Authority in .b64 format.
-
Using ConsoleOne, open the properties of the Tree Organizational CA.
-
Select Self Signed under the certificate tab in the Security Container.
-
Click Export.
Do not export the private key.
-
Select File in Base64 Format and then click Next.
-
Using a text editor on your configuration workstation, open the .b64 file for the Certificate Authority, select the file contents, then paste the contents to the Clipboard.
The content should be similar to the following example:
-----BEGIN CERTIFICATE-----MIIFOjCCBCKgAwIBAgIhAhwR+pxWWF78DPWCaZJz8K245MzcSvS0EwzRbBJwAgEKMA0GCSqGSIb3DQEBBQUAMDcxGjAYBgNVBAsTEU9yZ2FuaXphdGlvbmFsIENBMRkwFwYDVQQKExBKU0hPUlQtTlc2NS1UUkVFMB4XDTA0MDUzMTE0MDY0OFoXDTE0MDUzMBgwEAIBAAIIf/////////8BAQACBBH6nFaiTjBMAgECAgIA/wIBAAMNAID//////////////wMJAID/////////MBIwEAIBAAIIf/////////8BAf8wEjAQAgEAAgh//////////wEB/zANBgkqhkiG9w0BAQUFAAOCAQEAUo9ffBgSGaYYDA5s6nqXdPxAb9XTVMz14mUT0JPOKtFgzdKLxyzS9GZAZrNTIz5izgrrAI7NoG5aNciohoCpEroUBPFCrwzGowqaixug/82DSjxhxljrVWyY7RH24N3uLbtVmLTrlUj+b1wnx3+wPxpxLpxQR84nWwA5JtsNG+E6/MT64oUYPqSHvBmrcmSl3+X2+pbTxJB/S+Znh7NDiIGvwAgM+N2JaCfUYWKzHeio1PhHyaqqSugZiYQ6DPXLXg7QXU+zVNjTQJDFx6BPCrjFbUHGsyVdJUiqDVtyHupb6qDeGplzssp/C/nYY5wpPf0P5HGk8lKV8Uv20UX/fw==-----END CERTIFICATE-----
-
-
Return to the Import Trusted Root dialog box, then paste the clipboard contents into the Insert Trusted Root contents text box.
-
Click OK.
-
Apply the changes.
-
At the iChain command line interface, initiate Set Authentication refreshaclcheck=1 to renew LDAP connections.
LDAP Port: Specifies the port on which the LDAP server listens for access control requests. The default is 389 for normal access. Uses 636 for secure access.
LDAP Proxy User: Specifies the LDAP username for the iChain Proxy Server to use when making requests for access control information from the iChain LDAP access control server.
Password: Specifies the LDAP password for the iChain Proxy Server to use when making requests for access control information from the iChain LDAP access control server.
Enable Authorized Access Rule Hit Logging: Specifies whether to enable logging for authorized access rule hits. The default is Disabled.
Enable Unauthorized Access Rule Hit Logging: Specifies whether to enable logging for unauthorized access rule hits. The default is Disabled.
Enable Object Level Access Control: Specifies whether to enable object level access control.
IMPORTANT:When the access control profile is first generated, object level access control must be disabled. Apply the ACL profile, mark Enable, then click Apply.
Enable Form Fill Authentication: Specifies whether to enable single sign-on with login HTML forms from origin servers.
Refresh ACLCheck: Refreshes the ACLCheck parameter settings.
Refresh OLAC: If OLAC has been enabled, use Refresh to force an immediate reread of OLAC parameters.
Refresh Form Fill: Refreshes the connection to LDAP servers and Form Fill policy rules.
19.5.7 FTP Page
Path: Configure > FTP
Figure 19-37 FTP Page
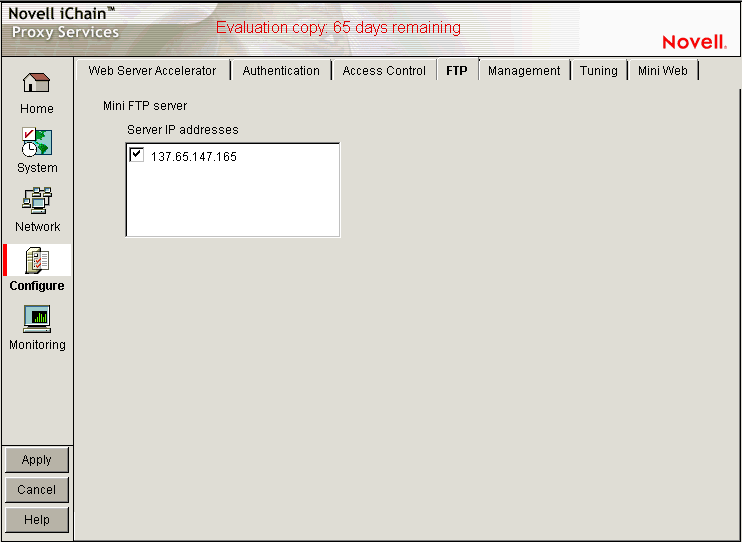
The FTP page lets you configure the appliance to provide an FTP listening address (Mini FTP Server) for appliance management.
Mini FTP Server: Select an address in the Server IP Addresses list to enable it for FTP listening. If an address is not selected, you cannot upload or download files using FTP.
19.5.8 Management Page
Path: Configure > Management
Figure 19-38 Management Page
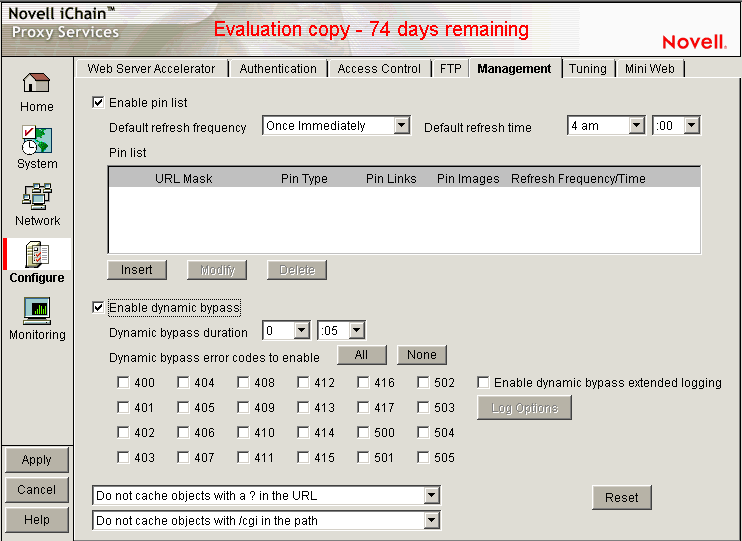
The Management page lets you identify objects that are either pinned (explicitly downloaded and retained in cache as long as possible) or bypassed (explicitly not cached when requested by users). It also lets you specify how pinned objects are stored on the appliance (pin type).
Enable Pin List: Select this option to activate pinning on the appliance. For information regarding what pin lists are and how they function, see The Pin List and Pin List Examples.
NOTE:Selecting this option affects only the pinning of objects on the appliance. It has no effect on whether objects are cached unless the pin type is set to Bypass.
Default Refresh Frequency: Lets you specify when the appliance checks to see if items should be added to or removed from the list of objects being pinned. At refresh time the appliance re-evaluates the objects in cache for the URL list and downloads those objects that have changed. For absolute URLs, objects in links are also evaluated down to the link level specified. Choices range from one time only to any arbitrary time interval.
Default Refresh Time: Lets you specify the time of day or the time interval when pinned objects are refreshed. To specify an interval, you must first select Timed Interval from the Default Refresh Frequency drop-down list.
The Pin List
The pin list lets you specify URL patterns for identifying objects on the Web. You configure each URL pattern in the list with specific handling instructions as explained below.
URL Mask: This can contain complete or partial URL patterns. A single URL mask might apply to a large set of URLs, or it might be so specific that only a single file on the Web matches it. For more information, see Pin List Examples.
Pin Type: This specifies whether and how the appliance will cache objects that match the URL mask.
-
Normal: iChain Proxy Services handles objects matching the mask in the same way it handles any other requested objects. In other words, objects are cached but not pinned.
-
Cache: iChain Proxy Services keeps the pinned objects in cache as long as possible, although they might be written to the appliance's hard disk.
-
Memory: iChain Proxy Services keeps the pinned objects in memory as long as possible, writes them to disk when memory gets too full, and places them back in memory as soon as they are requested by a user of the cache.
-
Bypass: iChain Proxy Services does not cache the objects. In other words, you can use this option to prevent objects from being cached.
Pin Links: Specifies how many link levels iChain Proxy Services follows the pin type rule you've established.
Pin Images: Used to pin image files that reside on a different host than the page requested.
Refresh Frequency/Time: Lets you specify a refresh frequency and time for the URL that is different from the default values shown above the pin list. After inserting the URL, click Modify to see the dialog box that lets you change these fields. Functionality is the same as described for the default refresh frequency fields.
Caching Based On URL Content
The two drop-down lists below the pin list let you specify object caching based on the following:
-
Whether URLs contain a question mark
-
Whether URLs have /cgi in the path
The Cache option lets you specify whether cachable objects that meet the criteria are always cached.
The Cache option is sometimes misinterpreted to imply that objects meeting the criteria are always cached. That is not the case. The proxy server appliance does not cache objects that Web server administrators have marked non-cachable.
By the same token, the Do Not Cache option is sometimes misinterpreted to imply that objects meeting the criteria are never cached. That is also not the case. Objects containing question marks and /cgi in the path might meet other criteria that cause them to be cached. This option only causes the proxy server to ignore question marks and /cgi in determining whether to cache objects.
Resetting the Defaults
Clicking the Reset button resets the two drop-down lists back to their default (do not cache) settings.
19.5.9 Tuning Page
Path: Configure > Tuning
Figure 19-39 Tuning Page
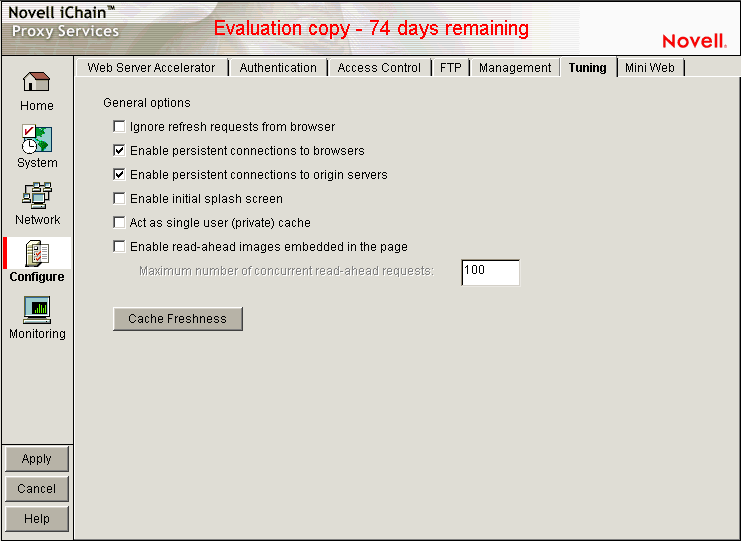
The Tuning page lets you restrict and enable functionality that affects all appliance operations. The implications for each option are explained below.
Ignore Refresh Requests from Browser: When a user clicks Refresh or Reload in the browser, the default system action is to send a new request to the Web server. Selecting this option causes refresh or reload requests to be filled from the cache until cache freshness parameters are met. See Cache Freshness Dialog Box.
Enable Persistent Connections to Browsers: If enabled, all connections from browsers to the appliance remain open. This makes the response time between the appliance and browsers faster.
Enable Persistent Connections to Origin Servers: If enabled, all connections from browsers to Web servers (through the appliance) remain open. This can cause some Web servers and their networks to crash, depending on the number of simultaneous connections they support.
Enable Initial Splash Screen: If enabled, browsers receive first-time and periodic notification that their requests are being processed by the appliance. The splash screen is customizable so that ISPs, for example, can advertise the fact that they are providing accelerated Web service. For information on customizing the splash screen, see Using FTP to Customize the Appliance Splash Screen. The splash screen is disabled (turned off) by default.
Act as a Single User (Private) Cache: If enabled, iChain Proxy Services caches objects that have been flagged for private caches only.
Enable Read-Ahead Images Embedded in the Page: If selected, iChain Proxy Services retrieves and caches objects that have been flagged Read-Ahead. You specify the maximum number of Read-Ahead objects the proxy server retrieves in the Maximum Number of Concurrent Read-Ahead Requests field.
Cache Freshness Dialog Box
Path: Configure > Tuning > Cache Freshness
Figure 19-40 Cache Freshness Dialog Box
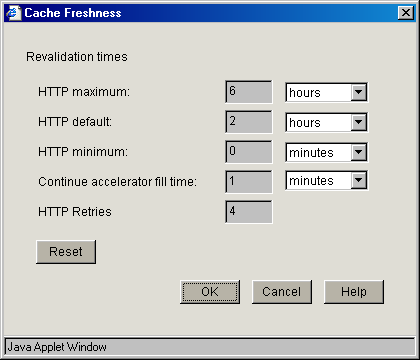
The Cache Freshness dialog box lets you set time values governing when iChain Proxy Services revalidates requested cached objects against those on their respective origin Web servers. If requested objects have changed, iChain Proxy Services re-caches them. Default field values are shown in Figure 19-40.
iChain Proxy Services does not automatically recache objects when they expire. Expired objects are revalidated (and recached if they have changed) only when requested by browsers and in accordance with the time values set in the Cache Freshness dialog box. For more information on the appliance's cache-freshness features, see Section 4.9, Cache Freshness.
HTTP Maximum: The maximum number of hours or days iChain Proxy Services serves HTTP data from cache before revalidating it against content on the origin Web server. No object is served from cache after this value expires without being revalidated.
This overrides a freshness or Time to Expire header value specified by the Webmaster if he or she specified a longer time.
You use this value to reduce the maximum time iChain Proxy Services waits before checking whether requested objects need to be refreshed.
HTTP Default: The value iChain Proxy Services uses to determine when to revalidate requested objects for which Webmasters have not specified a freshness or Time to Expire header value.
HTTP Minimum: The minimum number of hours or minutes iChain Proxy Services serves HTTP data from cache before revalidating it against content on the origin Web server. No requested object is revalidated sooner than specified by this value.
This overrides the freshness or Time to Expire header value specified by the Webmaster if he or she specified a shorter time.
You can use this value to increase the minimum time iChain Proxy Services waits before checking whether requested objects need to be refreshed. This parameter does not override No Cache or Must Revalidate directives from the origin Web server.
Continue Accelerator Fill Time: The number of minutes or hours that the appliance's Web acceleration services ignore browser request cancellations and continue downloading objects from the target Web server until the download is complete.
HTTP Retries: The number of retry requests to be issued.
19.5.10 Mini Web Page
Path: Configure > Mini Web (to see this page, click the upper-right corner of the Tuning page.)
Figure 19-41 Mini Web Page
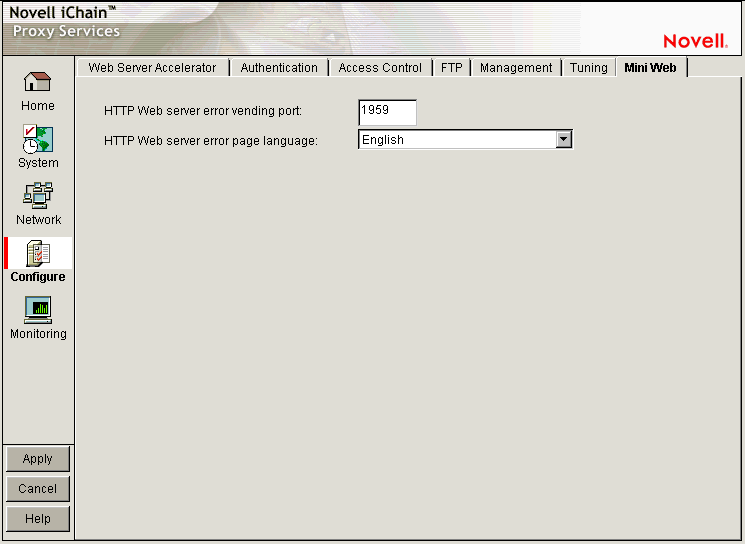
The Mini Web page lets you configure how appliance-generated error pages are vended to browsers.
HTTP Web Server Error Vending Port: The port the browser uses when requesting objects that are part of the error pages. Changing this value does not affect the port for appliance administration, which is fixed at 1959.
HTTP Web Server Error Page Language: From the drop-down list, you can select a language for appliance-generated error messages to browsers.