3.2 Installing Novell Identity Audit
The Identity Audit installation package installs everything you need to run Identity Audit: the Identity Audit application and communications bus, the database to store events and configuration information, the Web-based user interface, and the reporting server. There are two installation options, a simple installation that can be run as root, or a multi-step installation that uses root as little as possible.
3.2.1 Quick Installation (as root)
This simple installation must be run as root.
-
Log in as root to the server where you want to install Identity Audit.
-
Download or copy identity_audit_1.0_x86-64.tar.gz to a temporary directory.
-
Change to the temporary directory (if necessary).
-
Extract the install script from the file by using the following command:
tar xfz identity_audit_1.0_x86-64.tar.gz identity_audit_1.0_x86-64/setup
-
Run the root_install_all.sh script with root privileges.
identity_audit_1.0_x86-64/setup/root_install_all.sh identity_audit_1.0_x86-64.tar.gz
NOTE:You can log in as root and run the command above or use the sudo command to run the command.
-
Choose a language by entering a number.
The end user license agreement displays in the selected language.
-
Read the end user license and enter 1 or y if you agree to the terms and want to continue installation.
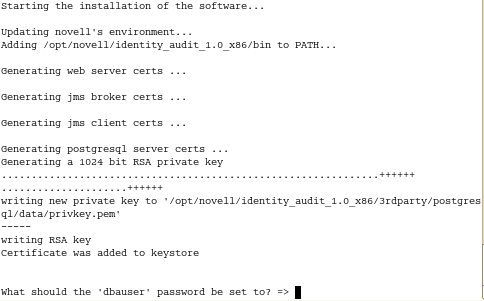
The installation begins. If the previously selected language is not available for the installer (for example, Polish), the installer continues in English.
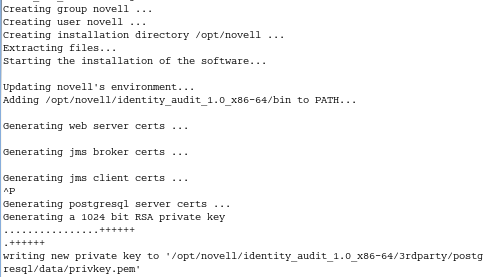
The novell user and novell group are created, if they do not already exist.
The novell user is created without a password. If you want to be able to log in as the novell user later (for example, to install patches), you can create a password for this user after the installation is completed.
-
Enter the password for database administrator (dbauser).
-
Confirm the password for database administrator (dbauser).
-
Enter the password for the admin user.
-
Confirm the password for the admin user.
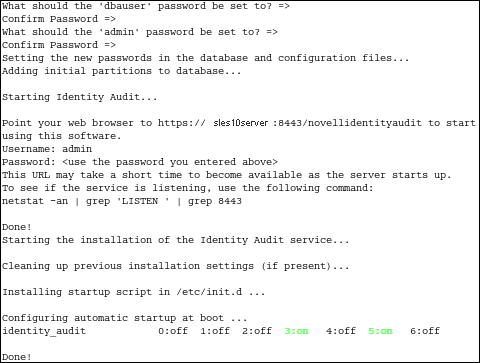
The dbauser credentials are used to create tables and partitions in the PostgreSQL database. Identity Audit is configured to start up with runlevels 3 and 5 (Multi-User Mode with boot-up in console or X-Windows mode).
After the Identity Audit service starts, you can log in to the URL (for example: https://10.10.10.10:8443/novellidentityaudit) specified in the installation output.The system starts processing internal audit events immediately, and it is fully functional after you configure event sources to send data to Identity Audit.
3.2.2 Non-root Installation
If organizational policy prohibits running the full installation process as root, the installation can be run in two steps. The first part of the installation procedure must be performed with root-level access, and the second part is performed as the Identity Audit administrative user (created during the first part).
-
Log in as root to the server where you want to install Identity Audit.
-
Download or copy identity_audit_1.0_x86-64.tar.gz to the /tmp directory.
-
(Conditional) If the novell user and novell group do not exist on the server:
-
Extract the script to create the novell user and novell group from the Identity Audit tar file. For example:
tar xfz identity_audit_1.0_x86-64.tar.gz identity_audit_1.0_x86-64/setup/root_create_novell_user.sh
-
As root, execute the script by using this command:
identity_audit_1.0_x86-64/setup/root_create_novell_user.sh
The novell user and novell group will own the installation and the running processes of Identity Audit.
-
-
Create a directory for Identity Audit. For example:
mkdir -p /opt/novell -
Set the directory to be owned by the novell user and novell group. For example:
chown -R novell:novell /opt/novell -
Log in as the novell user:
su novell
-
Extract the Identity Audit tar file to the directory you just created. For example:
cd /opt/novell tar xfz /tmp/identity_audit_1.0_x86-64.tar.gz -
Execute the installation script. For example:
/opt/novell/identity_audit_1.0_x86-64/setup/install.sh -
Choose a language by entering a number.
The end user license agreement displays in the selected language.
-
Read the end user license and enter 1 or y if you agree to the terms and want to continue installation.
The installation begins. If the previously selected language is not available for the installer (for example, Polish), the installer continues in English.
-
Enter the password for database administrator (dbauser).
-
Confirm the password for database administrator (dbauser).
-
Enter the password for the admin user.
-
Confirm the password for the admin user.
-
Log out and log back in as novell. This loads the PATH environment variable changes made by the install.sh script.
-
Execute the root_install_service.sh script to enable Identity Audit to start up as a service. This step requires root level access. For example:
sudo /opt/novell/identity_audit_1.0_x86-64/setup/root_install_service.sh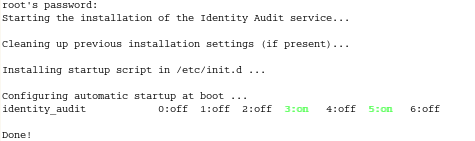
-
Enter the root password.
Identity Audit is configured to start up with runlevels 3 and 5 (Multi-User Mode with boot-up in console or X-Windows mode).
After the Identity Audit service starts, you can log in to the URL (for example: https://10.10.10.10:8443/novellidentityaudit) specified in the installation output.The system starts processing internal audit events immediately, and it is fully functional after you configure event sources to send data to Identity Audit.