6.2 Installing and Configuring the User Application WAR
NOTE:The installation program requires the Java 2 Platform Standard Edition Development Kit version 1.5. If you use an earlier or later version, the installation procedure does not successfully configure the User Application WAR file. The installation appears to succeed, but you encounter errors when trying to start the User Application.
-
Navigate to the directory containing your installation files.
-
Launch the the installer for your platform from the command line, using the JRockit Java environment:
Solaris
$ /opt/WL/bea/jrocket_150_11/bin/java -jar IdmUserApp.jar
Windows
C:\WL\bea\jrocket_150_11\bin\java -jar IdmUserApp.jar
When the installation program launches, you are prompted for the language.

-
Use the following information along with the instructions on each installation panel to complete the installation:
Installation Screen
Description
Novell Identity Manager
Select the language for the installation program. The default is English.
License Agreement
Read the License Agreement, then select .
Application Server Platform
Select for the application server.
Standard or Provisioning
: Select this option if you are installing the User Application Standard Edition.
: Select this option if you are installing the Roles Based Provisioning Module.
Data Migration
Accept the default (verify that is not selected).
WARNING:Do not select , If Yes is selected, you will encounter problems starting the User Application.
For information on migrating, see the User Application: Migration Guide.
Where is the WAR?
If the Identity Manager User Application WAR file is in a different directory from the installer, the installer prompts for the path to the WAR.
Choose Install Folder
Specify where you want the installer to put the files.
Database Platform
Select the database platform. The database and JDBC driver must already be installed. Options include:
-
Oracle (you are prompted for the version)
-
MS SQL Server
Java Install
Specify the Java root install folder.
IDM Configuration
Specify the application context. This will be the part of the URL when you start the User Application from a browser.
Audit Logging
To enable logging, click . The next panel prompts you to specify the type of logging. Choose from the following options:
-
: Enables Novell Audit Logging for the User Application.
-
: Events are logged to your OpenXDAS logging server.
For more information on setting up Novell Audit or OpenXDAS logging, see the .
Novell Audit
: If you enable Novell Audit logging, specify the hostname or IP address for the Novell Audit server. If you turn logging off, this value is ignored.
: Specify the directory for the logging cache.
Security - Master Key
: Allows you to Import an existing master key. If you choose to import an existing encrypted master key, cut and paste the key into the install procedure window.
: Creates a new master key. After you finish the installation, you must manually record the master key as described in Section 8.1, Recording the Master Key.
The installation procedure writes the encrypted master key to the master-key.txt file in the installation directory.
Reasons to import an existing master key include:
-
You are moving your installation from a staging system to a production system and want to keep access to the database you used with the staging system.
-
You installed the User Application on the first member of a JBoss cluster and are now installing on subsequent members of the cluster (they require the same master key).
-
Because of a failed disk, you need to restore your User Application. You must reinstall the User Application and specify the same encrypted master key that the previous installation used. This gives you access to the previously stored encrypted data.
-
-
You are prompted for the information that the installation program uses to configure the User Application WAR file. (If you are not prompted for this information, you might not have completed the steps outlined in Section 2.5, Installing the Java Development Kit.
Installation Screen
Description
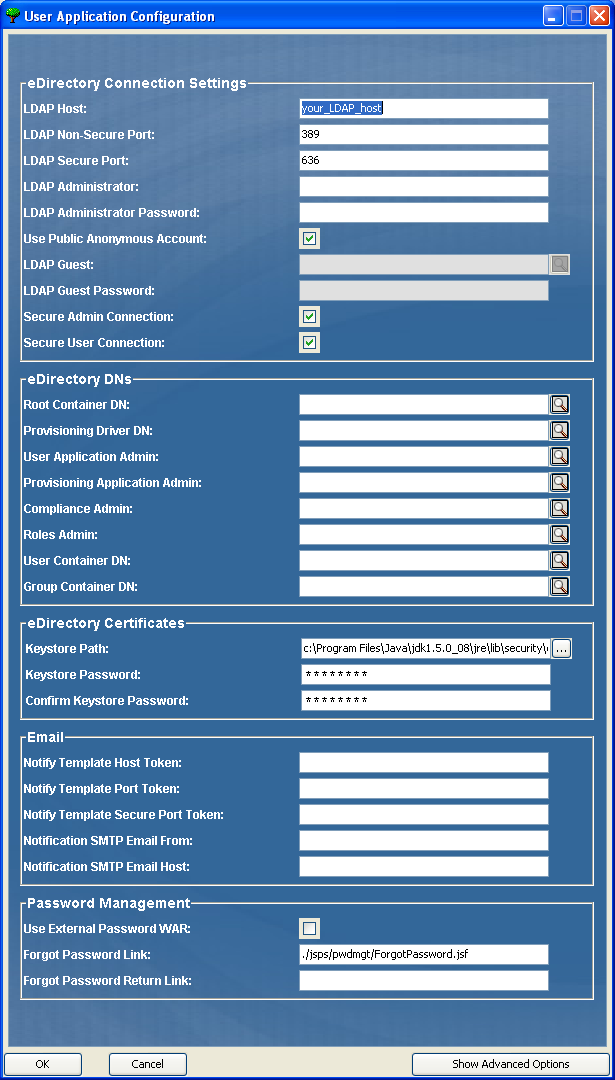
User Application Configuration
The User Application install enables you to set User Application configuration parameters. Most of these parameters are also editable with configupdate.sh or configupdate.bat after installation; exceptions are noted in the parameter descriptions.
For more information, see Section A.0, IDM User Application Configuration Reference
Pre-Installation Summary
Read the Pre-Installation Summary page to verify your choices for the installation parameters.
If necessary, use to return to earlier installation pages to change installation parameters.
The User Application configuration page does not save values, so after you re-specify earlier pages in the installation, you must re-enter the User Application configuration values. When you are satisfied with your installation and configuration parameters, return to the Pre-Install Summary page and click .
Install Complete
Indicates the installation is finished.
6.2.1 Viewing Installation and Log Files
If your installation completed without error, continue with Preparing the WebLogic Environment. If the installation issued errors or warnings, review the log files to determine the problems:
-
Identity_Manager_User_Application_InstallLog.log holds results of the basic installation tasks.
-
Novell-Custom-Install.log holds information about the User Application configuration done during installation.