Advanced Configuration of NAT
This section provides an example of using Novell® BorderManager® 3.8 Network Address Translation (NAT) in a private network when the network uses both registered and unregistered addresses.
See Setting Up NAT section for instructions on how to set up Network Address Translation.
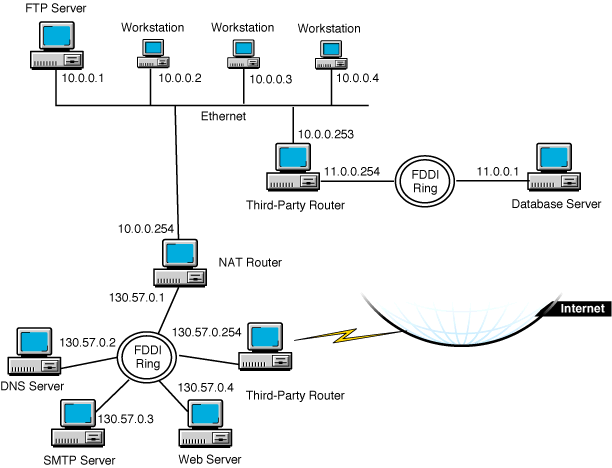
In the following example, NAT is used to separate a segment of a private network, which uses registered addresses, from the rest of the network, which uses unregistered addresses. As shown in the following illustration, the segments of the private network that use unregistered addresses (network 10.0.0.0 and network 11.0.0.0) have an FTP server and database server that need to be accessible from the Internet.
Workstations on network 10.0.0.0 should be able to access the rest of the private network and the Internet.
The segment of the private network that uses registered addresses (network 130.57.0.0) has a Web server, a Domain Name Server (DNS) server, and a Simple Mail Transfer Protocol (SMTP) gateway server that should be accessible from the workstations on the rest of the private network.
In this example, the following registered IP addresses have been obtained from an Internet Service Provider (ISP) for NAT use: 130.57.100.1, 130.57.100.2, 130.57.100.3, 130.57.100.4, and 130.57.110.1.
These addresses are to be mapped to the FTP server, database server, and workstations on the 10.0.0.0 and 11.0.0.0 networks.
Figure 81Using NAT within a Private Network
For this example, an administrator must complete the following tasks:
- Add the secondary IP addresses on the NAT router interface that has been assigned IP address 130.57.0.1.
- Enable Network Address Translation on the NAT router interface.
- Create a Network Address Translation table mapping the secondary IP addresses to the private hosts on networks 10.0.0.0 and 11.0.0.0.
- Create static (default) routes on the routers to enable routing between the private network segments if the routers have been configured to filter Routing Information Protocol (RIP) packets.
To perform these tasks:
-
At the server console, enter
LOAD INETCFG
-
Select Protocols.
-
If TCP/IP was not configured on the NAT router interfaces, enable TCP/IP for each interface under Protocols, and bind IP addresses to the public and private interfaces under Bindings.
In this example, bind 130.57.0.1 to the public interface, and bind 10.0.0.254 to the private interface.
-
Press Esc until you are prompted to save your changes, then select Yes.
-
Select Manage Configuration > Edit AUTOEXEC.NCF.
-
Specify the commands to bind secondary IP addresses after the line that executes INITSYS.NCF.
In this example, enter the following lines:
ADD SECONDARY IPADDRESS 130.57.100.1
ADD SECONDARY IPADDRESS 130.57.100.2
ADD SECONDARY IPADDRESS 130.57.100.3
ADD SECONDARY IPADDRESS 130.57.100.4
ADD SECONDARY IPADDRESS 130.57.110.1
-
Press Esc until you are prompted to save your changes, then select Yes.
-
Press Esc until you return to the Internetworking Configuration menu.
-
Select Bindings.
-
Select the public interface that has a registered address bound to it.
In this example, select the interface bound to the address 130.57.0.1.
-
Select Expert TCP/IP Bind Options.
-
Select Network Address Translation.
-
For Status, select Static Only.
-
Select Network Address Translation Table, then press Ins.
Specify the following public address and private address pairs:
Public Address Private Address
130.57.100.1 10.0.0.1
130.57.100.2 10.0.0.2
130.57.100.3 10.0.0.3
130.57.100.4 10.0.0.4
130.57.110.1 11.0.0.1 -
Press Esc until you are prompted to save your changes, then select Yes.
-
Press Esc to return to the Internetworking Configuration menu.
-
If the third-party router that connects the 10.0.0.0 network to the 11.0.0.0 network is filtering outgoing RIP packets, add a static route on the NAT router for the 11.0.0.0 network with a next hop of 10.0.0.253.
Also verify that each host on the 10.0.0.0 network that is allowed to access the 11.0.0.0 network has a static route to the router with the IP address 10.0.0.253.
To configure a static route on the NAT router:
-
From the Internetworking Configuration menu, select Protocols > TCP/IP.
-
If necessary, change the status of LAN Static Routing from Disabled to Enabled.
-
Select the LAN Static Routing Table field.
-
Press Ins to add a TCP/IP static route.
-
For Route Type, select Network.
-
For IP Address of Network/Host, enter 11.0.0.0.
-
For Subnetwork Mask, accept the default, FF.0.0.0, or enter the subnet mask for your network.
-
For Next Hop Router on Route, enter 10.0.0.253.
-
Press Esc and select Yes to update the database.
-
Press Esc and select Yes to update the TCP/IP configuration.
-
Press Esc to return to the Internetworking Configuration menu.
-
-
If the NAT router is filtering incoming RIP packets, add a default static route for the 130.57.0.0 network on the third-party router that connects the 11.0.0.0 network to the rest of the network.
Also verify that each host on the 10.0.0.0 network that is allowed to access the Internet uses 10.0.0.254 bound to the NAT interface as the default route to the 130.57.0.0 network.
NOTE: Because the 10.0.0.0 network is not using registered addresses, both incoming and outgoing RIP packets should always be filtered. This enables NAT to hide the 10.0.0.0 network while allowing its hosts to access the Internet.
-
If the third-party router that connects the 130.57.0.0 network to the Internet is filtering incoming RIP packets, add a default route to the Internet on the NAT router with a next hop of 130.57.0.254.
Also verify that each host on the 130.57.0.0 network that is allowed to access the Internet has a default route to the router with the IP address 130.57.0.254.
To configure a default static route on the NAT router, complete the following steps:
-
From the Internetworking Configuration menu, select Protocols > TCP/IP.
-
If necessary, change the status of LAN Static Routing from Disabled to Enabled.
-
Select the LAN Static Routing Table field.
-
Press Ins to add a TCP/IP static route.
-
For Route Type, select Default Route.
-
For Next Hop Router on Route, enter 130.57.0.254.
-
Press Esc twice and select Yes to update the database.
-
Press Esc and, if prompted, select Yes to update the TCP/IP configuration.
If you have enabled LAN Static Routing in Step 19b, you are prompted to update the TCP/IP configuration
-
Press Esc to return to the Internetworking Configuration menu.
-
-
If you want the static routes to take effect immediately, select Reinitialize System and select Yes to activate your changes.