16.2 VPN Server Configuration
The VPN server can be used to modify or delete existing configuration. You can also configure a new server as a VPN server. The pre requisites to configuring a VPN server are:
-
Trusted Root Container (TRC, referred to as Trusted Root in the iManager and in Novell eDirectory). If you want to create the Container see Section 15.4, Creating Trusted Root Containers. If you want the VPN configuration utility to create the Container automatically, skip the Creating Trusted Root Containers section.
-
Key Material Object (KMO) for the server. If you want to create the KMO manually, see Section 15.2, Creating Server Certificates, and export the KMO using the steps in Section 15.3, Exporting Root Certificates from the Server Certificate. If you want the VPN configuration to create the KMO automatically, you need not refer to Creating Server Certificates, but after it is created you need to export it using the steps in Section 15.3, Exporting Root Certificates from the Server Certificate .
-
Trusted Root Object (TRO) under the Trusted Root Container see Section 15.5, Creating the Trusted Root Object.
16.2.1 Adding a New VPN Server
-
Log in to iManager. On a Windows XP or 2000 machine connected to a NetWare® 6.5 server, open either the Internet Explorer or Mozilla Forefox browser and, go to (https:// ipaddress/nps/iManager.html), where ip address is the IP address of a NetWare 6.5 server running Novell BorderManager 3.9.
-
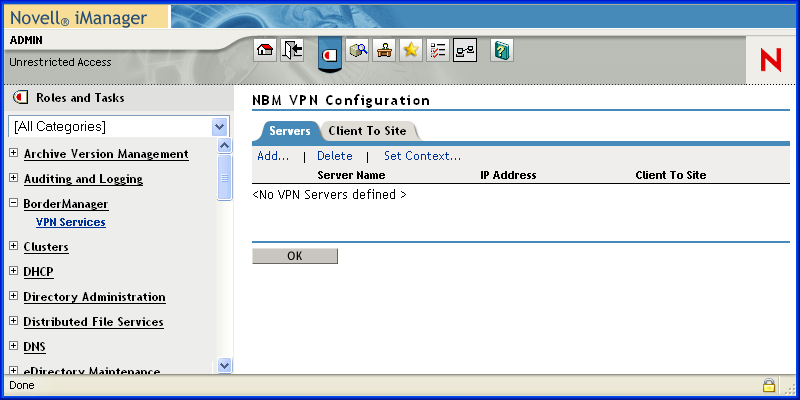
On the left pane, select > .
Initially, the page is blank. The list of VPN servers is empty until a VPN server is configured. After a server is added, the list shows the server, its IP address, and whether it is hosting a client-to-site or a site-to-site service.
Figure 16-1 NBM VPN Server Configuration
-
To add a new VPN server, under click .
-
Provide the Server Name or, click the
 icon and select the Novell eDirectory context in which you would want to view the already configured VPN servers. Select
for a detailed context check. The
search shows all VPN servers residing in Configuring VPN Services all subcontexts.
icon and select the Novell eDirectory context in which you would want to view the already configured VPN servers. Select
for a detailed context check. The
search shows all VPN servers residing in Configuring VPN Services all subcontexts.
-
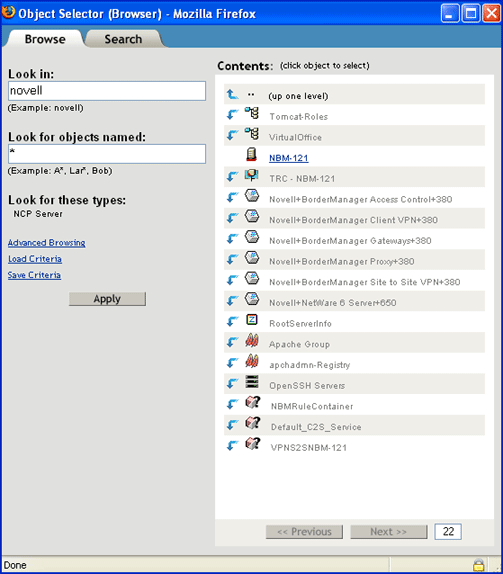
Click the
icon next to the field and choose a server in the tree.
Figure 16-2 Server Selection
-
Select a server from the list (it should be one of the underlined objects). After you have selected the server, you return to the previous page.
-
Click .
-
Select > and click .
-
Select the .
NOTE:3.9 is the only member version option. This is selected by default.
-
Select the .
If you select the method of authentication, specify the following:
-
Issuer: The eDirectory™ distinguished name of the trusted root object that has issued teh certificate for the master member of the site-to-site service.
-
Subject Name: The subject name of the X.509 server certificate sued for the master member.
-
Alternative Subject Name: One of the following three types:
-
DNS
-
Mail
-
IPv4
NOTE:If you choose of these, you must provide the alternative subject name.
You can also add the following:
-
-
Protected IP Network and Hosts: The list of networks or hosts to be protected by this site-to-site master member.
-
Enable IP RIP: Adds RIP filters to IPFLT.
If you select the Pre-Shared Key method of authetication, you must provide the shared key. You can provide the shared key on the previous page.
NOTE:You can configure other parameters too. However, this depends on the peer's capability. We recommend that you configure both the methods of authentication in a mixed mode deplyment.
When two slaves are initiating connection between two slaves, the PSK authentication method always takes precendence over certificate method of authentication.
-
-
After you have provided all the relevant information, click . You return to the previous page. Here, specify the following:
On the page that appears, specify the following:
-
IP Address and Subnet Mask (Server): Public IP address and subnet mask of the VPN server. This is the public IP address bound to the NetWare server.
-
IP Address and Subnet Mask (Tunnel): Novell BorderManager 3.9 server's virtual tunnel IP address and subnet mask. This should have an encrypted tunnel and not a real IP address bound to an interface.
-
Key Life Time: The IKE Key Life Time in minutes. The default is set to 480 minutes. This is the lifetime for which the IKE key is valid. If the time period is reduced, the overhead increases and the performance is impacted. However, it provides higher security.
-
Configuration Update Interval: The interval at which the VPN server will look for updates to the configuration.
-
Server Certificate: Use the default value if you want to automatically create and use the server certificate (Key Material Object). If you want to use a server certificate that you have already created using the steps in Section 15.2, Creating Server Certificates, select the Key Material Object from Novell eDirectory by using the Browse button.
-
Trusted Root Container: The Trusted Root Container object that will contain all the Trusted Root objects for this VPN Server. Use the default value if you want to automatically create and use the Trusted Root Container. If you want to use a Trusted Root Container that you have already created using the steps mentioned in Section 15.4, Creating Trusted Root Containers, select the Trusted Root Container for eDirectory using the Browse button (trusted root is one of the underlined items).
-
S2S Pre-Shared Key: The Pre-Shared Key (PSK) establishes a VPN tunnel between two Site-to-Site (S2S) members. In the PSK authentication method, a common secret or a pre-shared key is configured on both the servers. The VPN server uses this key secret to establish the tunnel. This method is the simplest way of configuring a Site-to-Site connection. To set a S2S Pre-Shared Key, click the
 icon. Provide the Pre-Shared Key.
-
Perfect Forward Secrecy: Indicates whether to enable or disable PFS in IKE Quick Mode. Enable this if you want higher level of security of IKE keys.
-
Trusted Master Server Certificate Subject Name: Specify the certificate subject name of the trusted master. If the master is in the same tree as the slave, browse to select the master’s certificate instead of entering the certificate subject name.
NOTE:: If the VPN server is assigned a site-to-site role and is acting as a slave, the trusted master for this slave needs to be configured. The Trusted Master Server Certificate Subject Name field is visible.
-
-
Click . You haev now sucessfully configured a site-to-site master server.
HINT:The feature is available when you modify VPN server information. Click to reload the configuration information. The Synchronize feature saves the configuration information and increments or decrements the interval by a second.
16.2.2 Deleting a VPN Server Configuration
To delete a VPN server configuration from a particular Novell BorderManager 3.9 server,
-
Select the VPN server configuration and click .
-
Click the server name link to modify the VPN server information. When you modify a server, you can choose to either modify the VPN server parameters or you can enable (attach) a site-to-site or a client-to-site service.
VPN Server Behind NAT
The VPN server can also be configured behind NAT. To do so, use the nat.nlm shipped with Novell BorderManager 3.9. The nat.nlm is available in filtsrv\system directory on the product CD. For more details on NAT, see Section 20.0, Setting Up NAT.