Replacing a Server
Menu options available in nwconfig.nlm allow you to prepare NDS information on a server for a planned hardware upgrade, volume sys: upgrade, or replacement of the server. The following instructions are designed for situations where a server is actually replaced. For naming purposes, the old server will be referred to as Server A and its replacement or the new server will be referred to as Server B.
NOTE: This functionality was formerly available through dsmaint.nlm.
To prepare for the upgrade the NDS backup utility creates the file, backup.nds that stores all the Directory information on a server, including replica information. It also locks and disables the Directory on this server preventing any data change. To other servers that normally communicate with this sever, the server appears to be down. Any Directory information that is normally sent to the locked server is stored by other servers in the directory. The stored information is used to synchronize the server when it comes back online.
Because other servers in the NDS tree are expecting the server to come back online quickly, you should plan to complete the upgrade promptly and restore Directory information on the server as soon as possible.
The Restore Local DS Information after Hardware Upgrade option uses the sys:system\backup.nds file created by the Save option to restore Directory information on this server.
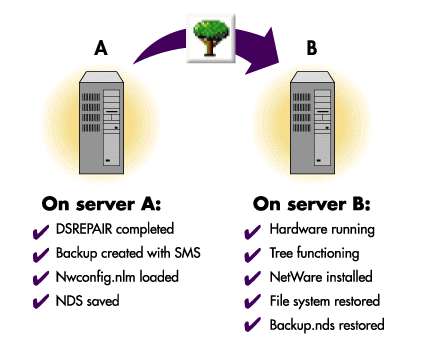
The following illustration depicts the procedure for replacing hardware.
Figure 1
Replacing a Server
Use the following checklist to determine if you are ready to start this procedure.
You are now ready to create the backup of NDS.
The NDS backup utility creates a file named sys:system\backup.ds that stores all the Directory information on this server. Use the following instructions on the system console to prepare NDS for a hardware upgrade:
Load nwconfig.nlm on Server A.
At the server console prompt, enter
NWCONFIG
Choose Directory Options > Directory Backup and Restore Options.
The DS Backup and Restore Options menu appears.
Choose Save Local DS Information Prior to Hardware Upgrade.
A help screen appears with NDS backup information. Press Enter to continue after reading this screen.
The Directory Services Login/Authentication screen appears.
Enter the administrator name and password.
The system logs into the Directory and creates the backup.nds file.
Save the backup.nds file to a location you know you can access.
You can save to sys:system on Server B but only if it is up and running.
Exit nwconfig.nlm and bring down Server A. Enter
DOWN
Server A's DS database is now locked. Complete the upgrade promptly and restore Directory information on Server B as soon as possible.
The Restore DS Information After a Hardware Upgrade option uses the sys:sytem\backup.nds file to restore Directory information on Server B. Before the Directory is restored, this utility ensures that the server is in the same relative state as before the upgrade. Nwconfig.nlm ensures that the server's object and authentication keys still exist and that the server still exists in all the replica rings for copies that were on this server before the upgrade.
Rename Server B using the Server A's tree name, address, and server name in autoexec.ncf.
Load nwconfig.nlm on Server B.
At the server console prompt, enter
NWCONFIG
Choose Directory Options > Directory Backup and Restore Options.
The DS Backup and Restore Options menu appears.
Choose Restore Local DS Information after Hardware Upgrade.
A screen appears that allows you to specify the path to the backup file.
Verify the path to the backup.nds file or press F3 to enter a new path and save it to sys:system on Server B.
Use SMS to restore the backup you made of Server A that restores the file system and trustees.
Use NetWare Administrator to check the server. Make sure that login scripts and printing work correctly.
If Server B does not work correctly and you need to make Server A functional immediately, do the following:
Unplug Server B's network cable or down the server.
Reattach Server A to the network and start it.
Ignore system messages requesting you to run DSREPAIR.
Load NWCONFIG.NLM on Server A.
At the server console prompt, enter
LOAD NWCONFIG
Choose Directory Options > Directory Backup and Restore Options.
The DS Backup and Restore Options menu appears.
Choose Restore Local DS Information after Hardware Upgrade.
Enter the path to backup.nds as sys:system on Server A.
This unlocks the NDS on the server and returns it to its state before the upgrade.
Remove NDS from Server B and try the upgrade again.