3.1 Small Deployment Configuration
To configure the Filr appliance for a small organization:
-
After you have installed the Novell Filr appliance, as described in Section 2.1, Installing the Filr Appliance, navigate to the following URL:
https://ip_address:9443
Use the IP address or DNS name of the server that you specified during the appliance installation.
-
Log in to the appliance using the vaadmin user and the password that you set.
The Novell Filr Appliance landing page is displayed.
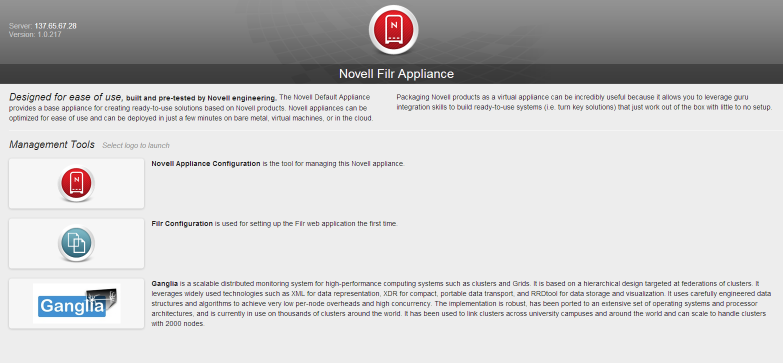
-
Click the icon.

The Filr Server Configuration Wizard is displayed.
-
Select , then click .
-
On the Database page, specify and confirm the password for the MySQL administrator.
If you need to change this password at a later time, you must use the native MySQL tools to do so.
-
Click .
-
In the field, select the default locale for your Filr site. This is the language and locale that Filr uses when users first log in to the Filr site.
Users can change the individual locale after they log in by modifying the user profile, as described in
Modifying Your Profile
in the Novell Filr 1.0.1 Web Application User Guide.Some aspects of the Filr interface, such as group names and the login page, are always displayed in the default language, regardless of individual user settings. For more information, see
Understanding the Filr Site Default Language
in the Novell Filr 1.0.1 Administration Guide. -
Click .
After the configuration is complete, a summary is displayed.
This configuration summary contains information such as network, database, and so forth. You can modify these configuration settings at any time from the column on the left side of this page.
For information about each configuration option, see Section 4.0, Configuring and Maintaining the Filr Appliance.
-
Continue with Section 8.0, Setting Up the Filr Site to make your site ready for user access.