5.3 Using a Standard Linux Installation with the Default Settings
This is the recommended installation method for a machine that meets but doesn’t exceed the minimal hardware requirements. Use this method if you want to use the default installation settings, as described in the following table.
Table 5-1 Default Installation Settings
A standard installation does not support configuring multiple network interfaces. Only the eth0 interface can be configured during installation. However, you can configure multiple interfaces through the Administration Console after installation.
-
Insert the Linux Access Gateway CD into the CD drive.
The boot screen appears.

-
By default, the option is selected in the boot screen. Use the Down-arrow key to select .
-
Use the function key options to change installation settings as desired. For more information on these function keys, see Section 5.2, Boot Screen Function Keys.
-
After you have completed any changes to the installation options, press Enter.
-
Review the agreement on the License Agreement page, then click to accept the agreement.
-
Select on the Language Selection page, then click .
The current version of the product is an English-only version.
-
Select a keyboard layout on the Keyboard Configuration page, then click
-
Configure values for region and time zone, change the date and time setting on the Clock and Time Zone Configuration page, then click
The Network Configuration page appears.
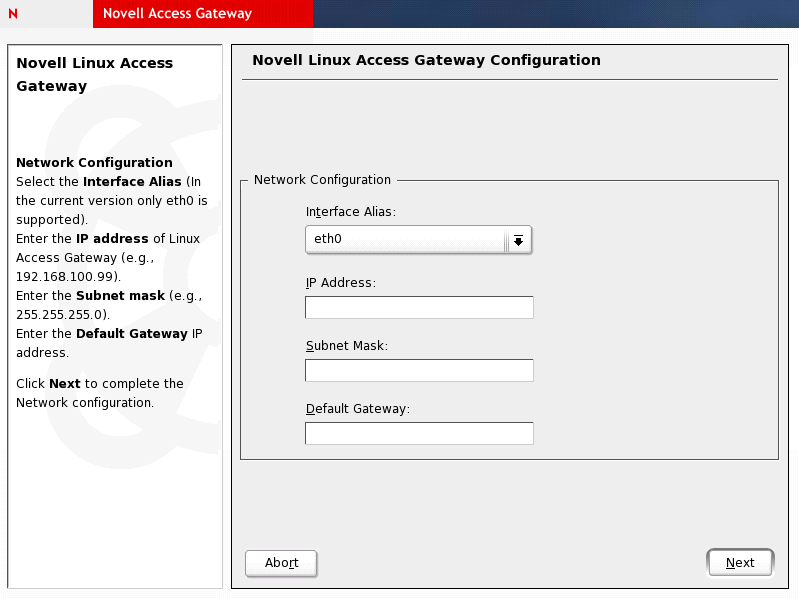
Configure the following:
Interface Alias: This option displays the eth0 interface that is configured by default. The Standard Installation does not support configuring multiple interfaces. Only the eth0 interface can be configured during the install. You can configure multiple interfaces by using the Administration Console after installation. For more information, see Section A.2.2, Manually Configuring a Network Interface.
IP Address: Specify the IP address of the Access Gateway.
Subnet Mask: Specify the subnet mask of the Linux Access Gateway network.
Default Gateway: Specify the default gateway.
-
Click . The section appears.

Configure the following:
Host Name: Specify the hostname for the Linux Access Gateway machine.
Domain Name: Specify the domain name for your network.
DNS Server 1: Specify the IP address of your DNS server. You can configure a maximum of three DNS servers. It is mandatory to configure at least one DNS server.
NTP Server: Specify the name of the NTP server.
-
Click . The section appears.
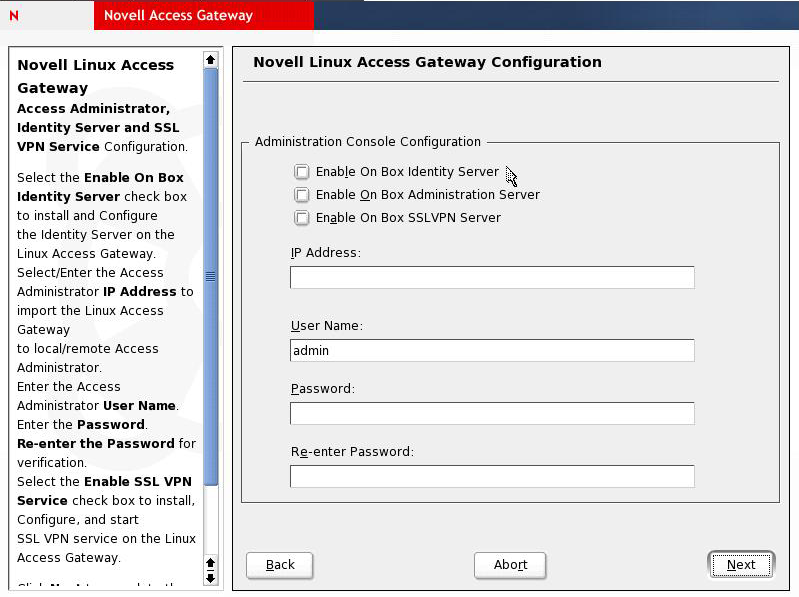
Configure the following:
Enable On Box Identity Server: Not currently available.
Enable On Box Administration Server: Not currently available.
Enable On Box SSL VPN Server: Select this check box to install and configure the SSL VPN service on the Linux Access Gateway.
IP Address: Specify the IP address of the Administration Console. The Linux Access Gateway is imported into this Administration Console. If you have selected the option, the SSL VPN is imported into this Administration Console.
Username: Specify the name of the Administration Console user.
Password: Specify the password for the user.
Reenter Password: Re-enter the password for verification.
-
Click . The Novell Linux Access Gateway Configuration Summary page appears.
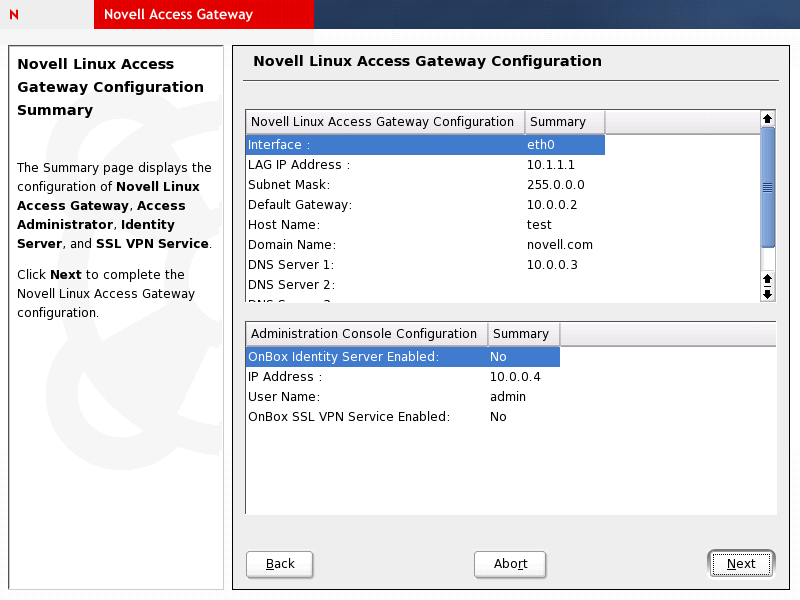
This page summarizes the configuration that you have selected. If you want to change any configuration, click .
-
Click , then click to start the installation process.
This process might take 15 to 30 minutes, depending on the configuration and hardware.
The machine reboots after the installation is completed and the Linux Access Gateway is imported to the Administration console.
Ignore the warning about failed services in runlevel3 for novell-jcc.
-
Log in as root and change the password.
-
At the login prompt, enter root.
-
At the password prompt, enter novell.
-
To change the password, enter passwd.
-
Enter a password.
-
Confirm the password by entering it again.
-
-
To change the password for the config user, enter the following commands:
-
Enter passwd config.
-
Enter a new password.
-
Confirm the password by entering it again.
-
-
(Optional) To verify the installation of the Access Gateway, log in to Administration Console (see Section 3.2, Logging In to the Administration Console), then click > .
If the installation was successful, the IP address of your Access Gateway appears in the Server list.

The Health status indicator appears yellow after the Access Gateway is imported and registers with the Administration Console, which can take up to 5 minutes. You must configure the Access Gateway in order to change its health to green.
If an Access Gateway starts to import into the Administration Console but fails to complete the process, the following message appears:
Server gateway-<name> is currently importing. If it has been several minutes after installation, click repair import to fix it.
If you have waited at least ten minutes, but the message doesn’t disappear and the Access Gateway doesn’t appear in the list, click the link. For additional help, see Section A.1, Troubleshooting the Access Gateway Import.
-
This completes the installation of the Linux Access Gateway. Continue with the one of the following: