5.3 Sharing Roles
When two Identity Servers are configured to trust each other, one as an identity provider and the other as a service provider, they can be configured so that roles are shared. The following instructions are written for when both the identity provider and the service provider are Novell Identity Servers. If you are using a third-party identity or service providers, you need to modify the instructions.
Figure 5-3 illustrates a configuration where Identity Server of Site A is acting as an identity provider for Site B. When you configure the Identity Servers correctly, the Access Gateway can use the roles defined for the users of Site A in its policies.
Figure 5-3 Two Federated Identity Servers
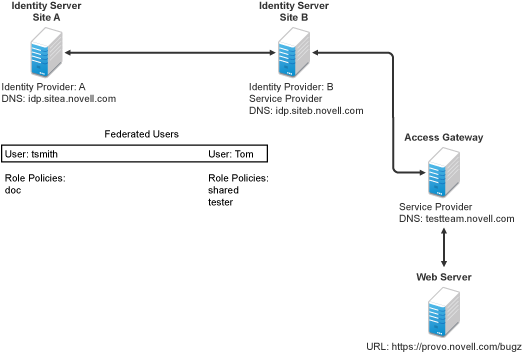
The key to sharing roles is to set up the configuration so that the SAML assertion that the identity provider (Site A) sends to the service provider (Site B) contains the roles that the user has been assigned. Site B evaluates the roles and assigns them to the federated users at Site B. The Access Gateway can use these roles in its policy evaluations, and grant or deny access based on the assigned roles.
For example, when user tsmith authenticates to Site A, tsmith is assigned the role of doc. Tom, a user at Site B, is federated with the tsmith user. The doc role is shared with Site B, and Site B contains a policy that assigns users with the shared doc role to the tester role. The Access Gateway is configured with an Authorization policy that grants access to a resource when the requester is assigned the tester role. However, Tom does not have the qualifications at Site B to be assigned the tester role.
In this scenario, when Tom requests access to the protected resource at Site B, a login page with a federated link to Site A is displayed. If Tom selects to log in to Site A, Site A assigns him to the doc role. The doc role is sent with tsmith’s authentication credentials to Site B. Site B evaluates the credentials and assigns Tom to the tester role because the following conditions are met:
-
Tom is federated with tsmith.
-
tsmith was assigned the doc role.
-
The shared role and tester policies on Site B qualify the user to be assigned the tester role.
When the Access Gateway evaluates the credentials of Tom, Tom is granted access to the protected resource because he now has the tester role.
This section describes how to set up such a configuration. It assumes that the following have already been done:
-
The trusted relationship between the identity provider and service provider is set up. For configuration instructions, see Section 5.2.2, Establishing Trust between Providers.
-
The following policies have been created: the doc role policy at Site A, the tester role policy at Site B, and the Authorization policy (that uses the tester role) for the Access Gateway. For information on creating a Role policy, see Section 6.4.2, Configuring a Role-Based Policy, and for the Authorization policy, see Section 6.4.3, Assigning an Authorization Policy to Protect a Resource. The following instructions explain how to set up the shared policy.
This section explains how to configure Site A and Site B so that Site A shares its roles with Site B.
5.3.1 Configuring Role Sharing
There are three major tasks for configuring role sharing. You need to configure a shared attribute for transferring the roles. You need to configure the identity provider and the service provider so that the role assignments can be added to the attribute and retrieved from the attribute. Finally, you need to create a shared Role policy for each role sent to the service provider. This policy defines how the role should be processed.
The following sections describe these configuration tasks:
Defining a Shared Attribute Set
-
In the Administration Console of the Site A (the identity provider), click > > .
-
Click , then .
-
Specify a , such as role_sharing, then click .
-
Click and fill the options:
Local attribute: Select .
Remote attribute: Specify a name, such as roles. Make sure you use the same remote name in the mapping for both the identity provider and the service provider.
Leave the other options set to their default values.
-
Click , then click .
Your newly created attribute mapping appears in the list of Attribute Sets.
-
Repeat Step 1 through Step 5 on Site B (the service provider).
-
Continue with Obtaining the Role Assignments.
Obtaining the Role Assignments
-
To export the roles from the identity provider, log in to the Administration Console for the identity provider. (In Figure 5-3, this is Site A.)
-
Click > > > > > .
If you are using SAML 2.0 or SAML 1.1 protocol, the steps are the same. You just need to click the appropriate tab after clicking . The path is the same for these protocols.
-
Select the attribute set you created, then move so this attribute is sent with authentication.
-
Click .
-
Update the Identity Server of Site A.
-
-
To import the roles from the identity provider to the service provider, log in to the Administration Console for the service provider. (In Figure Figure 5-3, this is Site B.)
-
Click > > > > > > .
-
Select the attribute set you created, then move so this attribute is obtained with authentication.
-
Click .
-
Update the Identity Server of Site B.
-
Continue with Configuring Policies to Process Received Roles.
-
Configuring Policies to Process Received Roles
For each role that is sent from Site A, you need to create a Role policy that specifies the role that should be activated on Site B. For example, suppose the tsmith user from Site A is assigned the doc role at authentication. You can create a Role policy on Site B that assigns the tester role to anyone with the doc role from Site A.
-
Log in to the Administration Console for Site B.
-
Click > > .
-
Specify a name for the policy, select for the type, then click .
-
In the section, click , then select .
-
(Conditional) If you have federated with more than one identity provider, select the provider. If you have federated with only one identity provider, the provider is selected for you.
In this example, you have federated with only the identity provider at Site A, and it is selected for you.
-
For the value, select, then specify the name of a role that is assigned by Site A, for example doc.
If you leave set to , make sure you specify the case correctly.
-
In the section, specify the role to activate on Site B for the role received from Site A.
Your policy should look similar to the following:

-
Click twice, then click .
-
To enable the role for the Identity Server, click > > .
-
Select the role, then click .
-
(Optional) Repeat Step 2 through Step 10 for other roles assigned at Site A.
If you have other Role policies at Site A, you need to set up Role policies at Site B to have the roles activated. For example, if Site A had a Tester Role policy and you wanted users assigned to the Tester Role policy to also be assigned to the Tester Role policy at Site B, you could create a separate policy for this activation, or you could add an Or condition group with a value field of tester to the policy in Step 7. The policy would assign federated users who belonged to the doc or tester roles at Site A, to the tester role at Site B.
-
To test role sharing:
-
Enter the URL of a protected resource that requires a role for access. For the policy above, it would be a resource requiring the tester role.
-
Click the federated link to Site A.
-
Log in with the credentials of a user who is assigned the doc role.
You are granted access to the resource. If you are denied access, continue with Section 5.3.2, Verifying the Configuration to discover the problem.
-
5.3.2 Verifying the Configuration
This section traces the role assignment from the Identity Server that assigns it to the user, through the Identity Server that receives the roles with the user’s authentication assertion, to the policy evaluation. If you are having trouble, this should help you determine the source of the problem.
The following procedures refer to the configuration displayed in Figure 5-3, Two Federated Identity Servers. A tsmith user from Site A, who is assigned the doc role, is federated with a Tom user at Site B. Site B does not assign Tom the tester role. The Web server has been configured to protect the bugz site, which requires the tester role.
To verify the configuration:
-
Make sure policy logging is enabled on the identity provider and the service provider. Make sure that you enable at least Application logging at an Info level.
For configuration procedures, see
Enabling Component Logging
in the Novell Access Manager 3.1 SP5 Identity Server Guide.You can access log files for downloading and viewing by clicking > .
-
Have a user access a resource that is protected by a policy requiring a role from Site A.
For this trace, the tsmith user from Site A requests access to the bugz page. The user uses the federated link and logs in with the credentials of the tsmith user.
-
Verify that Site A is assigning the user the role.
-
View the catalina.out file (Linux) or the stdout.log file (Windows) of the Identity Server at Site A.
-
Search for the name of the role. You should find a line similar to the following:
<amLogEntry> 2009-08-22T20:30:19Z INFO NIDS Application: AM#500105013: AMDEVICEID#C5F467BA50B009AC: AMAUTHID#DEEF6BEC3655DEB71CA56832DDDF866E: Authenticated user cn=tsmith,o=novell in User Store sitea-nids-user-store with roles doc,authenticated. </amLogEntry>
If the role you need is not listed, look at the policy evaluation trace to discover why the user has not been assigned the role. For more information on how to understand role traces, see
Role Assignment Traces
in the Novell Access Manager 3.1 SP5 Policy Guide.
-
-
Verify that Site A is sending an authentication assertion to Site B.
In the catalina.out file (Linux) or the stdout.log file (Windows) of the Identity Server from Site A, look for lines similar to the following:
<amLogEntry> 2009-08-22T20:30:19Z INFO NIDS Application: AM#500105018: AMDEVICEID#C5F467BA50B009AC: AMAUTHID#DEEF6BEC3655DEB71CA56832DDDF866E: Responding to AuthnRequest with artifact AAPLsCVpfv3ha9Mpn+cUiCXcf3D63sc0QfscL5mZaaygHBKVOOh9aPSQ </amLogEntry>

<amLogEntry> 2009-08-22T20:30:19Z INFO NIDS Application: AM#500105019: AMDEVICEID#C5F467BA50B009AC: AMAUTHID#F8B1C147EB3DDEFE9A3DB0827BA8E4A3: Sending AuthnResponse in response to artifact AAPLsCVpfv3ha9Mpn+cUiCXcf3D63sc0QfscL5mZaaygHBKVOOh9aPSQ </amLogEntry>
If you do not see these types of entries, verify that you have configured Site A to send the roles. See Obtaining the Role Assignments.
-
Verify that Site B is receiving the SAML assertion with the roles.
In the catalina.out file (Linux) or the stdout.log file (Windows) of the Identity Server from Site B, look for lines similar to the following:
<amLogEntry> 2009-08-22T20:30:19Z INFO NIDS Application: AM#500105020: AMDEVICEID#488475009C6D3DDF: AMAUTHID#0FBA0CF7E41E6C7F9121DABB918D34F4: Received and processing artifact from IDP - AAPLsCVpfv3ha9Mpn+cUiCXcf3D63sc0QfscL5mZaaygHBKVOOh9aPSQ </amLogEntry>

<amLogEntry> 2009-08-22T20:30:19Z INFO NIDS Application: AM#500105021: AMDEVICEID#488475009C6D3DDF: AMAUTHID#0FBA0CF7E41E6C7F9121DABB918D34F4: Sending artifact AAPLsCVpfv3ha9Mpn+cUiCXcf3D63sc0QfscL5mZaaygHBKVOOh9aPSQ to URL https://rholm.provo.novell.com:8443/nidp/idff/soap at IDP </amLogEntry>
The artifact ID should be the same as the artifact ID in Step 4.
If you do not see these types of entries, verify that you have configured Site B to receive the roles. See Obtaining the Role Assignments.
-
Verify that Site B is evaluating the received role assignments and activating the roles.
In the catalina.out file (Linux) or the stdout.log file (Windows) of the Identity Server from Site B, search for a policy evaluation for RolesFromIdentityProvider. You should find lines similar to the following:
~~CO~1~RolesFromIdentityProvider(6670):https://ipd.sitea.provo.novell.com:
8443/nidp/idff/metadata:TESTER,DOC,AUTHENTICATED~com.novell.nxpe.condition.
NxpeOperator@string-equals~(0):hidden-param:hidden-value:~~~True(69)

~~PA~ActionID_1203705845727~~AddRole~tester~~~Success(0)

<amLogEntry> 2009-08-22T20:30:20Z INFO NIDS Application: AM#500105013: AMDEVICEID#488475009C6D3DDF: AMAUTHID#0FBA0CF7E41E6C7F9121DABB918D34F4: Authenticated user cn=Tom,o=novell in User Store Internal with roles tester,authenticated. </amLogEntry>
The policy evaluation shows that the condition evaluates to true and that the tester role is activated. Tom is the user that is federated with the tsmith user, and the entry shows that Tom has been assigned the tester role.
If you do not see a policy evaluation for RolesFromIdentityProvider, make sure you have created such a Role policy and that you have enabled it. See Configuring Policies to Process Received Roles.
-
If the use has been assigned the correct role, the last step is to verify how the embedded service provider evaluated the policy protecting the resource.
In the catatina.out file of the ipd-esp file for the Access Gateway, search for lines similar to the following for the authorization policy trace:
<amLogEntry> 2009-08-22T20:30:20Z INFO NIDS Application: AM#501102050: AMDEVICEID#esp-2559E77C93738D15: AMAUTHID#BCF3CB40B51E8A0AF8582BEF762B4DDD: PolicyID#65LN233O-KN19-1L7M-176M-P942LMN6P832: NXPESID#1411: AGAuthorization Policy Trace:
 ~~RL~1~~~~Rule Count: 2~~Success(0)
 ~~RU~RuleID_1198874340999~Allow_Tester~DNF~~1:1~~Success(0)
 ~~CS~1~~ANDs~~1~~True(69)
 ~~CO~1~CurrentRoles(6660):no-param:TESTER,AUTHENTICATED~com. novell.nxpe.condition.NxpeOperator@string-substring~SelectedRole (6661):hidden-param:hidden-value:~~~True(69)
 ~~PA~1~~Permit Access~~~~Success(0)
 ~~PC~1~~Document=(ou=xpemlPEP,ou=mastercdn,ou=ContentPublisher Container,ou=Partition,ou=PartitionsContainer,ou=VCDN_Root,ou=accessManagerContainer,o=novell:romaContentCollectionXMLDoc),Policy=(Allow_Tester),Rule=(1::RuleID_1198874340999),Action=(Permit::1)~~~~Success(0)
 </amLogEntry>
If the PA line does not evaluate to Permit Access, then you need to review the Authorization policy and discover the conditions, other than the tester role, that must be met to permit access.