5.3 Configuring the Identity Server
You need to configure the Identity Server to use the Active Directory server as a user store, configure a Kerberos authentication class, method, and contract, create a configuration file, enable logging to verify the configuration, then restart Tomcat. These instructions assume that you have installed and configured an Identity Server cluster configuration. If you have not, see the Novell Access Manager 3.1 SP4 Installation Guide and the NetIQ Access Manager 3.1 SP5 Setup Guide.
This section covers the following tasks:
5.3.1 Enabling Logging for Kerberos Transactions
Enabling logging is not required, but it is highly recommended. If Kerberos authentication does not function after you have finished the configuration tasks, the first step in solving the problem is to look at the catalina.out (Linux) or the stdout.log (Windows) file.
-
In the Administration Console, click > > > .
-
Enable the and options.
-
In the section, set to .
-
Click , then update the Identity Server.
5.3.2 Configuring the Identity Server for Active Directory
You need to either configure your Identity Server to use Active Directory as a user store or verify your existing configuration for your Active Directory user store.
-
In the Administration Console, click > > .
-
Click .
-
View your installed user stores.
If you have already configured your Identity Server to use the Active Directory server, click its name.
If you haven’t configured a user store for the Active Directory server, click .
-
For a new user store, fill in the following fields. For an existing Active Directory user store, verify the values.
Name: Specify a name of the user store for reference.
Admin name: Specify the name of the administrator of the Active Directory server. Administrator-level rights are required for setting up a user store. This ensures read/write access to all objects used by Access Manager.
Admin password and Confirm password: Specify the password for the administrator of the Active Directory server and confirm the password.
Directory Type: Select .
Search Contexts: For a new user store, click and specify the context of the administrator of the Active Directory server. For an existing user store, verify that you have an entry for the context of the administrator and add one if it is missing.
-
(Conditional) For a new Active Directory user store, add a replica. In the section, click .
-
Fill in the following fields:
Name: Specify a name of the replica for reference. This can be the name of your Active Directory server.
IP Address: Specify the IP address of the Active Directory server and the port you want the Identity Server to use when communicating with the Active Directory server.
-
Configure the other fields to fit your security model.
-
Click .
-
-
(Optional) Specify values for the other configuration options.
-
To save your changes, click or .
-
Continue with Creating the Authentication Class, Method, and Contract.
5.3.3 Creating the Authentication Class, Method, and Contract
-
In the Local page, click > .
-
Fill in the following fields:
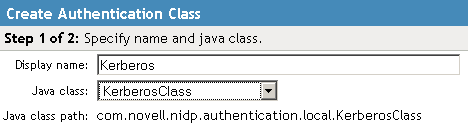
Display name: Specify a name that you can use to identify this class.
Java class: Select .
The field displays the name of the KerberosClass.
-
Click
-
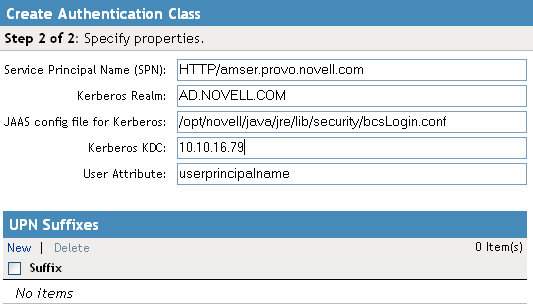
Fill in the following fields:
Service Principal Name (SPN): Specify the value of the servicePrincipalName attribute of the Identity Server user. For this example configuration, this is HTTP/amser.provo.novell.com.
Kerberos Realm: Specify the name of the Kerberos realm. The default value for this realm is the domain name of the Active Directory server, entered in all capitals. The value in this field is case sensitive. For this example configuration, this is AD.NOVELL.COM.
JAAS config file for Kerberos: Verify the default path. This should be the same path to which you copied the keytab file (see Step 2 in Configuring the Keytab File) and end with the name of the configuration file, bcsLogin.conf.
For Windows, the path needs to contain double slashes, for example: C:\\Program Files\\Novell\\jre\\lib\\security
Instructions for creating this file are in Creating the bcsLogin Configuration File.
Kerberos KDC: Specify the IP address of the Active Directory server.
User Attribute: Specify the name of the Active Directory attribute that combines the cn of the user with the DNS domain name to form its value. It is an alternate name for user login. Accept the default value unless you have set up a different attribute.
-
(Conditional) If you have configured your users to have multiple User Principal Names (UPN) so they can log in using different names (such as jdoe@abc.com, jdoe@bcd.com, and jdoe@cde.com), click , specify the suffix (such as @abc.com), then click .
-
Click .
IMPORTANT:You should create only one Kerberos class. This is caused by a limitation in the underlying Sun JGSS.
-
On the Local page, click >
-
Fill in the following fields:
Display name: Specify a name that you can use to identify this method.
Class: Select the class that you created for Kerberos.
User stores: Move the Active Directory user store to the list of User stores. If you have only one installed user store, can be used. If you have multiple user stores, the Active Directory user store must be in this list (or if it is configured to be the default user store, must be in this list).
NOTE:The testing procedure to verify Kerberos authentication is dependent upon having the Active Directory user store configured as the default user store. See Step 13.
You do not need to configure properties for this method.
-
Click .
-
In the Local page, click >
-
Fill in the following fields:
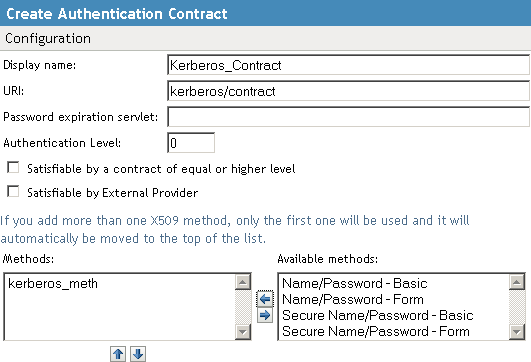
Display name: Specify a name that you can use to identify this method.
URI: Specify a value that uniquely identifies the contract from all other contracts.
The URI cannot begin with a slash, and it must uniquely identity the contract. For example: kerberos/contract
Methods: From the list of , move your Kerberos method to the list.
You do not need to configure the other contract options.
-
Click .
-
(Optional) To use the procedure that verifies the authentication configuration, you need to make the Active Directory user store the default user store. In the Local page, click .
-
Fill in the following fields:
User Store: Select the name of your Active Directory user store.
Authentication Contract: Select the name of your Kerberos contract.
-
Click .
This allows you to log in directly to the Identity Server by using the Kerberos contract. If you have already logged in to the Active Directory domain on the Windows machine, single sign-on is enabled and you are not prompted to log in to the Identity Server.
-
-
On the Identity Servers page, click .
Wait until the Health icon turns green. Click to update the page.
-
If you have Access Gateways or J2EE Agents that you want to configure to use the Kerberos contract, update these devices so that the Kerberos contract is available.
-
Continue with Creating the bcsLogin Configuration File.
5.3.4 Creating the bcsLogin Configuration File
If you are upgrading from 3.1 SP2 to 3.1 SP3, the syntax of the bcsLogin.conf file has changed.
To create the file:
-
Open a text editor.
-
Enter the following lines. The file cannot contain any white space, only end-of-line characters. Two lines (principal and keyTab) need to specify unique information for your configuration. The principal line needs to specify the service principle name for the Identity Server. The keyTab line needs to specify the location of the keytab file. The following file uses the values of the example configuration for the principal and keyTab lines. The keyTab and ticketCache lines use the default path for SUSE Linux Enterprise Server (SLES).
com.sun.security.jgss.accept {
com.sun.security.auth.module.Krb5LoginModule required
debug="true"
useTicketCache="true"
ticketCache="/opt/novell/java/jre/lib/security/spnegoTicket.cache"
doNotPrompt="true"
principal="HTTP/amser.provo.novell.com@AD.NOVELL.COM"
useKeyTab="true"
keyTab="/opt/novell/java/jre/lib/security/nidpkey.keytab"
storeKey="true";
};
For Windows, the path needs to contain double slashes: C:\\Program Files\\Novell\\jre\\lib\\security
Windows Server 2003: The path in the keyTab line should be C:\\Program Files\\Novell\\jre\\lib\\security\\nidpkey.keytab
The path in the ticketCache line should be C:\\Program Files\\Novell\\jre\\lib\\security\\spnegoTicket.cache
Windows Server 2008: The path in the keyTab line should be C:\\Program Files (x86)\\Novell\\jre\\lib\\security\\nidpkey.keytab
The path in the ticketCache line should be C:\\Program Files (x86)\\Novell\\jre\\lib\\security\\spnegoTicket.cache
-
Save this file with a name of bcsLogin.conf.
-
Copy this file to the location specified in the field of Step 4 in Creating the Authentication Class, Method, and Contract.
-
Make sure the file permissions are set correctly. They should be set to 644.
-
Restart Tomcat.
-
Linux Identity Server: Enter the following command:
/etc/init.d/novell-tomcat5 restart
-
Windows Identity Server: Enter the following commands:
net stop Tomcat5
net start Tomcat5
Whenever you make changes to the bcsLogin.conf file, you need to restart Tomcat.
-
-
If the cluster contains multiple Identity Servers, copy the bcsLogin.conf file to each member of the cluster, then restart Tomcat on that member.
5.3.5 Verifying the Kerberos Configuration
To view the catalina.out (Linux) or the stdout.log (Windows) file of the Identity Server:
-
In the Administration Console, click g > .
-
In the Identity Servers section, select the catalina.out or stdout.log file.
-
Download the file and open it in a text editor.
-
Search for Kerberos and verify that a subsequent line contains a Commit Succeeded phrase. For the configuration example, the lines look similar to the following:
principal's key obtained from the keytab
principal is HTTP/amser.provo.novell.com@AD.NOVELL.COM
Added server's keyKerberos Principal HTTP/amser.provo.novell.com@AD.NOVELL.COMKey Version 3key EncryptionKey: keyType=3 keyBytes (hex dump)=0000: CB 0E 91 FB 7A 4C 64 FE

[Krb5LoginModule] added Krb5Principal HTTP/amser.provo.novell.com@AD.NOVELL.COM to Subject
Commit Succeeded
-
If the file does not contain any lines similar to these, verify that you have enabled logging. See Enabling Logging for Kerberos Transactions.
-
If the commit did not succeed, search backward in the file and verify the following values:
-
Service Principal Name
-
Name of keytab file
For the example configuration, the file should contain lines with text similar to the following:
Principal is HTTP/amser.provo.novell.com
KeyTab is /usr/lib/java/jre/lib/security/nidpkey.keytab
-
-
(Conditional) If you make any modifications to the configuration, either in the Administration Console or to the bcsLogin file, restart Tomcat on the Identity Server.
5.3.6 (Optional) Using the Name/Password Form Authentication
You can configure the IP address or the range of IP addresses of the clients for which the kerberos authentication should be skipped or performed using the kerberos.exclude or kerberos.include keywords respectively.
NOTE:You can specify only kerberos.exclude or kerberos.include argument in the kerb.properties file not both.
To configure this option, add the following entry in the kerb.properties file:
kerberos.exclude=IP Address/Range separated by comma.
For example: kerberos.exclude=1.1.1.1,1.1.12,1.1.1.50-1.1.1.100
For the clients coming from the IP addresses specified in kerberos.exclude, Kerberos authentication will be skipped and will fall back to the custom authentication class. See Section 5.3.7, (Optional) Configuring the Fall Back Authentication Class.
For the clients coming from the IP addresses that are not specified in kerberos.include, kerberos authentication will be skipped and will fall back to the custom authentication class. See Section 5.3.7, (Optional) Configuring the Fall Back Authentication Class.
The kerb.properties file is available at the following locations:
Linux: /var/opt/novell/tomcat5/webapps/nidp/WEB-INF/classes/kerb.properties
Windows Server 2008: \\Program Files (x86)\\Novell\\Tomcat\\webapps\\nidp\\WEB-INF\\classes\\kerb.properties
5.3.7 (Optional) Configuring the Fall Back Authentication Class
You can configure an optional authentication class that has to be executed when either the kerberos authentication fails or when the kerberos authentication has to be skipped.
For information about how to skip the kerberos authentication for certain IP addresses, see Section 5.3.6, (Optional) Using the Name/Password Form Authentication.
To configure the fall back authentication class:
-
Go to the > > > > > tab.
-
Add a new property /value pair with name as FALLBACK_AUTHCLASS and set the property value to be the qualified class name such as com.novell.nidp.authentication.local.PasswordClass.
The class name value should be same as the value configured in the Java class path of the class at > > > > .
NOTE:If your authentication class requires a custom JSP file for seeking credentials, add the property JSP and specify the name of the jsp file. When the JSP property is not specified, Identity Server will use the default login.jsp for seeking the credentials.
For example, if you want to fall back to Radius, configure the following properties for the kerberos method:
FALLBACK_AUTHCLASS=com.novell.nidp.authentication.local.RadiusClassJSP=radiuslogin
Server=<<radius IPs with comma separate>>
SharedSecret=<<secret string>>
Port=<<port>>
ReplyTime=7000 (in milli seconds, this is optional)
ResendTime=2000 (in milli seconds, this is optional)
Retry=5 (this is optional)
Password=false
NOTE:Property name is case-sensitive.
Also, you can configure fall back to other mechanism based on the incoming header. In the kerberos method, add the name/value in the property field with name as NO_NEGO_HEADER_NAME. In the value field you can provide the header, which needs to be ignored for the kerberos authentication.
For example, in the kerberos method properties, if you configure the name as NO_NEGO_HEADER_NAME with value X-NovINet. If the client comes with header X-NovINet, the kerberos class will not be executed and it will fall back to the name password form by default or to the configured fall back mechanism.