15.4 Configuring a Custom Login Policy for SSL VPN
When you configure a custom login policy for SSL VPN, the SSL VPN server redirects the login requests to different URLs based on the policy configured.
-
In the Administration Console, click > .
-
Select from the policies section.
-
Click in the section.
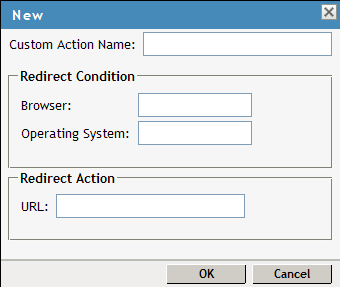
The New dialog box is displayed.
-
Specify the following information:
Custom Action Name: Specify a name for the custom login policy.
Redirect Condition: Specify the redirect condition in terms of the browser and the operating system. The conditions configured for the workstation platform and the browser platform are verified against the user agent HTTP header of the browser. For an example of a custom-login policy configured for Citrix clients, see Section 18.3, Configuring a Custom Login Policy for Citrix Clients.
-
The browser can be Firefox, Safari*, Internet Explorer, or any other. You can specify more than one browser, separated by a comma.
-
The operating software can be Windows, Linux, Macintosh, or Any. When you configure this attribute to Any, the custom-login policy becomes platform independent.
Redirect URL: Specify the URL to which a user is redirected if the redirection conditions match.
-
-
Click .
-
Specify a URL as the default URL. The user is redirected to this URL if none of the conditions are met.
-
To save your modifications, click , then click on the Configuration page.