3.4 Configuring Authentication Contracts
Authentication contracts define how authentication occurs. An Identity Server can have several authentication contracts available, such as name/password, X.509, or Kerberos. From the available contracts, you assign a contract to a specific resource or resources. It is access to a resource that triggers the authentication process. If the user has already supplied the required credentials for the contract, the user is not prompted for them again.
Each contract is assigned a URI that uniquely identifies it. This URI can be shared with other providers so that they can identify the type of credentials the Identity Provider is requiring. You can also restrict a contract so that it can only be used for local authentication and not with other providers.
-
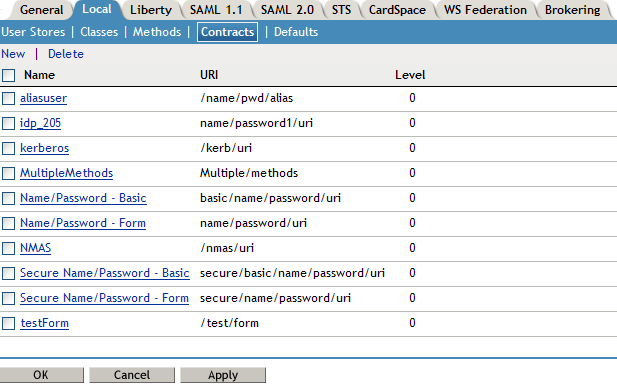
In the Administration Console, click Devices > Identity Servers > Edit > Local > Contracts.
-
To delete a contract, select the contract, then click Delete.
You cannot delete a contract if it is in use by an Access Gateway or J2EE agent.
-
To create a new contract, click New.

-
Fill in the following fields:
Display name: Specifies the name of the authentication contract.
URI: Specifies a value that uniquely identifies the contract from all other contracts. It is used to identify this contract for external providers and is a unique path value that you create. No spaces can exist in the URI field.
The following are all valid values for the URI:
/mycompany/name/password/form
http://mycompany.com/login
secure/form/password/bcompany
Password expiration servlet: Specifies a URL to a page where the user can change his or her password. This applies only to eDirectory servers when the password is expired or is within the grace login period. You must use eDirectory to change the number of grace logins.
For more information about how to use this type of servlet, see Section 3.4.1, Using a Password Expiration Service.
Allow User Interaction: If you specify a password expiration servlet, you can enable this option, which allows the users to decide whether to go to the servlet and change their passwords or to skip the servlet. If you always want to force the users to go the servlet to change their passwords, do not enable this option.
Authentication Level: A number you can assign to this authentication contract to specify its security level or rank. You use this setting to preserve authentication contracts of a higher security level. When you enable the Satisfiable by a contract of equal or higher level option on this page, the system uses this value as a reference.
For example, you might create a name/password authentication contract and assign it to level one. You might also create an X.509 authentication contract and assign it to level two. If a user supplies the credentials for the X.509 level-two contract, the system does not require the credentials to satisfy the name/password level-one authentication contract.
Authentication Timeout: Specify how long the session can be inactive before the user is prompted to log in again. The value can be from 5 minutes to 66535 minutes and must be divisible by 5.
If you modify the timeout value for a contract, the newly assigned value is given to users as they log in. Currently logged in users retain the old value until they re-authenticate.
You need to experiment to discover what values are best for your network configuration, your security requirements, and your users.
-
Shorter timeouts increase back-channel traffic and require more threads for authentication checks, but quickly free resources that are being used by inactive users. If you have slow back-end services, users could get disconnected waiting for a response, and these disconnects can generate more authentication traffic.
-
Longer timeouts, which allow inactive users to remain connected, increase memory requirements to store session information, but require fewer threads and don't generate as much back-channel traffic.
For example, if you set the timeout to 5 minutes, an authentication check needs to be done 12 times each hour for each user authenticating with this contract. If the timeout is set to 60 minutes, an authentication check is done only one time each hour for each user. However, for the 5 minute timeout, resources can be freed within 5 minutes of inactivity by the user. For the 60-minute timeout, resources can take as long as 60 minutes to be freed, depending upon when the user goes inactive.
NOTE:In case of Name/Password - Basic and Secure Name/Password - Basic contracts applied to a protected resource, then you won’t find the session as timed out, as the session gets renewed after timeout without user intervention using the Basic Authorization header sent from browser to Identity Provider.
For information about how to use this feature with the Access Gateway, see
Assigning a Timeout Per Protected Resource
in the NetIQ Access Manager 3.2 SP3 Access Gateway GuideActivity Realm(s): Specify the name of the realm that can be used to indicate activity. Use a comma-separated list to specify multiple realms. This allows a user’s session to be kept alive when the user is accessing resources that are protected by different contracts. If both contracts belong to the same realm, activity on either resource keeps the session alive on the other resource. For more information about this feature, see Section 3.4.2, Using Activity Realms.
Satisfiable by a contract of equal or higher level: Allows the system to satisfy this authentication contract if a user has logged in using another contract of an equal or higher authentication level, as specified in the Authentication Level field of an authentication contract.
When you enable this option, you need to be aware of the authentication levels you have set for other contracts and the level that has been assigned to the default contract.
When the protected resource is configured with Name/Password -Form as Authentication procedure, the user authentication details are prompted with transient federation. This option should be enabled to avoid prompting for authentication in the Target Service Provider.
Satisfiable by External Provider: Allows this contract to be selected when configuring an identity provider for Liberty or SAML 2.0. When you configure the authentication request, you can select a contract that has this option enabled and require the identity provider to use this contract in order for authentication to succeed.
Requested By: Select one of the following options:
-
Do not specify: Specifies that the identity provider can send any type of authentication to satisfy a service provider’s request, and instructs a service provider to not send a request for a specific authentication type or contract.
-
Use Types: Specifies that authentication types should be used.
Select the types from the Available types field to specify which type to use for authentication between trusted service providers and identity providers. Standard types include Name/Password, Secure Name/Password, X509, Token, and so on.
-
Use Contracts: Specifies that authentication contracts should be used.
Select the contract from the Available contracts list. For a contract to appear in the Available contracts list, the contract must have the Satisfiable by External Provider option enabled. To use the contract for federated authentication, the contract’s URI must be the same on the identity provider and the service provider. For information about contract options, see Section 3.4, Configuring Authentication Contracts.
Most third-party identity providers do not use contracts.
Allowable Class: Specifies the class that instructs a service provider to send a request for a specific authentication type to the Identity Provider. You are allowed to modify this option only when you select authentication types.
NOTE:In SAML 2 federation with Access Manager as Service Provider, if external Identity Server is authenticating a user, it sends <AuthnContext> information after authentication in the response. Access Manager uses this <AuthnContext> to find a matching contract at the Service Provider to identify the user. It identifies the contract by trying to match <saml:AuthnContextClassRef> with AllowableClass attribute or <saml:AuthnContextDeclRef> with URI attribute of existing contracts at the Service Provider.
For example, if the external Identity Server sends the following AuthnContext
<saml:AuthnContext> <saml:AuthnContextClassRef>urn:oasis:names:tc:SAML:2.0:ac:classes:Password</saml:AuthnContextClassRef> <saml:AuthnContextDeclRef>adroit:login:user:np</saml:AuthnContextDeclRef> </saml:AuthnContext>
then, if Access Manager has a contract A with uri = adroit:login:user:np, then it matches the contract.
and if Access Manager has a contract A with uri = adroit:login:user:np or with Allowable class = urn:oasis:names:tc:SAML:2.0:ac:classes:Password, then it matches the contract.
For more information about using CloudAccess as a trusted Identity Provider, see Using NetIQ® CloudAccess as a Trusted Identity Provider for NetIQ® Access Manager.
NOTE: The Allowable class field is blank when an inbuilt Authentication Class is used in Identity Server.
Methods and Available Methods: Specifies the authentication method to use for the contract. You can specify the order in which the methods are executed for login; however, this is not a graded list, so all the methods you specify are required. Available methods are the authentication methods you have set up.
You can enable the multi-factor authentication by associating more than one methods to a contract.
If you add more than one X.509 method, only the first one is used and it is automatically moved to the top of the list.
When you choose a secure method, such as Secure Name/Password, ensure that you have enabled security for the Identity Server configuration by setting the protocol to HTTPS. See
Enabling SSL Communication
in the NetIQ Access Manager 3.2 SP3 Setup Guide. -
-
Click Next.
-
Configure a card for the contract by filling in the following:
ID: (Optional) Specify an alphanumeric value that identifies the card. If you need to reference this card outside of the Administration Console, you need to specify a value here. If you do not assign a value, the Identity Server creates one for its internal use.
Text: Specify the text that is displayed on the card to the user.
Image: Specify the image to be displayed on the card. Select the image from the drop down list. To add an image to the list, click Select local image.
Show Card: Determine whether the card is shown to the user, which allows the user to select and use the card for authentication. If this option is not selected, the card is only used when a service provider makes a request for the card.
Passive Authentication Only: Select this option if you do not want the Identity Server to prompt the user for credentials. If the Identity Server can fulfill the authentication request without any user interaction, the authentication succeeds. Otherwise, it fails.
-
Click Finish, then OK.
-
Update the Identity Server and any devices that use the Identity Server configuration.
-
To use this contract, you must configure Access Manager to use it:
-
You can assign it as the default contract for the Identity Server. See Section 3.5, Specifying Authentication Defaults.
-
You can configure a protected resource to use it. See
Configuring Protected Resources
in the NetIQ Access Manager 3.2 SP3 Access Gateway Guide.
-
3.4.2 Using Activity Realms
Activity realms are designed to be used with an Access Manager system that uses multiple contracts to protect resources that require different activity timeouts. Activity realms allow you to define how activity at one protected resource affects the activity timeout at another protected resource.
An activity realm essentially represents a time line that tracks the last activity for any resource that is protected by a contract assigned to the activity realm. When a protected resource is accessed, the activity realm associated with the contract is marked as having activity. The contract times out for a protected resource when the elapsed time for activity on the activity realm is greater than the time limit specified in the contract.
For example, suppose you create an activity realm called shared1 and assign it to contract C1 with a timeout of 30 minutes and to contract C2 with a timeout of 15 minutes. Any activity at the resource protected by C1 or C2 marks activity to the shared1 time line. Figure 3-3 illustrates this scenario.
Figure 3-3 Two Contracts Sharing an Activity Realm
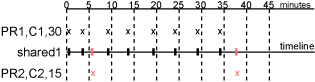
In Figure 3-3, the user logs into PR1 at time 0, then logs into PR2 at time 6. During the next 30 minutes, the user is active on PR1. The time line for the shared1 activity realm is updated with the user’s activity. The user then access PR2 at time 38. Even though no activity has taken place on PR2 for more than the 15-minute contract timeout, PR2 does not time out because activity has occurred within this time at PR1 and because the resources share the same activity realm. Assigning two or more contracts to the same activity realm allows the contracts to influence the timeouts of the other contracts in the activity realm.
When you configure protected resources to use different contracts with different timeouts, they can keep each other alive when they share the same activity realm. If protected resources should not affect each other's activity, they must not share a common activity realm.
You can assign a contract to multiple activity realms. With this configuration, activity on a resource updates the time lines of all activity realms associated with the contract. As long as one of the activity realms has activity within the contract’s timeout limit, the user’s session remains authenticated.
Activity realms are defined by specifying a name, and the names are case insensitive. Use a comma-separated list to specify multiple names. The system has two default realms that you can use:
-
Any: Leave the field blank or specify any when you want the user’s session to remain alive as long as there is some activity by the user at the Access Gateway or at the Identity Server.
When the Identity Server receives an assertion from another Identity Server that cannot be mapped to a contract, the activity realm is set to any with the timeout value equal to the value of the Tomcat session. (The Tomcat session timout is set to the greatest timeout value of the contracts configured for the Identity Server.)
-
NIDPActivity: Specify NIDPActivity for the realm when any activity at the Identity Server by the user can be used to keep the user’s session alive.
When you place multiple contracts in the same activity realm, you need to plan carefully so that security limits aren’t overruled by activity on less critical protected resources. You also need to carefully balance the desire for single sign-on with the need to require reauthentication for sensitive data. Highly sensitive resources are most secure when they are protected by a contract that is created from its own unique method and that is assigned its own unique activity realm. For more information, see Assigning a Timeout Per Protected Resource
in the NetIQ Access Manager 3.2 SP3 Access Gateway Guide.