13.2 Installing ClamAV Advanced
-
Click from .
-
Click , then click .
-
Set your scanner options for archival file support.
-
Clam Archive Max Files to Scan: Specify the maximum number of files to scan within an archive. A value of 0 disables this option.
-
Clam Archive Recursion: Specify the Clam archive maximum compression ratio. Any file that has a compression ratio above this value is marked as a virus. A value of 0 disables this option.
-
Clam Archive Limit Memory Usage: Select the check box to enable slower but more memory-efficient decompression algorithm. This only affects the bzip2 decompressor.
-
Clam Block Encrypted Archives: Select the check box to mark encrypted archives as viruses.
-
Clam Archive Block Max: Select the check box to mark archives as viruses when the archive max files, archive max file size, or archive max recusion limit is reached.
-
-
Select the security options most suitable for your business needs.
-
Portable Executable Support: By default, AntiVirus uses the most common recommended options. This option disables recommended options and allows you to enable the selected ones below. The first option is PE. PE stands for Portable Executable, which is an executable file format used in all 32-bit versions of Windows operating systems. This option allows ClamAV to perform a deeper analysis of executable files and it is also required for decompression of popular executable packers such as Petite.
-
Detect Broken Executables: Select the check box to allow detection of broken executables.
-
Microsoft Office Document Scanner: Select the check box to enable scanning of Microsoft Office document macros.
-
Check Mail Scanner: Select the check box to enable the internal e-mail scanner.
-
Clam Mail URL Scanner: Select the check box to enable the downloading and scanning of e-mail that contains URLs.
-
Clam MS HTML Script Scanner: Select the check box to enable HTML normalization and decryption of MS and Script Encoder code.
-
-
Select the appropriate runtime parameters.
-
Clam Stream Max Length: Specify that the Clam Stream maximum length connection is closed when the data size limit is exceeded. The value should match your mail transport agent’s (MTA) limit for a maximum attachment size.
-
Clam Max Connection Queue Length: Specify the maximum length for the queue of pending connections.
-
Clam Max Threads: Specify the maximum number of threads running at the same time.
-
Clam Data Read Timeout: Specify the time in seconds to wait for data from a client socket before going to timeout.
-
Clam Idle Job Timeout: Specify the time in seconds to wait for a new job before going into timeout.
-
Clam Max Directory Scan Recursion: Specify the maximum depth to which directories are scanned.
-
Clam Self Check of Software: Specify the time in seconds to perform internal sanity checks, such as database integrity and freshness.
-
Clam Follow Directory Symlinks: Select the check box to enable following of directory symlinks.
-
Clam Follow File Symlinks: Select the check box to enable following of regular file symlinks.
-
Clam Virus Event Command Execution: Enable the execution of a command when a virus is found.
-
Clam Run as User: Run as a selected user (Clam must be started by root).
-
Clam Allow Supplementary Groups: Select the check box to allow the initialization of supplementary group access (Clam must be started by root).
-
Clam Exit if Out of Memory Condition Exists: Select the check box to enable stopping the daemon when libclamav reports an out-of-memory condition.
-
-
Select the appropriate network configuration.
-
Clam Path to Local Socket File: Specify the path to a local socket file the daemon will listen on.
-
Clam Fix Stale Socket: Select the check box to enable the removal of a stale socket after an unclean shutdown.
-
Clam TCP Port Number: Specify the TCP port address.
-
Clam IP Bind Address: Specify the TCP address to bind to.
-
-
Select appropriate network configurations.
-
Clam Path to Local Socket File: Specify the path to a local socket file the daemon will listen on.
-
Clam TCP Port Number: Select the check box to enable the removal of a stale socket after an unclean shutdown.
-
Clam IP Bind Address: Specify the TCP port address.
-
Clam Fix Stale Socket: Specify the TCP address to bind to.
-
-
Select the appropriate logging options.
-
Clam Log File Path: Specify the full path of the log file. The log file must be writable for the user running the daemon.
-
Clam Log File Maximum Size: Specify the maximum size of a log file. A value of 0 disables the limit. You can use modifiers to specify log size in megabytes (M or m) or kilobytes (K or k). To specify the size in bytes, do not use modifiers.
-
Clam Log Syslog Facility: Specify the type of syslog message. Refer to man syslog for facility names.
-
Clam Log File Unlock: Select the check box to disable log file locking. By default, the log file is locked for writing to protect against running ClamAV multiple times. If you want to run another ClamAV, copy the configuration file, change the Log File variable, and run the daemon with the -config-file option.
-
Clam Log Event Time: Select the check box to enable an event’s time to be logged.
-
Clam Log Event Messaging to Syslog: Select the check box to use the system logger. This can work together with LogFile.
-
Clam Verbose Logging: Select the check box to enable verbose logging.
-
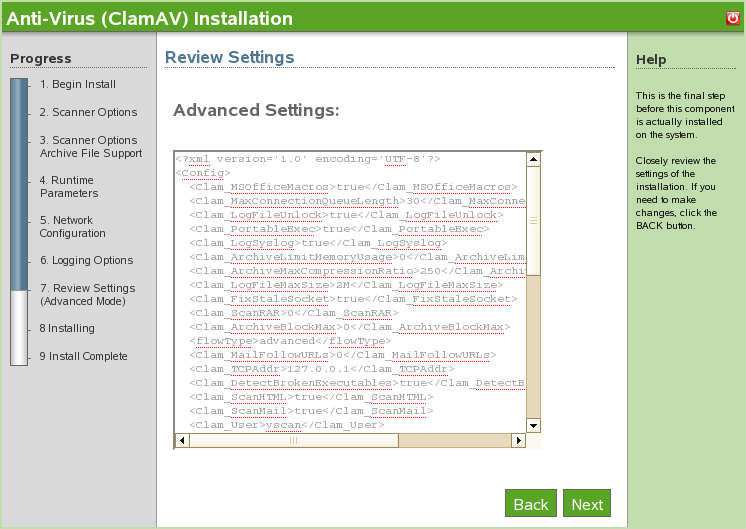
-
Review the settings. To make a change, click . To proceed with the installation, click .
-
The ClamAV advanced install is now complete. Click to return to the available components page.