3.5 Cluster-Enabling MySQL on the Logical Volume
Now that you have configured MySQL for the LVM logical volume, you are ready to cluster-enable MySQL. In iManager, you use the Novell Cluster Services MySQL template to create a cluster resource for the LVM volume group that contains the MySQL database. The resource’s load script starts the MySQL daemon when the resource is brought online, and the unload script stops it when the resource is taken offline.
The sample scripts in this section use the following sample parameters. Ensure that you replace the sample values with your values.
|
Parameter |
Sample Value |
|---|---|
|
Resource IP Address |
10.10.10.44 |
|
MOUNT_FS |
ext3 This is the file system you created on the LVM volume group, such as ext2, ext3, reiserfs, or xfs. |
|
VOLGROUP_NAME |
mysqlvg |
|
MOUNT_DEV |
/dev/$VOLGROUP_NAME/mysqllv |
|
MOUNT_POINT |
/mnt/mysql |
|
MySQL_ROOT |
$MOUNT_POINT/var/lib/mysql |
Use the following procedure to create the MySQL cluster resource for the LVM volume group:
-
In iManager, select > , select the cluster., then select the tab.
-
Under the title, click .
-
On the > page, specify as the type, then click .
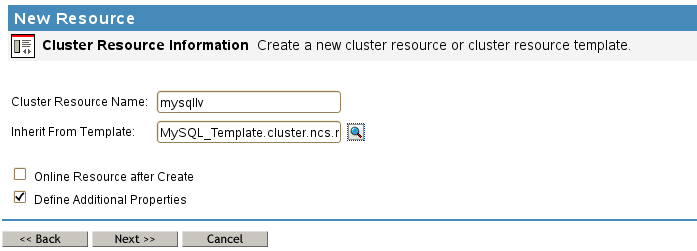
-
On the > page, specify a cluster resource name, browse to select the then click .
Do not select . You must configure the resource scripts and settings before bringing the resource online.
-
On the Load Script page, modify the definition fields for your MySQL resource, file system type, volume group name, logical volume name, and mount point, then click .
The following load script uses the sample values from the MySQL setup:
#!/bin/bash
. /opt/novell/ncs/lib/ncsfuncs

# define the IP address
RESOURCE_IP=10.10.10.44
# define the file system type
MOUNT_FS=ext3
#define the volume group name
VOLGROUP_NAME=mysqlvg
# define the device
MOUNT_DEV=/dev/$VOLGROUP_NAME/mysqllv
# define the mount point
MOUNT_POINT=/mnt/mysql

# define MySQL database root
MySQL_ROOT=$MOUNT_POINT/var/lib/mysql

#activate the volume group
exit_on_error vgchange -a ey $VOLGROUP_NAME

# mount the file system
exit_on_error mount_fs $MOUNT_DEV $MOUNT_POINT $MOUNT_FS

# add the IP address
exit_on_error add_secondary_ipaddress $RESOURCE_IP

# start MySQL
/usr/bin/mysqld_safe --user=mysql --pid-file=$MySQL_ROOT/mysql.pid --socket=$MySQL_ROOT/mysql.sock --datadir=$MySQL_ROOT --bind-address=$RESOURCE_IP &>/dev/null &

# return status
exit 0
-
On the Unload Script page, modify the definition fields for your MySQL resource, file system type, volume group name, logical volume name, and mount point, then click .
The following unload script uses the sample values from the MySQL setup:
#!/bin/bash
. /opt/novell/ncs/lib/ncsfuncs

# define the IP address
RESOURCE_IP=10.10.10.44
# define the file system type
MOUNT_FS=ext3
#define the volume group name
VOLGROUP_NAME=mysqlvg
# define the device
MOUNT_DEV=/dev/$VOLGROUP_NAME/mysqllv
# define the mount point
MOUNT_POINT=/mnt/mysql

# define MySQL database root
MySQL_ROOT=$MOUNT_POINT/var/lib/mysql

# request MySQL stop
ignore_error killproc -p $MySQL_ROOT/mysql.pid -TERM /usr/sbin/mysqld

# del the IP address
ignore_error del_secondary_ipaddress $RESOURCE_IP

# umount the file system
sleep 10 # if not using SMS for backup, please comment out this line
exit_on_error umount_fs $MOUNT_DEV $MOUNT_POINT $MOUNT_FS

#deactivate the volume group
exit_on_error vgchange -a n $VOLGROUP_NAME

# return status
exit 0
-
On the Monitoring Script page, modify the definition fields for your MySQL resource, file system type, volume group name, logical volume name, and mount point, then click .
The following monitoring script uses the sample values from the MySQL setup:
#!/bin/bash
. /opt/novell/ncs/lib/ncsfuncs

# define the IP address
RESOURCE_IP=10.10.10.44
# define the file system type
MOUNT_FS=ext3
#define the volume group name
VOLGROUP_NAME=mysqlvg
# define the device
MOUNT_DEV=/dev/$VOLGROUP_NAME/mysqllv
# define the mount point
MOUNT_POINT=/mnt/mysql

# define MySQL database root
MySQL_ROOT=$MOUNT_POINT/var/lib/mysql

#check the logical volume
exit_on_error status_lv $MOUNT_DEV

# check the file system
exit_on_error status_fs $MOUNT_DEV $MOUNT_POINT $MOUNT_FS

# check the IP address
exit_on_error add_secondary_ipaddress $RESOURCE_IP

# check MySQL
exit_on_error checkproc -p $MySQL_ROOT/mysql.pid /usr/sbin/mysqld


# return status
exit 0
-
On the Resource Policies page, specify the , , , and , then click .
For information about completing these fields, see
Configuring the Start, Failover, and Failback Modes for Cluster Resources
in the OES 11 SP3: Novell Cluster Services for Linux Administration Guide. -
On the Resource Preferred Nodes page, assign the nodes where MySQL is installed, then click .
The resource appears in the Cluster Objects list:

-
Bring the MySQL resource online. Select , select the MySQL resource check box, then click .

If the resource goes comatose, offline the resource, then open its properties page and re-verify the scripts.