5.2 Special Options
In addition to the settings for a default user account, openSUSE offers some special options, such as auto login, login without password, encrypted home directories or quotas for users and groups.
5.2.1 Auto Login and Passwordless Login
If you use KDE or GNOME desktop environment you can configure Auto Login for a certain user as well as Passwordless Login for all users. Auto login causes a user to become automatically logged in to the desktop environment on boot. This functionality can only be activated for one user at a time. Login without password allows all users to log in to the system after they have entered their username in the login manager.
WARNING: Potential Security Risk
Enabling Auto Login or Passwordless Login on a machine that can be accessed by more than one person bears a potential security risk. Without the need to authenticate any user can gain access to your system and your data. If your system contains confidential data, do not use this functionality.
If you want to activate auto login or login without password, access these functions from .
5.2.2 Managing Encrypted Home Directories
To protect data in home directories against theft and hard disk removal, you can create encrypted home directories for users. These are encrypted with LUKS (Linux Unified Key Setup), which results in an image and an image key generated for the user. The image key is protected with the user's login password. When the user logs in to the system, the encrypted home directory is mounted and the contents are made available to the user.
With YaST, you can create encrypted home directories for new or existing users. To encrypt or modify encrypted home directories of already existing users, you need to enter the user's current login password. By default, all existing user data is copied to the new encrypted home directory, but it is not deleted from the unencrypted directory.
Creating Encrypted Home Directories
-
Open the YaST dialog in the view.
-
To encrypt the home directory of an existing user, select an entry and click .
Otherwise, click to create a new user account and enter the appropriate user data on the first tab.
-
In the tab, activate . With , specify the size of the encrypted image file to be created for this user.
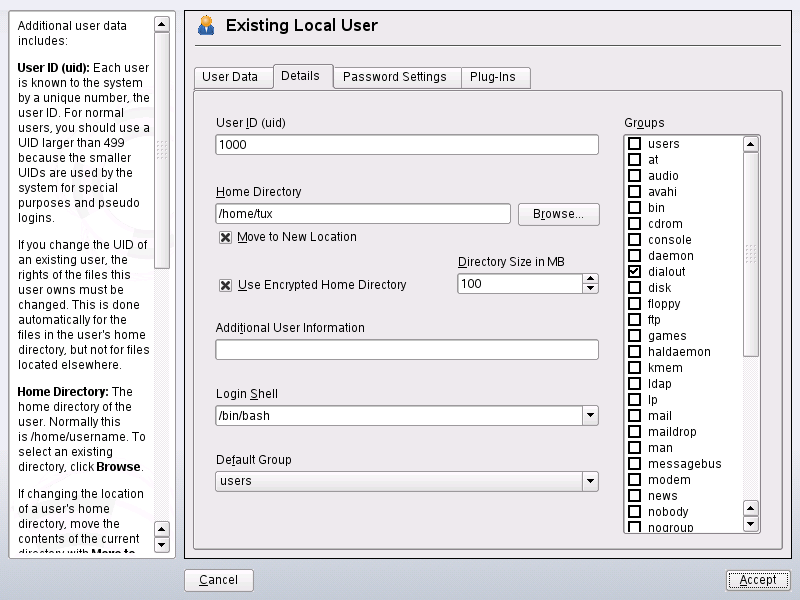
-
Apply your settings with .
-
If you have changed the encryption options for an already existing user, YaST prompts you for the user's current login password. Enter the user's password to proceed.
-
Click to save all changes without exiting the administration dialog. Or click to close the administration dialog and to save the changes.
Modify or Disable Encrypted Home Directories
Of course, you can also disable the encryption of a home directory or change the size of the image file at any time.
-
Open the YaST dialog in the view.
-
Select a user from the list and click .
-
If you want to disable the encryption, switch to the tab and disable .
If you need to enlarge or reduce the size of the encrypted image file for this users, change the .
-
Apply your settings with .
-
Enter the user's password to proceed.
-
Click to save all changes without exiting the administration dialog. Or click to close the administration dialog and to save the changes.
WARNING: Security Restrictions
Encrypting a user's home directory does not provide strong security from other users. If strong security is required, the system should not be physically shared.
Further options for encrypted home directories are available from a command line tool,
cryptconfig. Find more information about cryptconfig and which additional
actions to take for stronger security in Section 40.2, Using Encrypted Home Directories,
(↑ Reference ).
5.2.3 Using Fingerprint Authentication
If your system includes the fingerprint reader by UPEK/SGS Thomson Microelectronics shipped with some IBM and Lenovo ThinkPads (also to be found in some other laptops, USB keyboards or as stand-alone device), you can use biometric authentication in addition to standard authentication via login and password. After registering their fingerprint, users can log in to the system either by swiping a finger on the fingerprint reader or by typing in a password.
Fingerprints can either be registered with YaST or from the command line. Find detailed information about configuration and use of fingerprint authentication at http://en.opensuse.org/Using_Fingerprint_Authentication.
5.2.4 Managing Quotas
To prevent system capacities from being exhausted unnoticed, system administrators can set
up quotas for users or groups. Quotas can be defined for one or more file systems and restrict
the amount of disk space that can be used and the number of inodes that can be created there.
For information about inodes, refer to Section 16.1, Terminology,
(↑ Reference ). openSUSE
allows usage of soft and hard quotas. Soft quotas usually
define a warning level at which users are informed they are nearing their limit, whereas hard
quotas define the limit at which write requests are denied. Additionally, grace intervals can be defined that allow
users or groups to temporarily violate their quotas by certain amounts.
Enabling Quota Support for a Partition
In order to configure quotas for certain users and groups, you need to enable quota support for the respective partition in the YaST partitioner first.
-
In YaST, select and click to proceed.
-
In the , select the partition for which to enable quotas and click .
-
Click and activate .
-
Confirm your changes with and leave the with .
Setting Up Quotas for Users or Groups
Now you can define soft or hard quotas for specific users or groups and set time periods as grace intervals.
-
In the YaST , select the user or the group for that you want to set quotas and click .
-
On the tab, select the quota entry and click to open the dialog.
-
From , select the partition to which the quota should apply.
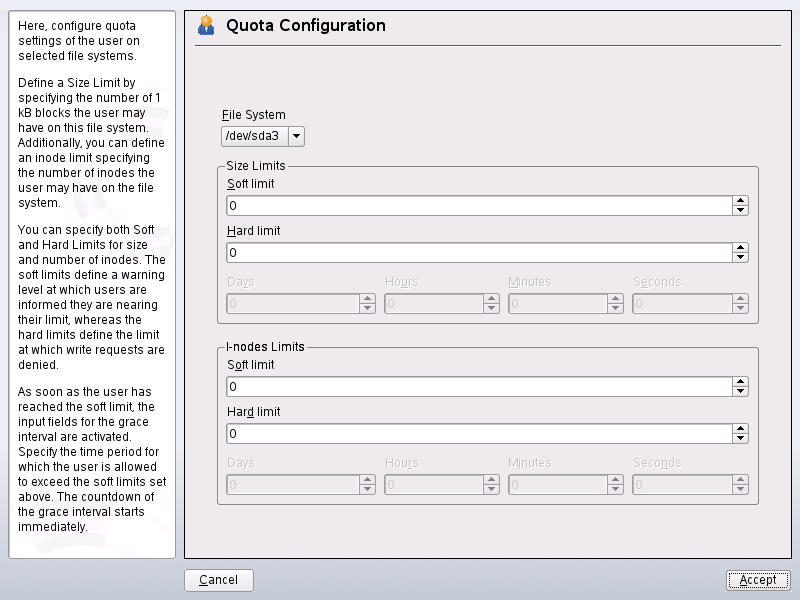
-
Below , restrict the amount of disk space. Enter the number of 1 kB blocks the user or group may have on this partition. Specify a and a value.
-
Additionally, you can restrict the number of inodes the user or group may have on the partition. Below , enter a and .
-
You can only define grace intervals if the user or group has already exceeded the soft limit specified for size or inodes. Otherwise the time-related input fields are not activated. Specify the time period for which the user or group is allowed to exceed the limits set above.
-
Confirm your settings with .