12.5 Configure Menu Options
NOTE:To use this feature, you must have the Event Menu Configuration user permission.
Use the Event Menu Configuration window to create the menu items that appear on the menu, which is available by right-click when an event (or set of events, if the action is written in JavaScript) is selected in any event table (for example, an Active View window, Snapshot window, Incidents Events window, or Offline Query window). Sentinel has the following default Event Menu Configuration items that you can clone, activate, or deactivate:
Figure 12-7 Event Menu Configuration

-
Ping: Ping the destination (or target) IP of the selected event
-
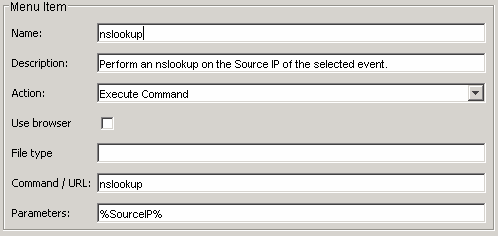
nslookup: Perform an nslookup on the Source (or initiator) IP of the selected event
-
tracert: Perform a traceret from the Source (or initiator) IP of the selected event to the Sentinel Server
-
Whois?: Perform an ARIN Whois? lookup on the Source (or initiator) IP of the selected event
To view the configuration details for any of these options, select the item and click .The following is the nslookup configuration.
Figure 12-8 Menu Item
In addition, new options can be customized to execute a command, open a Web browser, or execute a JavaScript Action configured through the Action Manager.
NOTE:The Execute Command scripts, commands, or applications must be available in <install_directory>/config/exec.
Event Menu Configuration allows you to perform the following activities:
12.5.1 Adding an Option to the Event Menu
Users with the appropriate permissions can add new actions to the event menu that appears when users right-click an event or events in any event table. There are three types of actions that can be configured for the event menu:
-
Execute Command: Executes a script or an application, and opens the output in a specified application. This action can take the value of a field or fields as input, and can only be executed on a single event.
-
Launch a Web Browser: Launches a Web browser with a specified URL. This action can take the value of a field or fields as input, and can only be executed on a single event.
-
JavaScript Actions configured through the Action Manager. JavaScript actions can be executed on a single event or multiple events.
NOTE:Some JavaScript action plug-ins require a correlated event or incident as input. Actions configured from these plug-ins are excluded from the Event Menu Configuration list. This Action Plugin property is defined by the developer.
To add a command to the right-click menu:
-
Click the tab.
-
In the Admin Navigator, click .
-
Click . The Event Menu Configuration window opens.

-
Specify a name and description.
To place the command in a folder, provide folder name/command name in the field.
-
Select an action from the drop-down menu or click to configure a new JavaScript action. The available settings vary based on which action is chosen:
Option
Description
Use browser
Displays the output of your command by using the defaults configured for the Web browser, based on the file type. This is only available with the Execute Command action.
File Type
If you selected the Execute Command Action, if your browser settings are set up to use the default browser, and if you selected the option to launch a browser, you have the option of setting the file type for the output of this command (such as .pdf). This is only available with the Execute Command action if Use browser is selected.
Command/URL
The script or URL that the browser should open or the script or application name to invoke. This is only available with the Execute Command and Launch Web Browser actions.
Parameters
Parameters to represent information from the selected event must be enclosed by percent signs (for example, %InitIP%). For a list of available tags you can use when specifying parameters, click in the Event Menu Configuration dialog box or see
Sentinel 6.1 Rapid Deployment Event Fields
in the Sentinel Rapid Deployment Reference Guide.This option is only available if your menu configuration browser settings are set to Use Default Browser. For more information, see Section 12.5.8, Editing Your Event Menu Browser Settings.
NOTE:The script or application for Execute Command must be located in <install_directory>/config/exec.
-
Click . The new option is added to the list of menu items when users right-click an event or events.
12.5.2 Cloning an Event Menu Option
-
Open the Event Menu Configuration window.
-
Select a menu item from the table and click Clone.
-
In the Event Menu Configuration dialog box, edit the following as necessary:
-
Name
-
Description
-
Action
-
To use a browser or not. For information, see Section 12.5.8, Editing Your Event Menu Browser Settings.
-
Command/URL
-
Parameters
-
Select an action:
-
Execute Command
-
Launch Web Browser.
-
Any JavaScript action configured in the Action Manager
-
For a list of available tags you can use when specifying parameters, click Help on the Event Menu Configuration dialog box or see
Sentinel 6.1 Rapid Deployment Event Fields
in the Sentinel 6.1 Rapid Deployment Reference Guide. -
-
Click OK. The new option is added to the list of menu items in the Event Menu Configuration window.
12.5.3 Modifying an Event Menu Option
-
Open the Event Menu Configuration window.
-
Double-click a menu option.
-
Type your desired changes and click .
12.5.4 Viewing Event Menu Option Parameters
-
Open the Event Menu Configuration window.
-
Select a menu item and click .
12.5.5 Activating or Deactivating an Event Menu Option
-
Open the Event Menu Configuration window.
Right-click a menu option and select either or .

12.5.6 Rearranging Event Menu Options
-
Open the Event Menu Configuration window.
-
Select a menu option and click or n.
12.5.7 Deleting an Event Menu Option
-
Open the Event Menu Configuration window.
-
Select a menu option and click .
-
Click to delete the menu option
-
Click to retain the menu option
-
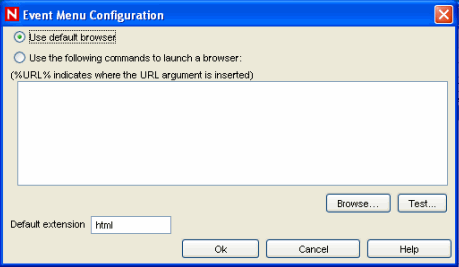
12.5.8 Editing Your Event Menu Browser Settings
This option allows you to send your Event Menu output to an external browser. The external browser can be any application. It is not restricted to Internet browsers. By changing the file extension, you can launch whatever application is associated with that extension. For example, txt is often associated with Notepad. You can also select to launch a specific program (for example, you can set txt files to be opened by Wordpad or another editor).
-
Open the Event Menu Configuration window.
-
Click Browser.
-
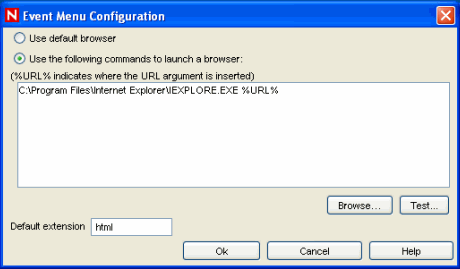
Select one of the following two options:
-
Use default browser: Uses the default browser set for that particular machine.
-
Use the following commands to launch a browser: Allows you to specify a specific application to launch. When you are using a browser other than the default browser, your command line must be followed by a %URL%. For example:
C:\Program Files\Internet Explorer\IEXPLORE.EXE %URL%
-
Default extension: This file extension is assumed if the file type in a configured action is blank.
The following is an example where the output of the Menu Option launches into Internet Explorer.
-
-
After you set your configuration, click .