4.4 Dynamic Lists
Dynamic lists are distributed list structures that can be used to store string elements, such as IP addresses, server names, or usernames. The lists are then used within a Correlation rule for a quick lookup to see whether an incoming event includes an element from the dynamic list. Some examples of dynamic list include:
-
Terminated user lists
-
Suspicious user watchlist
-
Privileged user watchlist
-
Authorized ports and services list
-
Authorized server list
A dynamic list can be built by using the text values for any event meta tag. Elements can be added to the list manually (by an administrator) or automatically whenever a Correlation rule fires. Elements can be removed from a list manually (by an administrator), automatically whenever a correlation rule fires, when their time limit expires, or when the maximum list size is reached.
IMPORTANT:The Time To Live (TTL) must be between 60 seconds and 90 days and the maximum list size is 100,000.
Regardless of how the values were added, they can be persistent (active until manually removed or until the maximum list size is reached) or transient (active only for a specified time frame after being added to the list, also known as the Time to Live). The Time to Live can range from 60 seconds to 90 days.
NOTE:If the Time to Live period is updated on an active dynamic list, the change is not retroactive to elements already on the list. Elements that are already added to the dynamic list retain their original Time to Live.
4.4.1 Adding a Dynamic List
-
Click on the menu bar and select Dynamic Lists. Alternatively, you can click the button on the toolbar.
-
Click the button located on the top left corner of the screen. The Dynamic List Properties window displays.
-
Provide the name of the list.
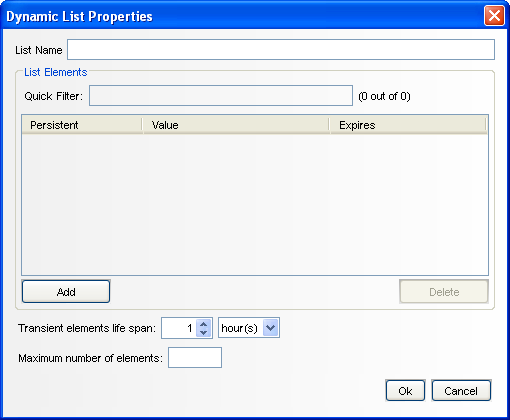
The name cannot contain special characters, such as quotations or hyphens.
-
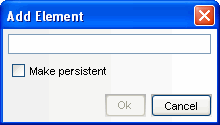
Click . The Add Element window displays:
-
Provide the name of the Element. To make the Element persistent, select the check box and click .
To make an existing element persistent, select the check box next to the element name in the Dynamic Properties window.
-
Select , then specify the time the persistent values are active in the list
-
Specify the maximum number of elements. The number defined here limits the number of elements in the list.
-
Click .
.
4.4.2 Modifying a Dynamic List
-
Click on the menu bar and select . Alternatively, you can click the button on the toolbar.
-
Select a dynamic list and click the link.
-
The Dynamic List Properties window displays. Edit the options as required and click .
4.4.3 Deleting a Dynamic List
WARNING:Do not delete a dynamic list that is part of a correlation rule or rules.
-
Click on the menu bar and select . Alternatively, you can click the button on the toolbar.
-
Select a dynamic list and click the link next to it. A confirmation message alert displays.
-
Click to delete the list.
4.4.4 Removing Dynamic List Elements
There are several ways an element can be removed from a dynamic list:
-
A user can remove it manually
-
The element can be removed by a Correlation rule action
-
The transient element life span can expire
-
If the maximum number of elements for a dynamic list is reached, elements are removed from the list to keep the list at or below the maximum list size. The transient elements are removed (from oldest to newest) before any persistent elements are removed.
4.4.5 Using a Dynamic List in a Correlation Rule
Dynamic lists can be referenced in a Correlation rule by using the option of the Correlation Rule Wizard. For example:
filter(e.<tagname> inlist <Dynamic List Name>)
Where, e.<tagname> represents a meta tag in the incoming event, such as e.shn (Source Host Name) or e.dip (Destination IP address) <Dynamic List Name> is the name of an existing Dynamic List, such as CriticalServerList
The following instructions assume that a dynamic list already exists.
To add a dynamic list to correlation rule:
-
Open the Correlation Rule Manager window and select a folder from the drop-down list to which this rule is added.
-
Click the button located on the top left corner of the screen. The Correlation Rule window displays. Select .
-
In the Custom/Freeform Rule window, write the condition for the rule, including the name of the dynamic list. For example, filter(e.sev inlist Severity) where Severity is the dynamic list name.
-
Click to test the validity of the rule.
-
After validation of the rule, click . The Update Criteria window displays.
-
Update the criteria for the rule to fire and click .
-
Provide a name for this rule. You have an option to modify the rule folder.
-
Provide a rule description and click .
-
You have an option to create another rule from this wizard. Select your option and click .
NOTE:Users must have the permission to Start/Stop the Correlation engine to perform these actions.
The two states of Correlation engine are:


When the Correlation engine is enabled, it processes active Correlation rules. When it is in a disabled state, all in-memory data is preserved and no new Correlation events are generated. Disabling the Correlation engine does not affect other parts of the Sentinel system.
Correlation rules are stored in the Sentinel database. When you activate the Correlation engine in the Sentinel Control Center, it requests the deployment information and rules from the database. Changes to a rule are not reflected in the Correlation engine until one of the following things happens:
-
The rule is undeployed, edited, and redeployed.
-
The rule is freshly deployed