12.4 Filters
Filters allow you to process data based on specific criteria for events in real time and for users of the system. Filters enable you to manage data seen in the Sentinel Control Center. The Filter engine drives the Real Time Event windows by maintaining the data structure for each security filter. Filters prevent users from viewing unauthorized events and they drop events that users don’t want to see. Filters are created in the tab of the Sentinel Control Center.
NOTE:The following are invalid filter name characters: $ # . * & : < >.
There are three types of filters:
12.4.1 Public Filters
Public filters are system-owned. Public filters can be used as security filters or display filters. Security filters are based on user permissions. Display filters determine which events are depicted in the real time event tables, charts, and graphs.
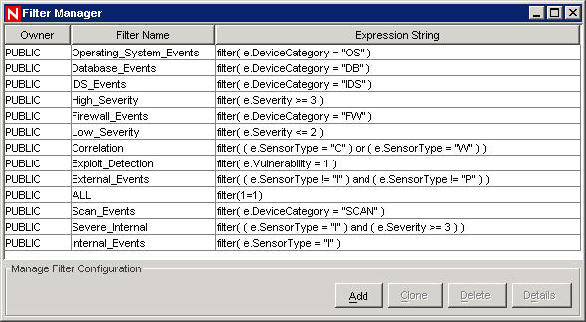
Figure 12-3 Filter Manager Window

12.4.2 Private Filters
Private filters are user-owned. Private filters are display filters and are shareable if you have the View Private Filters permission.
12.4.3 Global Filters
Global filters are classified as Public filters. Global filters are sequentially processed at the Collector Manager for each event. Once the global filter criteria are met, the evaluation stops for that event and the associated global filter action is taken for the event.
The order of evaluation of global filters is top to bottom, as shown in the console. They can be enabled or disabled as required. Global Filters enable routing actions and JavaScript actions on events. Routing actions include dropping events or routing events to database, database and GUI (SCC), or only to GUI (SCC).
Through the Global Configuration window, you can:
Figure 12-4 Global Filter Configuration
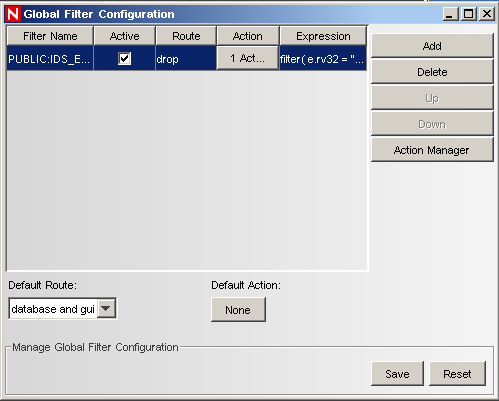
NOTE:The column and the button are available only on systems that have Sentinel Rapid Deployment Hotfix 2 or later installed.
Creating a Global Filter
-
Click the tab.
-
Click or select in the navigation tree.
-
In the window, click .
-
In the new blank row, click the column.
-
In the window, highlight a relevant filter and click , or click if you need to create a filter.
-
In the column, select the checkbox to associate the filter with the options specified in the and columns.
NOTE:If the checkbox is not selected, the options sepecified in the and will be associated to the filter. If the is set to None, then no action will be associated to the filter.
-
In the column, select the routing action that the global filter will have on events that pass this global filter.
If an event does not meet any of the active global filters, the default action determines how the event is handled.
The following are the options available in the drop-down list:
-
drop: Events are dropped and are not sent to Sentinel Control Center or the Sentinel Server database.
-
database: Events are sent directly to the Sentinel Server database and not sent to the Sentinel Control Center.
-
database and gui: Events are sent to the Sentinel Control Center and the Sentinel Server database.
-
gui only: Events are sent to the Sentinel Control Center.
-
-
Continue adding filters until you have completed adding all the required filters.
-
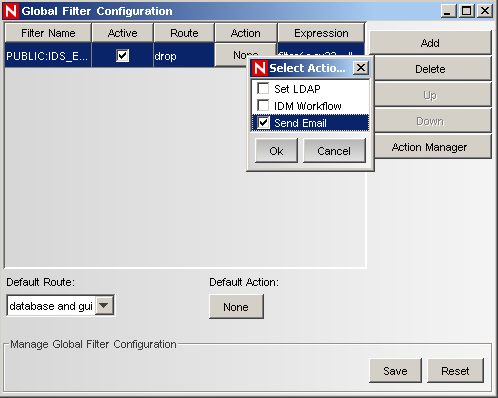
In the column, select the action that needs to be performed once the filter criteria are met.
NOTE:To create new actions for the filter, click or from the menu bar click > > . For more information on creating actions, see Section 17.3, Actions.
You can associate single or multiple actions to a filter. By default, the and > are set to None. Global Filters execute only JavaScript actions. Actions that are associated with global filters cannot be deleted from the Action Manager.
-
Continue adding filters until you have completed adding all the required filters.
-
Click .
Rearranging Global Filters
-
In the window, select a filter and click or to move it to a different location on the list.
-
Click .
Deleting a Global Filter
NOTE:When you delete a global filter, the confirmation message is not displayed.
-
In the window, select a filter from the list and click .
-
Click .
12.4.4 Configuring Public and Private Filters
Configuring public and private filters allow you to:
Figure 12-5 Filter Manager Window
Adding a Filter
To add a public or private filter:
-
Click or select under the folder in the Navigator; then click .
-
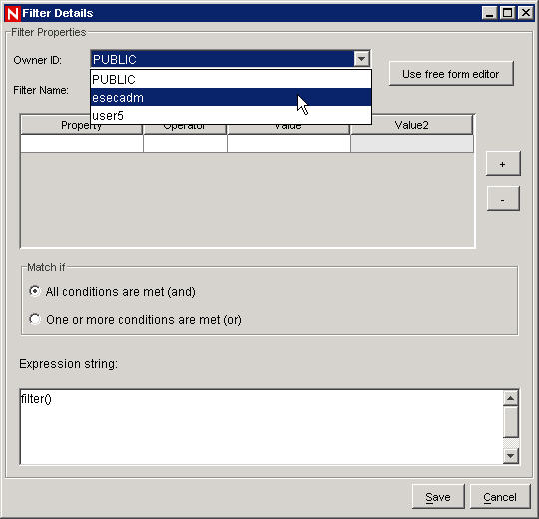
Select an Owner ID. You can select PUBLIC or PRIVATE (user owned).
-
Specify a filter name.
The table editor is the default selection for editing the contents.
Optionally, you can click Use free form editor to display a free form editor. The free form editor allows you to create complex expressions not possible with the table editor. However, after the expression is modified with the free form editor, the table editor cannot be used with the expression.
-
Select the criteria for the following columns:
-
Property
-
Operator
-
Value columns.
NOTE:To include special characters in the column, you should provide the hexadecimal value (character code) of the special character. For example, if the value is “10.1.1.1”, you should enter \x2210.1.1.1\x22 to embed the double quote in a string value.
The box displays the filters that you created in RuleLg language.
-
-
In the Match if box, click one of the following:
-
All conditions are met (and)
-
One or more conditions are met (or)
-
-
To create another filter expression, click Create a New Filter Expression (+) to add another row to the filter expression table.
-
To remove a filter expression, select a filter expression from the table and click Remove the Selected Expression (-).
-
Click Save.
Cloning a Public or Private Filter
Cloning is a convenient way to duplicate a filter to assure consistency of criteria among a group of filters or users.
-
Open the Filter Manager window.
-
Click .
-
Provide a new filter name.
-
Change any original filter’s criteria.
-
Click .
Modifying a Public or Private Filter
-
Open the Filter Manager window.
-
Select a filter and click .
-
Change any of the criteria as desired. You cannot change the Owner ID and the Filter Name.
-
Click Save.
Viewing the Details of a Public or Private Filter
-
Open the Filter Manager window.
-
Select a filter and click .
Deleting a Public or Private Filter
-
Open the Filter Manager window.
-
Select a filter and click .
A confirmation window displays.
-
Click in delete confirmation dialog box.
12.4.5 Color Filter Configuration
The Color Filter Configuration feature allows you to assign background and text colors to events in the Sentinel Control Center based on filter criteria. The background and text colors assigned to a filter apply to all Sentinel tables, including Active Views, event tables associated with incidents, offline queries and historical event queries.
On applying a color filter, all the event tables are updated.
Figure 12-6 Color Filter Configuration
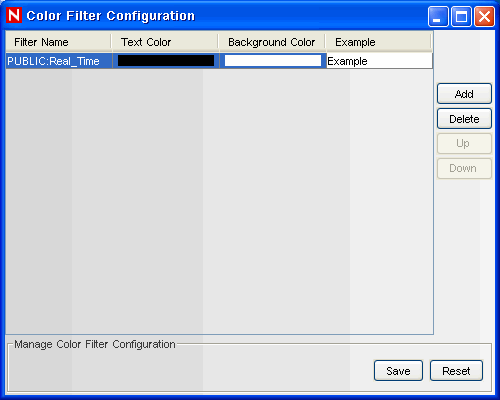
The Color Filter Configuration GUI displays a list of all the color filters that are defined in the order in which they should be applied. If an event meets the criteria for more than one of the color filters, the first color filter configuration is applied. For example, the following filter configurations are created and attached to color filter configuration:
-
Color filter configuration 1: sev=2 (with background color red and text color yellow)
-
Color filter configuration 2: sev>1 (with background color white and text color black)
Any event with severity=2 will meet the criteria for both color filters, but because the sev=2 color filter configuration is at the top, all the events with sev=2 are coded according to color filter configuration 1. All the other events with sev>1 (For example, sev=3, 4, 5 and so on) follow color filter configuration 2.
Adding a Color Filter
-
Click Color Filter Configuration in the navigation pane or click the button.
-
Click Add. A new Color Filter Configuration row is created as shown below.

-
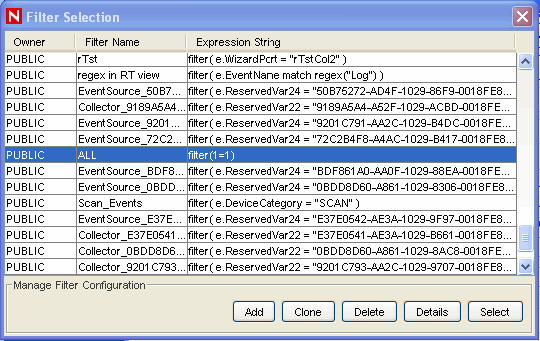
Click the Filter Name drop-down list. The Filter Selection window displays.
-
From the list, select a filter to which you want to apply the color filter configuration and click , or click to create a new filter.
For more information on configuring filters, see Section 12.4.4, Configuring Public and Private Filters.
-
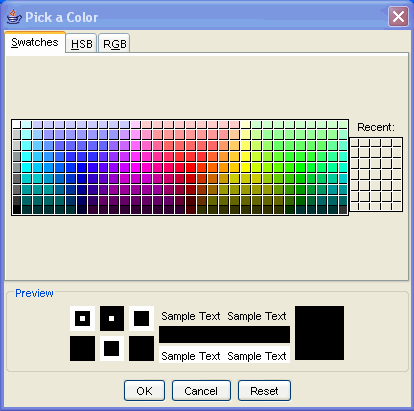
In the Color Filter Configuration window, click . The Pick a Color window displays.
-
Select a color from the tab. Alternatively, click the or tab and specify the HSB or RGB color value in the respective tab.
-
Click .
-
In the Color Filter Configuration window, click . The Pick a Color window displays.
-
Select a color from the Swatches tab. Alternatively, click the or tab and specify the HSB or RGB color value in the respective tab.
-
Click .
-
Click .
NOTE:The order of the color filter configuration row in the Color Filter Configuration window matters. If more than one color filter definition applies to an event, the formatting for the first color filter takes precedence.
Deleting a Color Filter
-
Click in the navigation pane.
-
Select a Color Filter Configuration row and click .
Setting Color Filter Priorities
-
Click Color Filter Configuration in the navigation pane or click the Color Filter Configuration button.
-
Select a Color Filter Configuration row.
-
Click the or button to set the priority.
NOTE:The Up and Down buttons are active only when there is more than one color filter configuration row available in the Color Filter Configuration window.