1.36 Relationships Tab
The Relationship Tab allows Users to view and/or create a Relationship Map for the current Item, with other Items within the CMDB.
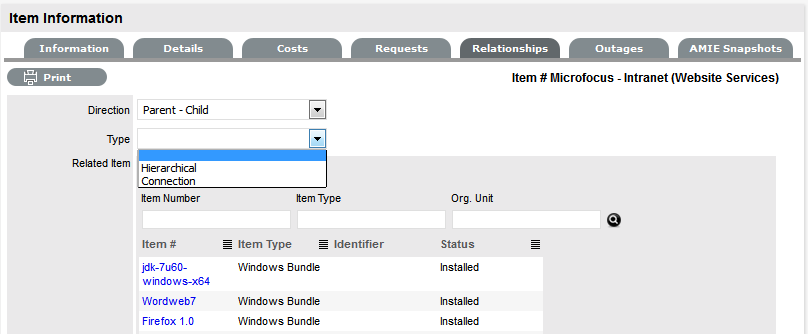
The Relationship direction can be defined as:
-
Service Oriented - Parent-Child Relationship
-
Component Oriented - Child-Parent Relationship.
Within each view the Relationship Class can be defined as:
-
Hierarchical Relationship
-
Connection - an association between the selected Items.
For a Service, such as the Email or Web Site Service, it is recommended that the Hardware be defined as the Parent for the Software Items and the Software be defined as the Parent of the Email or Web Site Service.
1.36.1 Create a Relationship
To create a new Item Relationship:
-
Select Configuration>Items
-
Select an Item
-
Select the Item's Relationship tab
-
Click Edit
-
Click New
-
Select the Relationship Direction and Class from the drop-down menus
-
Define the Relationship by selecting a description from the drop-down list
NOTE:If the Relationship Type has the Inherit Parent Ownership option enabled, Child Items that use this relationship will inherit the Parent Item's owners. The ownership will not be editable and no other Parent Item can be assigned to the Child Item. A warning will be displayed if a relationship type has the Inherit Parent Ownership option enabled.
-
Use the Find Item field to locate the relevant Item
-
Click on the Item Number hyperlink to create the Relationship
-
Click Save to default to the Relationship Map view.
1.36.2 Relationship Map
Within the Relationships tab of the Item Information screen, a Relationship Map visually displays the connections that have been defined for an Item. All Item Relationships are listed in the Relationships Table beneath the Map. The Relationship Map can display up to 48 Child Items and 16 Parent Items in the one diagram.
The central icon of a Map is a visual representation of the selected Item. Scroll over an Item label to view any information recorded on the Information and Details tabs of the Item. To drill-down through the relationships, click on an Item icon label. To change the focus of the Relationship Map to another Item, click on the Item icon label and the system will request that OK be selected before updating the central node of the Map.
The Relationship Table data displayed at the base of the map can be filtered using the Direction filter view of Parent-Child or Child-Parent.
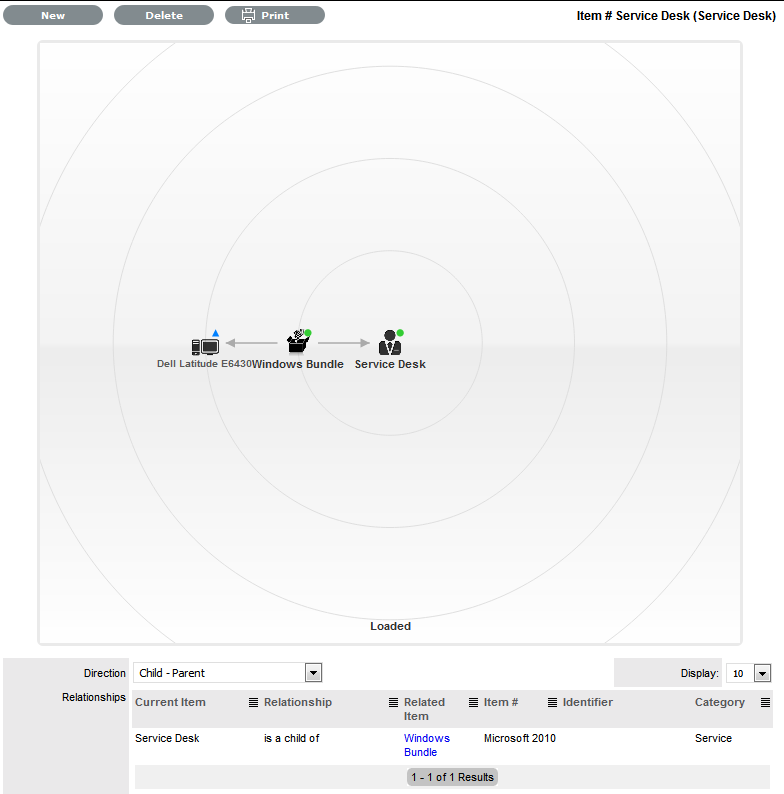
The map displays the relationship between each Lifecycle State by using different colors to represent the type of Lifecycle State.
|
Color |
|
|---|---|
|
Green Circle |
CI is assigned an online status. |
|
Red Square |
CI is assigned an offline status. |
|
Blue Triangle |
Service CI is assigned a pre-production status. |
The Lifecycle State name can be accessed by scrolling over the Item icon within the Map.
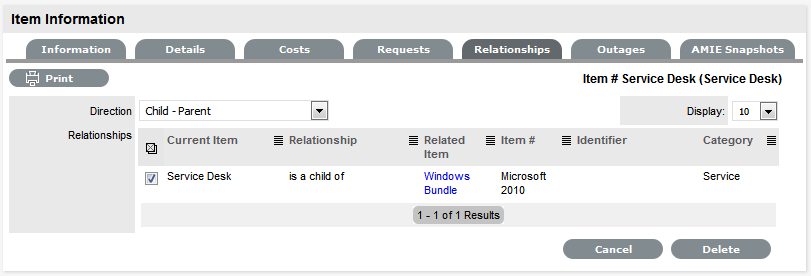
1.36.3 To delete a Relationship:
To remove the Relationship between Items:
-
Select the relevant Item within the Configuration tab
-
Move to the Relationships tab
-
Click Edit
-
Select Delete
A table with the Relationship details is displayed.
-
Select the Relationship Direction to display the relevant Relationship table
-
Mark the checkbox next to the Relationship that is to be removed
-
Select Delete
-
Click Done to return to the Item list.