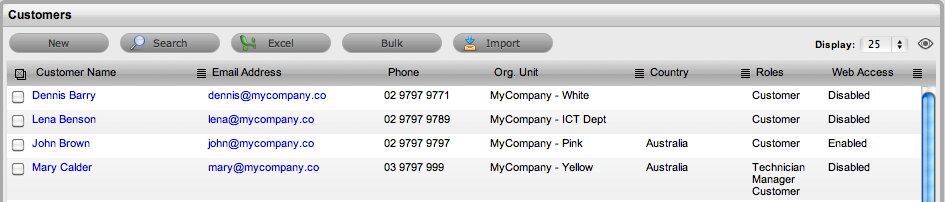
Select
User>Customers
The Customers screen is displayed.
Home > Administrator Guide > Users > Customers > Importing Customers using a CSV File
Using a .CSV file (comma-delimited text file), Customers can be imported instantly.
The fields that are required within the text file for Customers to be imported are:
First Name
Last Name
Email address
Username (unique)
Password.
To import Customers using a .CSV File:
Select
User>Customers
The Customers screen is displayed.
Click
![]()
The Customer Import Wizard appears.
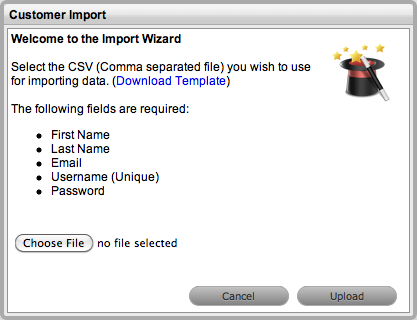
To view a template that illustrates the fields the application is looking for and the data types (see below), click the Download Template link on the Customer Import Wizard screen.
The following fields should be visible:
Title (char 128),First Name(char 64), Last Name(char 64), Email Address(char 64), Company(char 64), Department (char 64),Primary Company Contact (int 1), Primary Department Contact (int 1),Address 1(char 128), Address 2(char 128), City(char 64), State(char 32), Postcode/ Zip (char 20), Country(char 64), Phone(char 20), Mobile(char 20), Fax (char 20), Pager (char 32),Username (Unique char 64), Password (char 64), Partners Email (char 64), Custom1(char 256), Custom2(char 256), Custom3(char 256), Custom4(char 256), Custom5(char 256), Notes (clob), Locale (char 5), Line Manager Username (char 128)
The ‘char ###’ designation in parentheses after each field name signifies what type of data the import utility expects to see in each field. For instance:
’First Name (char 64)’ means that the first name field cannot exceed 64 characters.
'Company Contact (int 1)' means that a 1 in the field will assume the Customer is the Primary Contact for the Company, if the field is left empty or completed with a zero, it is assumed the Customer is not a Primary Contact.
Fields marked as ‘Unique’ must be unique in the system
Locale is the Email Locale for the Customer and will be set to the option applied in the Setup>Email>Setup>Default Locale field if the column is empty
Line Manager Username is the Customer's Username as recorded in the system or to be created as part of the .CSV import.
If the Partner option has been enabled in the application Setup, a Partner can be assigned to a Customer by defining the Partner email within the .CSV file.
The Country specified must be the
same as what is found within the application
If the spelling is different in the .CSV file, a Customer's Country
details will not be imported.
Click
Choose File
Select a .CSV file to be imported
Click
Upload
Displayed are lists of fields that are mapped to the corresponding
fields in the .CSV file that is to be imported.
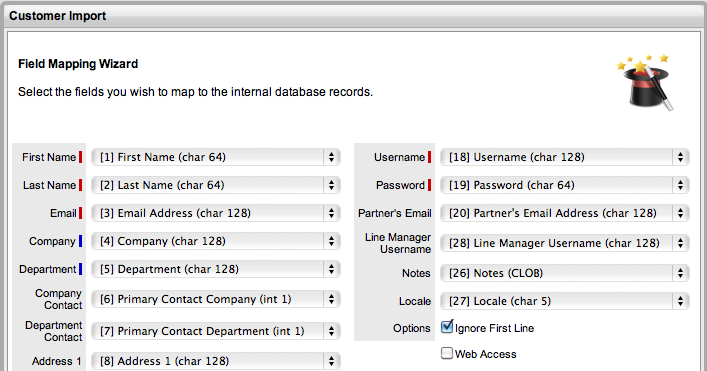
*Fields marked with a I are mandatory.
*Fields marked with a I
that do not contain matching system records automatically create new records
in system.
Adjust mapped fields, if relevant
Check
Ignore First Line if the imported .CSV file uses its first line as
a header to define the field information
Leave the box unchecked if the .CSV file begins with usable data.
Check
Web Access if the imported Customers are to have immediate access
to the Customer Portal
If this option is not selected, Customers will not be able to log into
the application until they have been designated web access within
the Customer Information>Contact tab.
Click
Import
The results of the import attempt will be displayed. If the import
was successful, the new Customer details can now be accessed in the
system.
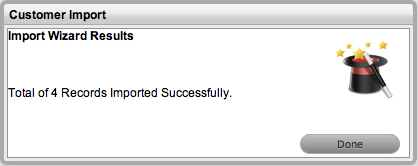
Click Done.
After the Customer has been imported, other fields require manual configuration, including:
Room (if relevant)