Importing Items using a .CSV File
To import Items using a .CSV file, a .CSV
template, containing all available fields, can be downloaded and populated.
The service management system uses a field mapping Wizard to match fields
in the template to those in the system. To download the template go to
Setup > Item Import > Import. See Downloading
an Item .CSV Template for more information on configuring the .CSV
file.
Before
Importing a CSV File
For an Item to be successfully imported,
the following fields must be mapped:
The
Teams within the .CSV file must be created in the system before
they can be associated with an Item as part of a .CSV import. Teams are
created by a Supervisor under the User>Teams tab.
Items are imported
based on Category (i.e. Hardware, Software, etc.), which must be configured
by the Supervisor within the Configuration>Categories tab before conducting
a .CSV import. The Categories configuration defines the Details recorded
in the Item to be imported into the system. The Administrator must create
separate .CSV files based on the Categories configured, that are then
individually uploaded into the application.
For Items imported with owners, the Username
in the .CSV file must match the Username within the support system. If
the owner does not exist in the system, the imported Item will become
a Global Item.
If relationships are to be created
between Items upon import, Parent Items should be imported first.
If the system generated Item Number is to be used for the Parent Item,
it needs to be included in the Parent Item Number field of the Related
Items when they are imported.
Importing Items
To import a CSV File using the Import Wizard:
Select
Setup>AMIE
Select
the Import tab
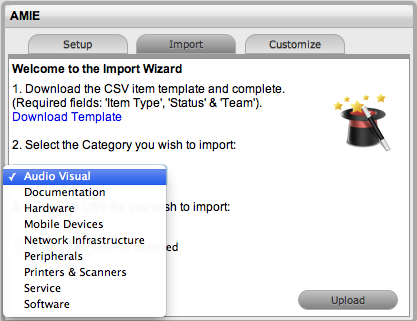
To access a template that illustrates the fields the application maps
and the data types (see below), click the Download Template link on
the Item Import Wizard screen within the Setup>AMIE>Import tab.
The following fields should be visible:
Item Number(Unique char 64),Item Type(char 128),Manufacturer(char 128),Incident
Team(char 64),Problem Team(char 64),Change Team(char 64),Request Team(char
64), Company(char 128),Department(char 128),Room(char 64),Username
(char 64),Status(char 128),Criticality(char 64)Purchase Date(datetime),Cost(decimal),Field1(char
256),Field2(char 256),Field3(char 256),Field4(char 256),Field5(char
256),Field6(char 256),Field7(char 256),Field8(char 256),Field9(char
256), Field10(char 256),Field11(char 256),Field12(char 256),Field13(char
256),Field14(char 256),Field15(char 256),Field16(char 256),Field17(char
256),Field18(char 256),Field19(char 256),Field20(char 256),Notes(CLOB),Relationship
Name(char 256),Parent Item Number(char 64)
The char ### designation in parentheses after each field name signifies
what type of data the import utility expects to see in each field.
For instance:
Item
Type (char 128) means that the first name field cannot exceed
128 characters.
Fields
marked as Unique must be unique in the system.
Note
the Room details MUST be in the following format: COMPANY-DEPARTMENT;Room
When creating a .CSV file for a Category, to
determine the Field number of a configured Custom Field, within the
Category tab of an Item
Category select the System defined Ordering option. The field labels
will then be listed in sequential order from one to twenty.
To
import, select the Item Category
The drop-down list consists of all Categories created by the Supervisor
in Configuration>Categories.
Enter
the file location, or use the Browse button
Select
Upload
The Field Mapping Wizard appears. Fields that can be mapped to the
CSV file are available in the drop-down list.
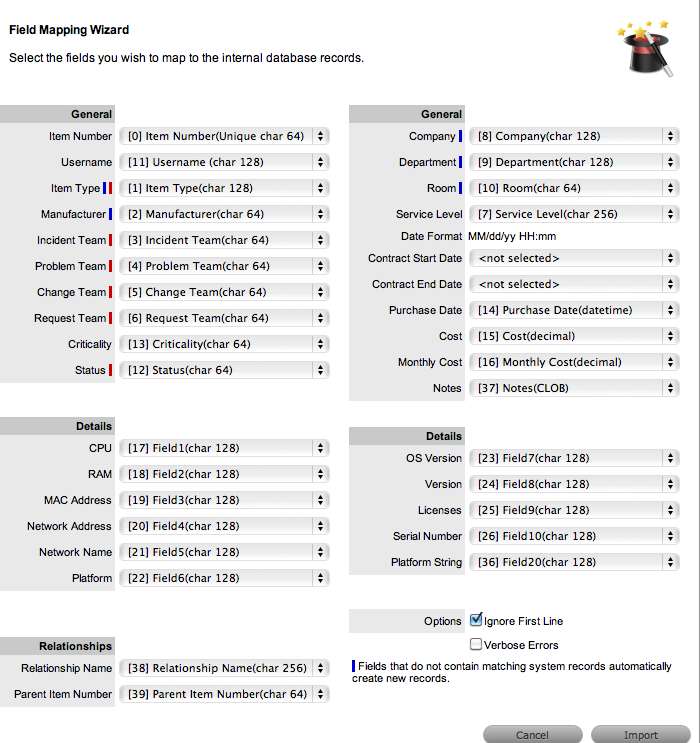
Review and map the fields within the .CSV
Field
Mapping Wizard |
General |
Item Number |
Unique
Item number of the Configuration Item, this can be generated
by the system or defined in the .CSV file. |
Username |
Customer
owning the Configuration Item, imported by entering their
user name. |
Item Type II |
Item
Type of the Configuration Item. |
Manufacturer I |
Sets
the manufacturer details of the Item. |
Incident Team I |
Incident
Team assigned to the Configuration Item. |
Problem Team I |
Problem
Team assigned to the Configuration Item. |
Change Team I |
Change
Team assigned to the Configuration Item. |
Request Team I |
Request
Team assigned to the Configuration Item |
Criticality |
Sets
the default Criticality (i.e, critical, high, moderate, low,
very low) for the Item. Optional. |
Status I |
Default
Configuration Item Status. |
Company I |
Company
owning the Configuration Item. |
Department I |
Department
owning the Configuration Item. |
Room I |
The
location of the Item. The .csv file data format to import
this information MUST be:
COMPANY-DEPARTMENT;Room |
Service Level |
Configuration
Item assigned SLA. |
Date Format |
Displays
the date format required for the contract details to be imported
successfully. |
Contract Start Date |
Sets
the start date of a contract associated with an Item. |
Contract End Date |
Sets
the end date of a contract associated with an Item. |
Purchase Date |
Date
the Item was purchased. |
Cost |
The
cost of the Item. |
Monthly Cost |
Sets
the monthly Service Cost on per month basis for the Item. |
Notes |
Free
text to add notes to the Item. Optional. |
Details |
Fields 1 to 20 |
Custom
fields created for the Category are displayed and can be mapped
to the Item based on information included in the .CSV file. |
Relationships |
|
Relationship Name |
Defines the description
of the relationship between the Item set in the following
field. |
Parent Item Number |
Identifies
the Item with which an Item is related using the Item Number. |
Options |
|
Ignore First Line |
Option
to ignore first row upon import. |
Verbose Errors |
Detailed
description of any errors that occur during the import process. |
I = Information
that needs to exist in the system before the import
I
= Fields that are mandatory
If relationships are to be created
between Items upon import, Parent Items should be imported first.
If the system generated Item Number is to be used for the Parent Item,
it needs to be included in the Parent Item Number field of the Related
Items when they are imported.

Select
the Ignore First Line checkbox if the first line of the imported CSV
file has field headings
Leave the checkbox clear if the CSV file begins with usable data.
Click
Verbose Errors to record a detailed description of any errors that
occur during the import
Leaving the box unchecked will return a summarized error report.
Select
Import to bring into the system the mapped field data
The Item Import screen displays the results of the import.
Select
Done.
Configuring Items after the Import
During the Item Import, elements that do not exist in the database are
created. These are the fields marked with a blue line within the Field
Mapping Wizard:
Item
Type
Warranty
Organizational
Units.
After an import, all Item Types that have
been created will need to be further configured.
To complete Item Type configuration:
Log
in to the Supervisor Portal
Select
Configuration>Types
In
the Item Types screen, click on the newly created Item
The Type Information screen appears.
Complete
the following fields:
Item
Type |
|
Name |
Name
of the Item Type. |
Manufacturer |
The
manufacturer of the Item Type. New manufacturers can be created
and existing manufacturers can be edited and deleted by using
the Edit and New buttons that appear beside the drop-down
menu of manufacturers. |
Item Category |
This
signifies the type of Item. (Hardware, Software or Service
are the default Types, but Users with the Supervisor Role
can create more if required). |
Identifier |
The
drop-down list that appears is drawn from the fields defined
for the Item Category selected. Although this information
is not required, the Identifier is used to differentiate similar
Items that may be in use throughout an organization. For example,
if an organization uses the same printers for all departments,
an Item Category field of "Location" could be configured
for the Item Details and this could also be used as a secondary
Identifier for Printer Item. |
Criticality |
Rates
the degree of importance of an Item Type within an organization,
which can be adjusted on a per Item basis. The 'Impact' of
a Request is initially pulled from the Criticality of the
Item, but can be adjusted within the request Information screen
if required. Requests logged through the Customer Portal,
use the Criticality of the Item to set the Priority
of the request.
The Incident Analyzer, if enabled by the
Administrator in Setup>CMS>Incident Analyzer, can
apply the Criticality to automatically detect Problems.
The minimum Criticality level can also
be used to determine the off-line Items that appear on Outages
pages, if the Outages pages are enabled by the Administrator
in Setup>Privileges>System. |
Icon |
When
the Type details are saved, the Icon selected for the Item
Category will be displayed. To customize the icon for the
specific Item Type, select the Icon to access the Upload  or Cancel or Cancel  options.
 |
Unit Price |
The
per-unit price of the Item Type. |
Instance
Total |
Number
of instances owned by the organization. |
Assigned |
Number
of instances assigned to Customers as Items. |
Hidden |
Select
'On' to ensure Customers cannot view this Item Type within
the list in the Customer Portal. If all Item Types use this
selection, the Item Type list will be completely removed from
the Portal.
Items created using Item Types with Hidden
enabled, will not allow Customers to generate requests against
them in the Customer Portal, nor will they be able to view
or receive updates about requests logged by the User against
Items with this functionality enabled. |
Creation |
Enabling
this option gives Customers using the portal the ability to
create new Items using this Item Type (if they have been granted
the ability to create Items by the Administrator in Setup>Privileges>Customer>Create
Item. (This option is not displayed when the Hidden
option is enabled.) |
Ignore Share |
Enabling
this option overrides the system level option for sharing
requests raised against Items of this Type. Requests raised
against Items of this Type will not appear in the customer
portal when viewing shared requests is enabled. |
Add Forum
Topic |
Create
a forum topic using the Item Type Name. This option is only
displayed when a new Type is being created. |
Incident
Default |
The
Team of Technicians assigned to support Incidents received
related to the Item Type. See: Teams |
Problem Default |
The
Team of Technicians assigned to support Problems received
related to the Item Type. See: Teams |
Change Default |
The
Team of Technicians assigned to support Change Requests received
related to the Item Type. See: Teams |
Request Default |
The
Team of Technicians assigned to support Service Requests received
related to the Item Type. See: Teams |
Service Level
Default |
The
default service level for the Item Type. When Billing is enabled,
service levels without a cost are listed as an option. The
service level with an associated cost can be applied when
the Item created, this ensures Item contract payment is processed. |
Support Levels |
All
Service Level Agreements assigned to the Item Type, which
will be displayed as options when a request is created applying
Item that uses this Type template. SLAs listed here, are used
within the Costs tab of Service Types to forecast break even
points on the Service relative to the number of Users. |
Find SLA
(Name) |
To
assign multiple SLAs use this option. Click  to view all SLAs or refine the search by entering a specific
name. Select the SLA hyperlink to assign the SLA to the Type
Information. Click
to clear the search field.
to view all SLAs or refine the search by entering a specific
name. Select the SLA hyperlink to assign the SLA to the Type
Information. Click
to clear the search field. |
Enter
the Unit Price for the Item Type. This is an optional field that is
used for asset management
See Finance Role.
Set
the Customer options
Assign
the default support Teams
Assign
one or multiple SLAs, as required
Click
Save
Move to the Classification
tab to create problem classification for this Item Type.
Click on the Item Type name to continue configuration.
Assigning multiple Companies and Departments to an Item
The .CSV file import facility can also be used to assign more than one
Company and Department to an Item, if required. To assign multiple companies
within the Company column of the .CSV file, enter the company names separated
by a semi-colon (;) If the Company or Companies do not exist in the system,
or have been deleted, a new Company will be created.
When importing multiple Departments related to the multiple Companies,
the Department related to the Company must be listed in the same order
as the Companies and separated by a semi-colon. For example:
Company Field: comp1;comp2
Department Field: dept1:depart2 or ;dept2 or dept1;
Any departments that do not exist in the database or have been deleted,
will be created as a result of the .CSV import.
To assign rooms to one of the locations of this multiple Company/Department
assignment, the full details of the Company and Department must be entered
into the column followed by a semi-colon and the Room number. An example
of the Room import format is:
Company Field:CompName1;CompName2
Department Field:Dept1;Dept2
Room Field: CompName1 - Dept1;Room1
Updating Item Information via .CSV
To easily update multiple Items that already exist within system, information
can be imported using a .CSV file. For the update to be successful, the
Item number in the .CSV file must match the Item number in the system.
Follow the above Importing Items
procedure and ensure the Item Number field is mapped correctly. If an
Item Number is not included in the .CSV file, a new Item will be created.