Workaround Article
Workarounds are temporary fixes applied to a Problem until the Problem
is resolved.
To assign a Workaround to a Problem, the User can apply a Proposed Workaround
presented by the application or use the Search Workaround facility. If
a Workaround Article does not exist, a Workaround can be created within
this screen. Once a Workaround is applied to the Problem it can be accessed
via the Analysis tab under the View Workaround option.
The Workaround options included in the Analysis tab are:
Analysis Tab Options |
Proposed Workarounds |
Displays a list of all Workarounds
with a search based on Problem Description, Item Type and Classification.
To assign a Workaround, select the Article number to display the
Workaround in full. Click Resolve if the Workaround is relevant.
This will assign the Workaround to the Problem. After a Workaround
has been assigned, the View Workaround option will become visible
within the Analysis options |
Search Workarounds |
Allows User to enter full
text or ID number to search for possible Workaround Articles.
To assign a Workaround, select the Article number to display the
Workaround in full. Click Resolve if the Workaround is relevant.
This will assign the Workaround to the Problem. After a Workaround
has been assigned, the View Workaround option will become visible
within the Analysis options |
New Workaround |
Displays Knowledge Base editor
to allow User to enter a new Workaround. Define visibility, enter
a Summary, a Description and Save. |
Creating a Workaround Article
Within a Problem:
Select the Analysis
tab
Click Edit
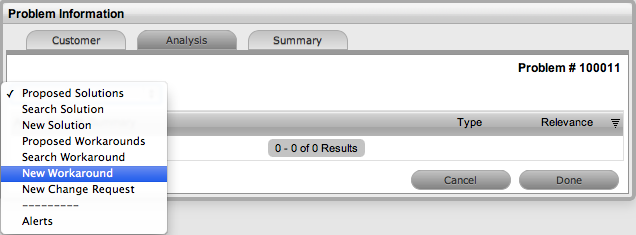
Select the New Workaround
option within the drop-down list
The screen defaults to the expanded Solution Article editor with the
Visibility and Status locked down.
Visibility
Options |
Description |
Assigned
Request |
The default visibility. This means that
the solution is only visible relative to the Problem through
which it was created. |
Users |
Visible by internal Users only (i.e.,
not Customers). |
Users &
Customers |
Visible to internal Users and Customers
logged into the
application. |
Everyone |
Available publicly, without logging
into the system. |
Enter a Review Date
or leave blank for the field to be automatically populated when saved
The Item Category, Classification and Item Type are all drawn from
the related request.
Edit the Problem content
if required

Enter the Workaround
content
Upload an relevant Attachments,
within the Attachments tab
Click Save.
Requests Tab
Workaround Articles generated within requests, include a Requests tab.
This tab enables the User to view details of the request related to the
Article. For detailed information about Knowledge Base Articles see: Articles.