Log in as an Administrator
Select Setup > Item
Import > Customize
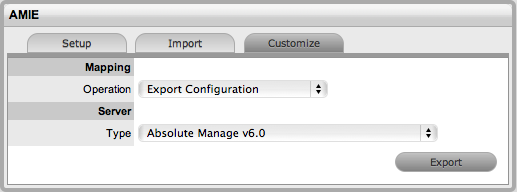
From the Mapping Operation drop-down list, select Export Configuration
Select the Server Type for the configuration export
Click Export.
An .xml file is produced.
The customized mapping functionality provides the Administrator with greater control over the Item Types and Categories information accessed during the Item import process. It allows the Administrator to customize queries by defining parameters for importing Items.
Prior to importing Items, to define the parameters of the Items to be
imported, the Item parameters must be exported to a file. To export the
parameters file:
Log in as an Administrator
Select Setup > Item
Import > Customize
From the Mapping Operation drop-down list, select Export Configuration
Select the Server Type for the configuration export
Click Export.
An .xml file is produced.
To customize the Item import, the above exported configuration file will need to be modified. To modify the file:
In the text editor of your choice, open the XML file
Modify the properties
as required.
The example below explains how the Centennial 2006 6.1 configuration
can be customized.
The first line within the XML file displays the following three fields:
<IMPORT_DEFN SERVER="Centennial"
VERSION="2006 6.1" AUTHOR="LiveTime Software Inc.">
They identify an entry for an Asset Management Server type. By modifying these fields, we can effectively create another configuration for Centennial 2006 6.1, for example:
<IMPORT_DEFN SERVER="Centennial"
VERSION="2006 6.1 (Bob's Config)"
AUTHOR="Bob">
This newly configured name will be the Server Type listed as an option
when setting up AMIE.
Item
Categories
The configuration mapping file is divided into "blocks" of
Item Categories. In each block, we define a number of instructions to
execute during AMIE's import process.
For example:
<ITEM CATEGORY="Hardware" ID_KEY_FORMAT="Client.Client">
"ITEM CATEGORY" instructs AMIE to import all items within the defined XML block, as generic “Hardware”. If we wanted to be more specific about our import for Hardware, we could break this down into sub-categories, for example: “Computer”, “Printer”, and “Network Peripheral”.
Assuming the selected Asset Management Server supports the inventory control of these individual categories, defining an XML block for each category would allow the Administrator to import each Hardware Item as a “Computer, “Printer” or “Network Peripheral”.
The ”r;ID_KEY_FORMAT” attribute is simply used to illustrate the format of the primary key field for this category in the Asset Management database . In the example, “Client.Client” says that the “Client” column of the “Client” table will contain the primary key for our Hardware.
Note that this only affects systems that support the feature of manually editing the Item Number field (when the Setup > Privileges> System> Edit Item Numbers option is enabled). In order to use editable Item numbers when AMIE is enabled, the 'Edit Asset Mgmt IDs' option must also be set to "Yes".
Item
Properties
Item Properties are typically the fields used to describe the Item Details,
such as “CPU”, “RAM”, “Serial Number” etc. The instructions to retrieve
property data are defined in the "<QUERY
...>" and "<ITEM_PROPERTY
...>" elements.
"<QUERY >" Element :
Define the 'Query' property to locate the table data.
For example, the query below will retrieve the 'CPU' data for Hardware . The Query Name (cpu) is used to reference the property field as described later.
<QUERY NAME="cpu">SELECT
cpu FROM com.livetime.assetimport.Hardware cpu WHERE cpu.propClient =
:ASSETID and cpu.propHardwareType = 4</QUERY>
"<ITEM_PROPERTY>" Element:
Define the 'Item Property' to extract column
data for the above Query.
Each of these entries maps an Item property,
from the Asset Management Server to the service management system. For
example, the value in the CPU field of the Asset Management Server will
be mapped to the CPU field of the application database.
<ITEM_PROPERTY FIELD="field1"
VALUE_PREFIX="" VALUE="cpu.propAsize"
VALUE_SUFFIX="MHz" TYPE="LOOKUP" />
Below is an explanation for each of these
attributes:
Attribute |
Description |
ITEM_PROPERTY FIELD
|
This is the name
of the field that exists in the system database. The field "field1"
for the "Hardware" Item Category maps to the "CPU"
field. |
VALUE_PREFIX
|
This will prefix the actual value returned from the Asset Management Server database. |
VALUE |
This value can
either be a hard-coded value, or a value the Administrator wants
to import from the Asset Management Server database (see: TYPE
attribute below) For the latter, we define a string using the query.property notation, which will reference the actual value in the database. In our example, our VALUE attribute is "cpu.propAsize".
In most cases, the property name is identical to the database column name, with the first letter capitalized followed by lower-case. Property names are always pre-appended with the word “prop”, to ensure uniqueness in the import process. Take this into consideration when defining custom properties. |
VALUE_SUFFIX
|
This will suffix the actual value returned from the Asset Management Server database. In our example, we set it to "Mhz", as it is the CPU field. Suffixing "Mhz" in this case gives the imported value more meaning. |
TYPE
|
"LOOKUP" - retrieves the data from the VALUE attribute as specified using the query.property notation. "QUOTED" - treats the VALUE attribute as a hard-coded value. |
Query entries
allow AMIE to retrieve necessary data from the Asset Management Server
database. AMIE queries are written in a query language called HQL,
which is similar to SQL.
For more information on HQL and some examples on how to write HQL queries,
see: http://www.hibernate.org/hib_docs/reference/en/html/queryhql.html
Item Relationships
When defining multiple Item Category types to import, for
example Hardware and Software, an Administrator can specify how they are
related. Configuring these properties will allow Items to be imported
with predefined relationships.
It is important to note that children should only ever contain this information, as relationships are defined from the bottom up.
In this example, the Centennial 2006 6.1 Software Relationship block is as follows:
<RELATIONSHIP RELATED_TO="Hardware" TO="is a parent of" NAME="Parent of / Child of" FROM="is a child of" CLASS="1000" INHERIT_OWNERSHIP="1">
<NATIVE_ID_QUERY>SELECT computer.client FROM com.livetime.assetimport.Client computer WHERE computer.propAddress is not null and computer.client :SW_ASSETID.0</NATIVE_ID_QUERY>
</RELATIONSHIP>
This "Parent of / Child of" relationship
already exists as one of the factory supplied relationship types. However
any newly defined relationships can be mapped and created as part of the
import process.
The attributes and child elements are explained as follows:
Attribute |
Description |
RELATED_TO
|
The Item Category another Item Category can relate to. For example "Software" is to be related to "Hardware". |
TO
|
A label describing the relationship from the parent to the child. For example: [Hardware] is a parent of [Software] |
NAME |
The name of the relationship. |
FROM
|
A label describing the relationship from the child to the parent. For example: [Software] is a child of [Hardware] |
CLASS
|
"1000" - Hierarchical-based relationship. "2000" - Connection-based relationship. |
INHERIT_OWNERSHIP
|
"1" - Propagates ownership data (customer and organizational unit) from each parent Itemto all of its children. "0" - Relationship does not inherit parent ownership data. |
Once the XML has been customized it needs to be imported back into the system to enable the application to import Items using the new specifications.
To import the XML:
Log in as an Administrator
Select Setup > Item Import > Customize
From the Mapping Operation
drop-down list, select Upload/Edit Configuration
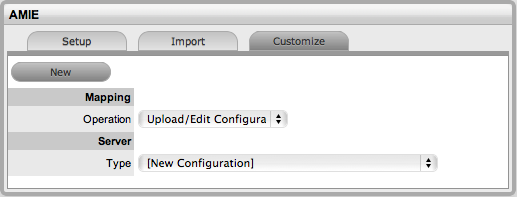
Select [New Configuration] in the Type list
Click New
Select Choose File
Search and upload the
XML file
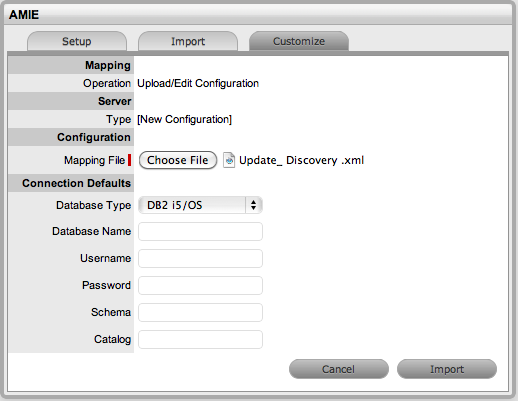
Enter Connection Default
values for the database type, name, username, password, schema and
catalog, if necessary
These will be the pre-set values when selecting and mapping the new
Server Type.
Click Import button
to import the XML file
When the import is complete, the new configuration file will appear
as a new Server Type.
The Server Connection Details can be modified or updated by clicking Edit and making the required changes
Click Save.
Once a new Server configuration has been imported into the system, it
can be selected as an option when configuring AMIE in the Setup tab.
To use the new Server Type:
Log in as an Administrator
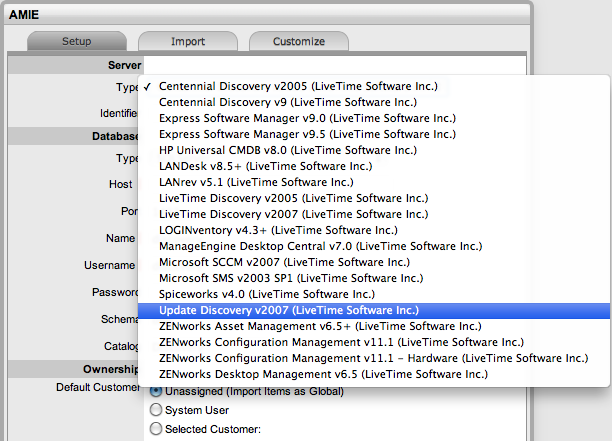
Select Setup > Item Import > Setup
Select the System Type as Database Mapping (AMIE)
From the Server Type
list select the customized server
Configure the database connect, ownership and synchronization period
Click Test to confirm the connection then Save when complete.
For more information on importing Items via AMIE, see: Importing Items Using Database Mapping.