3.19 Meeting Whiteboard Tab
You can create a whiteboard session with other meeting participants. A whiteboard session allows you and the other meeting participants to draw or write on a white board while conducting the meeting.
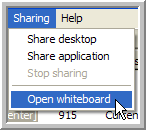
To create a whiteboard session, select the menu item. The Whiteboard screen appears, indicating that you are sharing data with other members of the meeting.
Figure 3-21 Sharing Menu > Open Whiteboard
To end a whiteboard session, click in the Conferencing Toolbar.
Figure 3-22 Conferencing Toolbar

The Whiteboard and the Shared Document can be edited with the following Whiteboard Toolbar icons:
Figure 3-23 Toolbar Icons

3.19.1 Document Options
Whiteboard documents are saved on the server and are only accessible from the meeting in which they were created.
Figure 3-24 Toolbar Icons Document Options

-
 New Document: Click to open a new document. You are prompted to save the current document. Click to save the current document, to open a new document without saving, or to continue working in the current document.
If you continue on to a new document, a dialog appears. Type the name of your new document, and then click , or click to continue working in the current document.
-
 Save Document: Click to save the current document.
-
 Upload Document: Click to upload a saved document from the server.
3.19.2 Page Options
Your document can contain multiple pages of content.
Figure 3-25 Toolbar Icons Page Options

-
 Organize Pages: Click to organize the pages in the current document. You can use the and buttons to change the page order, the button to remove pages, and the button to give meaningful names to the various pages.
Click to save your changes, or to return to the current document without saving your changes.
-
 Insert New Blank Page: Click to insert a blank page in your document. The new blank page is the last page in your document and automatically opens.
-
 First Page: Click to go to the first page in your document.
-
 Previous Page: Click to go to the previous page in your document.
-
 Goto Page: Click to go to a specific page in your document. Select the page from the drop-down list that appears.
-
 Next Page: Click to go to the next page in your document.
-
 Last Page: Click to go to the last page in your document.
3.19.3 Editing Tools
Use these tools to edit the content of your document (see the Graphics and Text Tools as well).
Figure 3-26 Toolbar Icons Editing Tools

-
 Cut: Click to cut selected material from the current page in your document. This material is now in your clipboard.
-
 Copy: Click to copy selected material from the current page in your document. This material is now in your clipboard.
-
 Paste: Click to paste the material currently in your clipboard onto the current page in your document.
-
 Delete This Section: Click to delete selected material from the current page in your document (this material is now in your clipboard).
-
 Clear Current Page: Click to clear the current page of all content.
-
 Undo: Click to undo your last action.
-
 Redo: Click to redo your last action.
3.19.4 Graphics and Text Tools
Use these tools to create and edit graphics and text in your documents.
Figure 3-27 Toolbar Icons Graphic and Text Options

-
 Select Objects: Click to enable the pointer and select objects on the current page. This is the default tool.
-
 Draw a Straight Line: Click to draw a straight line.
-
 Draw a Line With an Arrowhead: Click to draw a line with an arrowhead.
-
 Scribble!!: Click to draw scribble a free-hand style line.
-
 Highlight: Click to highlight sections of your page.
-
 Draw a Rectangle: Click to add a rectangle to the current page.
-
 Draw an Ellipse: Click to add an ellipse to the current page.
-
 Draw a Textbox: Click to add a text box to the current page.
-
 Draw a Check Mark: Click to add a check mark to the current page.
-
 Line Thickness: Click to change the thickness of a line or border, becomes the default for the next object you draw.
-
 : Click to change the style of a line or border. The selection becomes the default for the next object you draw.
-
 Font Settings: Select to edit the font settings for a text box The selection becomes default for the next text box you add.
-
 Line or Border Color: Click to change the color of a line or border. The selection becomes the default for the next object you draw.
-
 Background Color: Click to change the background color of an object The selection becomes the default for the next object you draw.
-
 Text Color: Select to edit the font color for a text box. The selection becomes the default for the next text box you add).
-
 Bring to Front: Click to bring the selected content to the front of the current page. in front of any objects it overlaps with.
-
 Send to Back: Click to send the selected content to the back of the current page (behind any objects it overlaps with).
-
 Toggle Transparency: Click to toggle transparency off and on for the selected content. When transparency is on, you can see through the fill color of a transparent object.