2.1 Setting Up Your Buddy List
One of the most powerful tools in Novell Teaming is the . This icon uses color to show you whether a person is online using Novell Conferencing and its Pidgin client. The presence icon enables quick communication with that person (sending an instant message using Novell Conferencing, initiating an instant meeting using Novell Conferencing, sending e-mail, placing a call using Skype*, and so on).
NOTE:Your presence icon requires that you run the Novell Conferencing Pidgin client on your computer. Running other IM or chat software does not enable your presence icon. If your presence icon does not display color properly, see your site administrator for more information.
Although presence icons are displayed in Novell Teaming wherever you see someone’s name, a good way to get started with presence is to set up your buddy-list portlet, so that as soon as you log in, you can see whether your buddies are online and logged into Pidgin.
To set up your buddy list:
-
Sign in with your username and password.
-
Locate the Teaming Buddy List portlet:
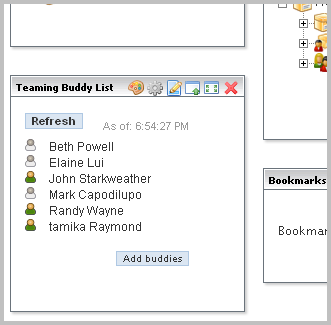
Unlike this picture, your portlet probably contains no names yet other than your own.
If you do not see the portlet, click in the upper right corner of the portal page, click , click the button next to the label , and click the icon (). Novell Teaming adds the buddy-list portlet to the portal page. If you require more assistance, see your Novell Teaming site administrator.
-
In the portlet, click .
Novell Teaming displays the form.
-
Type the first few letters of either the first or last name of a buddy, and then click that person’s linked name in the drop-down list.
Novell Teaming includes the type-to-find feature. To use this feature, place your cursor in a text box that requires a known type of information, such as a name. Then, type a space, and then backspace over it. Novell Teaming then displays a list of links to all possible items:
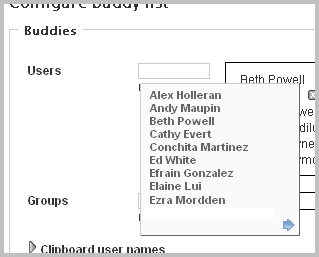
Notice the blue arrow in the bottom-right corner of the names panel. You can view next and previous panels of choices using the blue-arrow icons.
As you type characters in the text box, Novell Teaming adjusts the list to match what you type. The following example shows what happens in the example installation when someone types the letter :
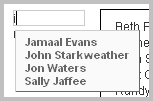
Novell Teaming displays a list of links of all the people whose first or last names match what you have typed so far. Click the linked name to add that person to your buddy list.
-
Repeat Step 4 as often as necessary to add all of your buddies.
If you mistakenly add a name, click the icon () next to the name to remove it:

-
Click .
-
Click .
To ensure that the buddy-list portlet is showing you the most up-to-date presence information for your buddies, click in the portlet.
Tips for Using Buddy Lists
-
Presence icons appear as follows:
 Online
 Away (recently online)
 Offline
 Status unknown
-
To communicate with a buddy, click the presence icon and select a communication method (instant message, instant meeting, e-mail, and so on).
-
To view a buddy’s personal workspace (which includes contact information), click the linked name of your buddy.