OpenText Vibe 4.0.8 User Quick Start
3.0 Getting to Know the Vibe Interface and Its Features
When you first launch Vibe you see the What’s New page. This page shows you what’s new in your teams, favorite places, and more.
3.1 Understanding the Masthead
The Masthead contains the following features:
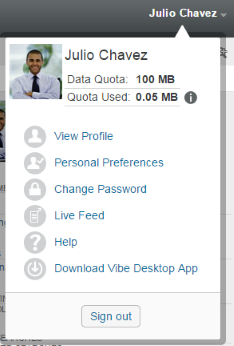
Name Link: Click your linked name in the upper right corner of any Vibe page to view the following options:
-
Data Quota information: (Conditional) Your current data quota and the amount of your quota that you have used are displayed.
If this option is not displayed, the Vibe administrator has not restricted you to a data quota.
-
View Profile:
 Displays your Vibe profile.
 -
Personal Preferences:
 Displays your personal preferences. You can configure the following personal preferences:
-
Entry Display: Specify the default behavior when clicking a file name.
-
Items per Folder Page: Specify how many entries you want to appear on a given page.
-
Hide ‘Public’ Collection: Select this option to hide the icon
 in the masthead so that it is no longer displayed in the web client.
 -
Define Editor Overrides: This feature allows you to change the default editor settings for editing files.
-
-
Live Feed:
 Displays live feeds of the latest entries in your teams, places you are following, or across the entire site.
 -
Vibe Resource Library:
 Displays the Vibe Resource Library, which includes additional information and resources, including downloadable custom forms and workflows, relevant articles, and more.
 -
Change Password:
 Specify your current and new password. For more information, see Changing Your Password.
 -
Help:
 Displays the Vibe Web Application User Guide.
 -
Download Vibe Desktop App: (Conditional) Displays the Vibe desktop app download page.
If this option is not available, the Vibe administrator has not enabled it.
-
Sign out: Signs you out of the Vibe site.
3.2 Understanding the Navigation Panel
The Navigation panel contains a navigation tree that displays the current workspace and all sub-workspaces and sub-folders.
3.3 Understanding the Action Toolbar
The Action toolbar contains the following features:
Expand/Contract Navigation Panel Icon:
![]() Hides and displays the Navigation panel.
Hides and displays the Navigation panel.
Expand/Contract Masthead Icon:
![]() Hides and displays the Masthead.
Hides and displays the Masthead.
Workspace Toolbar Icon:
![]() Displays the Workspace toolbar, which enables you to quickly navigate to any location where you have appropriate rights.
Displays the Workspace toolbar, which enables you to quickly navigate to any location where you have appropriate rights.
My Workspace: Displays your personal workspace.
What’s New: Displays the What’s New page, where you can quickly see what’s new in your teams, favorite places, and more.
My Favorites: Enables you to add a place as a favorite, or to quickly visit your favorite places on the Vibe site.
My Teams: Displays links to all of the team workspaces where you are a member.
Recent Places: Displays the places that you have most recently visited.
View: Enables you to accomplish various tasks, such as seeing what’s new or unread in the workspace or folder, viewing who has access, viewing the Vibe clipboard, and accessing the Vibe Trash.
Search: Enables you to search the entire site for entries, places, and people. You can locate subject-matter experts, or see what information is available concerning a particular topic.
Click the icon ![]() if you want to specifically search for a person, place, or a tag. You can also use a saved search or perform an Advanced Search.
if you want to specifically search for a person, place, or a tag. You can also use a saved search or perform an Advanced Search.
3.4 Understanding the Relevance Tabs in the Home Page of Your Personal Workspace
The home page of your personal workspace contains various tabs that are designed to help facilitate your work. Use these tabs as a central location where you can quickly be informed of new entries, upcoming tasks, your daily meetings, and more.
What’s New: Enables you to quickly see new entries in your teams, places you are following, or across the entire site.
Recent: Enables you to view entries that you have recently posted, and entries that you have recently visited. You can view who has recently visited your workspace, as well as see your personal tags.
Tasks and Calendars: Enables you to view tasks that are assigned to you, as well as today’s events from the calendars you are following.
Accessories: Contains an Accessory panel that lists entries from your Guestbook, Blog, and Photo Album folders.
3.5 Understanding the Content Area
The Content Area in Vibe is where the majority of information is displayed, such as workspaces, folders, and entries.
4.0 Setting Up Your Personal Workspace
Before you take advantage of all of the features and functionality of OpenText Vibe, you might want to customize your personal workspace.
4.1 Modifying Your Profile
You might need to manually update your profile in order for important contact information to be seen, such as your email address, phone number, time zone, and picture.
Another reason to modify your profile is to publicize your skills and past experience to other Vibe users. One advantage of Vibe is the ability to find experts on any subject within your organization. You, as a Vibe user, have the ability to be a subject-matter expert.
NOTE:If you are unable to modify your personal information (such as your Vibe password) as described in this section, it is probably because your personal information is being synchronized from an external directory server. You must consult your Vibe administrator to make changes.
-
Click your linked name in the upper right corner of any Vibe page.
-
Click .
-
Click , make any necessary changes, then click .
4.2 Branding Your Workspace
Adding a personal brand to your workspace can enhance the appearance of your workspace and make you feel more at home.
-
Navigate to your personal workspace.
-
Next to the workspace name, click the icon
 , then click .
The Workspace/Folder Branding dialog box is displayed.
-
Specify the following information to create your desired brand:
Use Branding Image: Select this option if you want to use the drop-down list to select an existing image, or click the icon
 to browse to an image on your computer’s file system.
Use Advanced Branding: Select this option, then click if you want to create a brand that includes advanced features, such as a YouTube video.
You can add a YouTube video in your branding section by clicking the icon
 .
.Background Image: Click the icon
to browse to an image on your computer’s file system. The provided drop-down list contains images only if you are branding a team workspace and if you have attached images to the workspace.The background image is displayed behind your regular branding.
Stretch Image: Stretches the background image so that it occupies the entire branding area.
If you stretch your background image, the image overrides any background color that you have set.
Background Color: Adds a background color that occupies the entire branding area. To change the background color, click the color name to the right of this field, select the new color, then click .
If you added a background image and stretched the image, the background color is not displayed.
Text Color: Changes the text color of the workspace name in the upper right corner of the branding area. To change the text color, click the color name to the right of this field, select the new color, then click .
Clear branding: Click this option to clear all of your current branding selections.
-
Click .
Your workspace now displays the brand that you created.
6.0 Creating a Team Workspace
By default, everyone in OpenText Vibe has rights to create a team workspace.
Team workspaces are the most common type of workspaces. They facilitate team objectives by enabling team members to quickly share files, share ideas, and work together more efficiently and effectively.
To create a team workspace:
-
Click the icon
in the Action toolbar, then expand in the Workspace tree.The Home Workspace directory is the highest-level folder in the workspace tree, and might be named something specific to your organization.
-
Click .
-
Click .
The New Workspace page is displayed.
If you do not see the option, your site administrator has not permitted you to create a new workspace at this level. Continue to expand the workspace tree, following the path of your organizational unit, click the name of the directory where you want to create the new team workspace, then, next to the workspace name, click the icon
. Click . Ensure that you select in the section. -
Specify the following information:
Workspace Title: Provide a title for the workspace.
Workspace: Select .
Team Members: Specify the team members.
You can specify individual users, entire groups, or add names that are on your clipboard.
Workspace Folders: Select the folders that you want the workspace to contain.
If you later decide that you want to add additional folders, you can add them at any time.
-
Click to create the new workspace.