E.21 Action - Launch Executable
The Add Actions - Launch Windows Executable dialog box lets you specify the Windows executable, command line parameters, and additional optional settings.
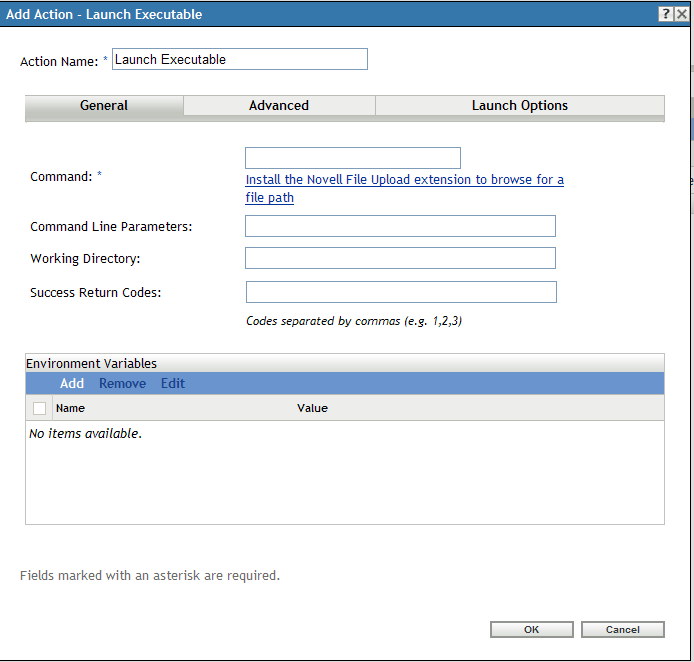
Figure E-22 Actions - Launch Executable Dialog Box
You access this dialog box by using the following methods:
-
As part of the process of creating a Directive bundle by using the bundle category. For more information, see Section 2.1, Creating Directive Bundles.
-
In ZENworks Control Center, click the tab, click the underlined link of a bundle in the column of the list, click the tab, click one of the action set tabs (Distribute, Install, Launch, Verify, Uninstall, Terminate, or Preboot), click the drop-down list, then select an available action.
E.21.1 General
The General page lets you specify the location of the Windows executable, the command line parameters to run when the executable launches, the working directory for the executable, and the non-zero success codes that the executable returns.
|
Field |
Description |
|---|---|
|
Command |
Specify the location of the Windows executable, including its filename. You can specify a local path or a network drive. If you specify the local path, you must include the executable’s full path, unless the executable is included in the workstation’s search path. If you specify a network drive, you can use a mapped drive or a UNC path, if the workstation can resolve the path. Click to browse to and select the desired transform file. You can upload the transform file or you can specify its location. If you have not installed the Novell File Upload extension on this device, you must do so before you can browse for a file path. For more information, see Novell File Upload Extension. |
|
Command Line Parameters |
Specify the command line parameters that you want to run when the executable launches. |
|
Working Directory |
Specify the working directory for the executable. |
|
Success Return Codes |
Specify the non-zero success codes that the executable returns. You can specify multiple success codes separated by commas. If an executable returns non-zero success codes, you should specify these non-zero success codes while launching the action. For example, explorer.exe in Windows returns a success code of 1. To successfully launch the Explorer application, you should add 1 as the success code while launching the action. Specify the Success Return Code as * to enable any non-zero code returned by a script to be treated as success. |
|
Environment Variables |
Lets you add, edit or remove the environment variables as follows:
|
E.21.2 Advanced
The Advanced page lets you specify the Window executable’s security level and the wait time after launch of windows executable and before proceeding to the next action.
|
Field |
Description |
|---|---|
|
Executable Security Level |
Click to specify the Window executable’s security level. The executable can run in either the “user” space or the “system” space. By default, the option is selected, which causes the application to run in the “user” space and inherit the same workstation security level as the logged-in user. If the logged-in user's security level does not provide sufficient rights and file access to run the executable, you can configure the executable to run in the “system” space or as a dynamic administrator, as described below:
|
|
Wait Before Proceeding to Next Action |
Click to specify how long to wait after launching the Windows executable and before proceeding to the next action. Specify what happens after the executable launches: No wait: The next action in the list is immediately performed. When launch action is complete: The next action in the list is performed after the launch action completes. For example, enable this option if you are running the action as a dynamic administrator and you want the profile cleaned up and deleted immediately. If you do not enable this option, the profile is cleaned up and deleted at the device’s next reboot. Wait for _ seconds: Wait the specified number of seconds before proceeding to the next action.
|
E.21.3 Launch Options
The Launch Options page lets you specify the Window executable’s compatibility mode, display settings, and the input settings.
|
Field |
Description |
|---|---|
|
Compatibility Mode |
Click to specify the Window executable’s compatibility mode. Launches the executable in a contained environment. Some executables cannot run on workstations with newer versions of Microsoft Windows because of incompatibility issues. The drop-down list is available after you select the option. Select this option if you successfully ran an executable on a previous Windows version but you are unable to run the executable on the device’s current Windows version. Select the desired platform from the list. |
|
Display |
Click More Options to specify the Window executable’s display settings.Select the desired display options:Run in 256 colors:Sets the color quality setting to 256 colors while this executable is running. The color quality setting reverts back to your default setting when you close the executable.Run in 640 × 480 screen resolution:Sets the screen resolution setting to 640 × 480 while this executable is running. The color quality setting reverts back to your default setting when you close the executable.Disable visual themes:Disables visual themes from being applied to the executable. If you are experiencing problems with menus or buttons on the title bar of the executable, this setting might solve these problems. The theme settings revert back to your default setting when you close the executable. |
|
Input Settings |
Click to specify the Window executable’s input settings. Temporarily turns off handwriting recognition, speech recognition, and some accessibility features. Turning off text services does not affect multiple languages or keyboards that you have added. |