Creating ZENworks Imaging Media


Option A: Creating a ZENworks Imaging CD

Creating a ZENworks Imaging CD is the preferred method for manually performing ZENworks Imaging tasks. Bootable CDs are significantly faster to use than booting from a floppy disk, and easier to manage.

To use this option, your workstation must be capable of booting from CD.

  1. On a machine with a CD burner, insert the ZfD 3.2 Program CD.

  2. Copy the following files from CD to a local hard drive on the CD burner machine:

    \path\PUBLIC\ZENWORKS\IMAGING\BOOTCD.ISO

    \path\PUBLIC\ZENWORKS\IMAGING\SETTINGS.ISO

  3. Use Adaptec Easy CD Creator (or similar software) to burn a CD session from the BOOTCD.ISO CD image. Set the software to leave the CD open after burning BOOTCD.ISO as a session. Do not close Easy CD Creator.

  4. Use Notepad to open the SETTINGS.TXT file.


    Screen shot of SETTINGS.TXT file in Notepad.

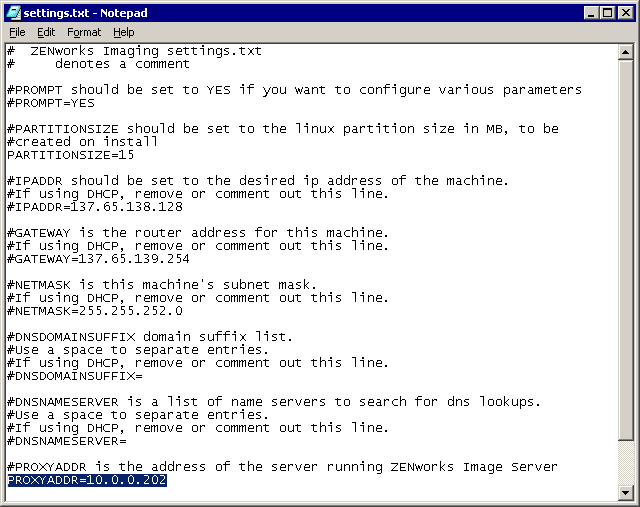
  5. Find the line starting with PROXYADDR= and change it to read PROXYADDR=10.0.0.202 > save the SETTINGS.TXT file.

  6. Add the modified SETTINGS.TXT file to the still-open CD in the burner by dragging it into Adaptec Easy CD Creator's CD layout.

  7. Re-burn the CD with the added SETTINGS.TXT file. Set the software to close the CD session and the CD.

    After creating a workstation image, you can use this same technique for adding the image file to a CD to make self-contained bootable media from which you can restore the ZENworks Imaging workstation image.

  8. Close Adaptec Easy CD Creator.


Option B: Creating ZENworks Imaging Floppy Disks

Using floppy disks is slower than using a CD because you must swap each of the three diskettes. However, this method works with even with older workstations that do not have CD drives.

  1. Obtain three floppy diskettes.

  2. Switch to your Windows* 2000 Server and start ConsoleOne®.

  3. In ConsoleOne, click Tools > ZENworks Utilities > Imaging > Create or Modify Boot Diskette.

  4. In the ZENworks Imaging Boot Disk Creator window, change the Imaging Proxy Server Address option to Use IP Address. Type 10.0.0.202 for the IP address.


    Screen shot of the ZENworks Imaging Boot Dist Creator dialog box.

  5. Insert your first floppy disk into the disk drive > click Create Boot Disk 1.

  6. Repeat for disk two and disk three.

  7. Click Close.

  8. Close ConsoleOne.