4.1 Configuring ZENworks Reporting Appliance
After deploying the ZENworks Reporting Appliance to a hypervisor, perform the following steps to configure ZENworks Reporting:
-
Launch the URL on a supported web browser.
The URL (https://<FQDN>:9443 or https://<ipaddress>:9443) is displayed on the Appliance console.
-
Choose the required language. If the web browser supports the selected language, then it displays in that language, else it displays in English.
-
Log in to ZENworks Reporting with the root or zenadmin credentials that were specified while configuring the appliance settings.
When you log in for the first time, you are prompted to configure ZENworks Reporting.
-
Verify the prerequisites on the Configure ZENworks Reporting page. You should be prepared with the required information to complete the configuration.
-
Domain specific to your reporting needs
-
Certificate Authority configuration
The ZENworks Reporting server requires a certificate to communicate securely. ZENworks Reporting supports internal and external certificates. If you want to use an internal certificate, it will be automatically generated by ZENworks Reporting. If you want to use an external certificate, you can generate a Certificate Signed Request (CSR) using ZENworks Reporting or by using your organization-specific methods, and then get the signed certificates.
A CSR is encrypted text, provided by a user to the Certificate Authority (CA), through a Secure Sockets Layer (SSL) digital certificate application. The CSR is validated by the CA and a signed certificate is issued.
-
-
Choose .
-
If you want ZENworks Reporting to generate a CSR, click .
If you generate the CSR from this page, the Private Key will be stored on the server.
While configuring ZENworks Reporting, you need to have a signed server certificate, private key, and a CA certificate. To get the signed server certificate, you need to generate a CSR and validate by the CA.
-
Specify the following information.
-
Common Name (CN): The Fully Qualified Domain Name of the ZENworks Reporting server. This name should match the server name in the URL, in order for browsers to accept the certificate for SSL communication. For example, mail.novell.com.
-
Organization (O): Organization name.
-
Organizational Unit (OU): Organizational unit name, such as a department or division.
-
City or Locality (L)
-
State or Province (ST)
-
Country or Region: Two-letter country code or region. For example, US.
-
Key length: The required key length can be 1024 or 2048.
-
-
Click and download the CSR.
-
-
Click .
-
Specify the following to create an administrator account:
-
Username: The user name can have a maximum length of 50 characters. It can contain alphanumeric characters and special characters (underscore _ and hyphen -).
-
Password: The administrator password is used for logging in to ZENworks Reporting. The password must contain a minimum of six characters.
-
Confirm Password: Use this field to confirm a correct password. If there is a mismatch, an error message is displayed after you click . You must re-enter the correct passwords.
This user will have administrator rights. This administrator account can be used to log into ZENworks Reporting independent of user sources and is given higher priority over any similar user existing in configured user sources.
-
-
Click .

-
(Optional) If you have configured ZENworks Service Desk in your zone, then ensure that you reconfigure the latest System Domains (ZCM, ZSD, etc). For more information, see Section 4.2, Reconfiguring ZENworks Reporting Appliance.
-
Specify one or more domains that you want to use for ZENworks Reporting. You can add domains from ZENworks Management Zone or import domain resource files.
-
Click .
-
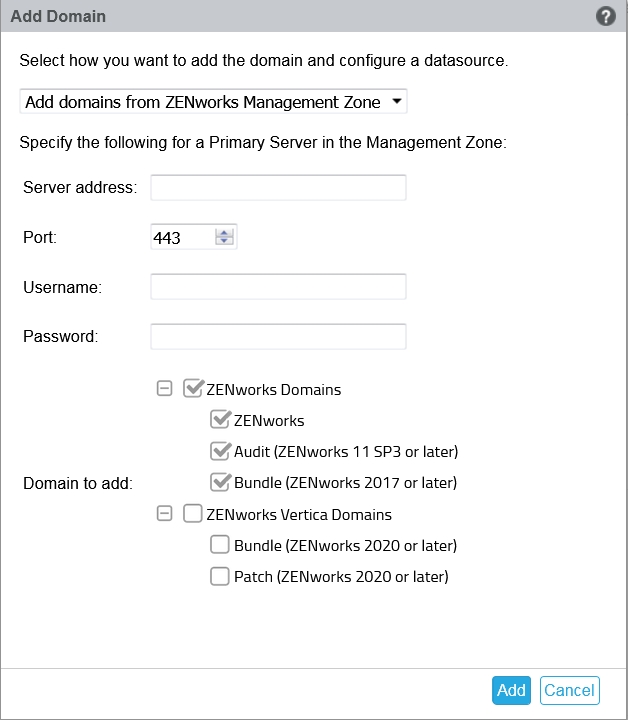
On the Add Domain page, select how you want to add the domain and configure a datasource.
-
Choose , then specify the following:
-
Server address: A valid IP address or a Fully Qualified Domain Name (FQDN) of the ZENworks Primary Server in the Management Zone. This Primary Server will be referenced to download the domain resource file and the required database information to configure the datasource for that domain.
-
Port: The port used by the Primary Server in the Management Zone. The default port is 443.
-
Username: The Management Zone's administrator username for logging in to ZENworks Control Center.
-
Password: The password for the Management Zone's administrator user specified in the Username field.
-
Domains to add: Select the domains that you want to add.
or
You can add domains from the ZENworks Management Zone or upload domain resource files for other Micro Focus products.
NOTE:While adding Vertica domain using the resource file, ensure that you select in the .
-
-
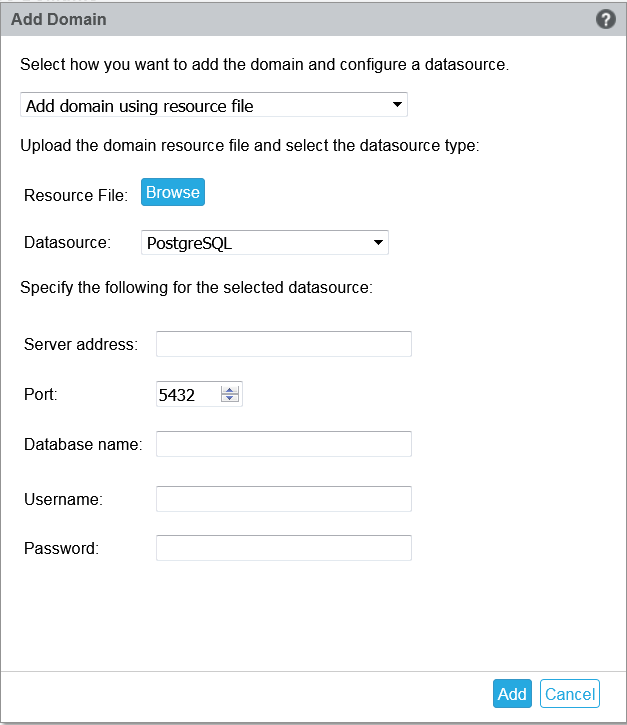
Choose .
-
Resource file (*.zip): Drag and drop the domain resource file that had been downloaded and is locally available.
-
Datasource: Select the datasource for the uploaded domain.
If the datasource is a database server, specify the following:
-
Server Address: A valid IP address or a Fully Qualified Domain Name (FQDN) of the database server.
-
Port: The port used by the database server.
-
Database Name: The name of the database.
-
Username: The username that has read and write permissions to access the database.
-
Password: A valid password to access the database.
If your database server is Microsoft SQL Server, then specify the following:
-
Instance name: Specify the name of the Microsoft SQL server instance that is hosting the database.
-
Authentication type: Select the authentication type.
-
Domain: This field is enabled if you select Windows Authentication. Specify the Fully Qualified Domain Name (FQDN) or hostname.
-
If the datasource is a ZENworks Management Zone, specify the following:
-
Server address: A valid IP address or a Fully Qualified Domain Name (FQDN) of the ZENworks Primary Server in the Management Zone. This Primary Server will be referenced to download the domain resource file and the required database information to configure the datasource for that domain.
-
Port: The port used by the Primary Server in the Management Zone. The default port is 443.
-
Username: The Management Zone's administrator username for logging in to ZENworks Control Center.
-
Password: The password for the Management Zone's administrator user specified in the Username field.
-
-
-
Click .
-
-
(Optional) Click hyperlink to edit a configured domain.
-
Choose the type of Certificate Authority (CA) for the Management Zone.
-
Internal CA: The certificate is automatically generated.
-
External CA: Choose , , or .
-
Based on the required certificate, specify the details:
-
-
Secure certificate: This certificate stores the server certificate, any intermediate certificate chains, and the private key in a encrypted file, which is password-protected. It supports the .p12 or .pfx file format.
-
Password: Password for the secured certificate file.
-
-
-
Root certificate: The top-level certificate in the certificate tree issued by the CA that signed the Server certificate and any intermediate certificate chains. It supports the .pem, .crt, .cer, .der, .p7b, or.p7c file format.
-
Server certificate: It is a signed certificate that is used for the ZENworks server. It supports the .pem, .crt, .cer, .der, .p7b, or .p7c file format.
-
Private key: The private key file that is associated with the signed server certificate. It supports the .der file format.
-
-
To use , you must have generated a CSR by using the link.
-
Root certificate: The top-level certificate in the certificate tree issued by the CA that signed the Server certificate and any intermediate certificate chains. It supports the .pem, .crt, .cer, .der, .p7b, or.p7c file format.
-
Server certificate: It is a signed certificate that is used for the ZENworks server. It supports the.pem, .crt, .cer, .der, .p7b, or .p7c file format.
-
-
-
Click .
ZENworks Reporting configuration starts and it might take several minutes. The configuration process will continue in the background even if you close the browser or the browser times out.
-
After ZENworks Reporting is configured, from the Summary page you can use the to access the ZENworks Reporting capabilities.
IMPORTANT:Ensure that you perform the following:
-
When you upgrade the ZENworks Management Zone, the domain should be reconfigured to get the latest ZRS domain resource files available in ZENworks.
-
When you change the ZENworks database, domain should be reconfigured so that the domain points to the new database.
-
When you change the ZENworks administrator Primary Server password, the domain should be reconfigured.
-
When you change the LDAP credentials, reconfigure the LDAP server.