ZENworks Service Desk - Getting Started
The ZENworks Service Desk Getting Started guide gives information about the basic steps that are required to quickly configure ZENworks Service Desk solution.
This guide which is primarily intended for administrators and supervisors includes the following sections:
6.0 Portal Views
The system offers 3 different portal views depending on who logs into the system:
-
Setup for system Administrators
-
Customer
-
User: This is accessible to those with the Supervisor, Technician or Partner role. It is also available to those with the Finance and the Manager role.
6.1 Administrator Portal
This portal is mainly for System Configuration, Setup tasks which include:
-
Customizing the application
-
Configuring the interaction between external systems (LDAP, EMAIL, ZENworks etc).
For more, see Administrator View.

6.2 Customer Portal
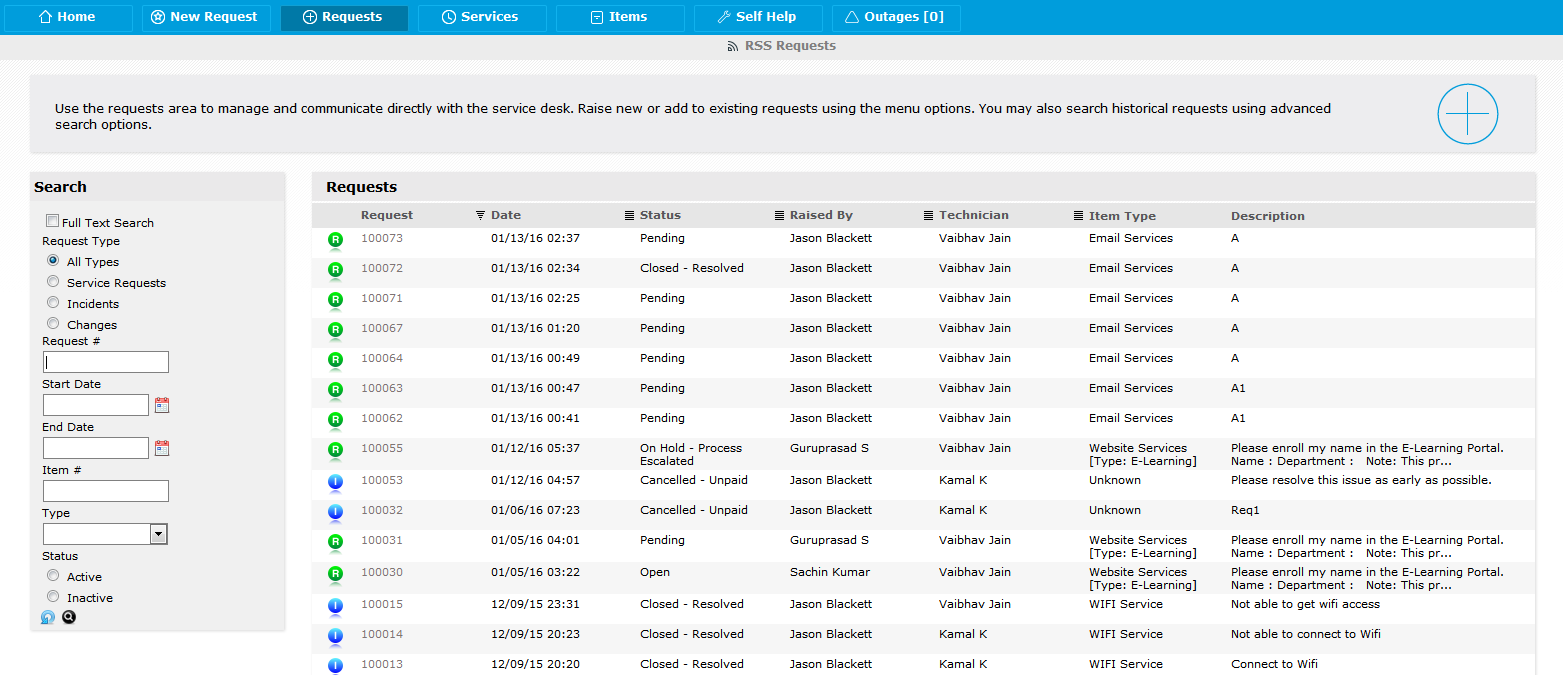
This portal is for the end users or Customers. It enables Customers to easily monitor and resolve service and support issues, thus allowing them to focus on core business activities. The user-friendly interface offers an easy-to-use Knowledge Base and Request tracking system. Customers can submit requests, view knowledge base, any outages, surveys, initiate chat with technician, view status of existing requests etc.
6.3 User Portal
This portal is available to those with the following roles:
-
Supervisor
-
Technician
-
Partner
-
Finance
-
Manager
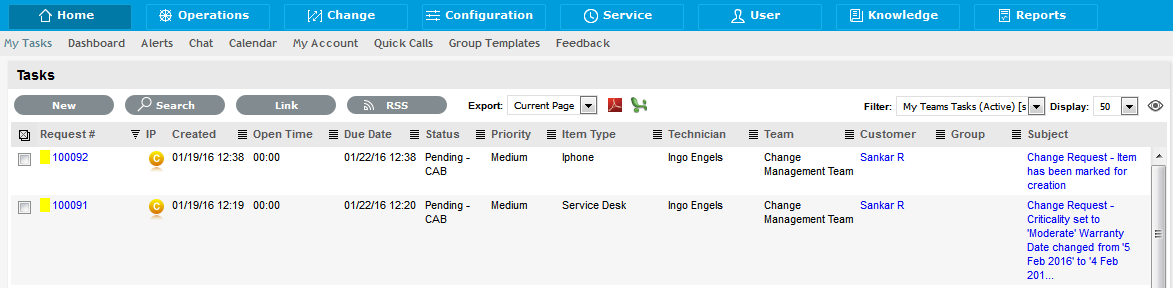
Technicians use this portal to work on notes and to add notes. Supervisors use this portal to create Knowledge Base articles and to configure Workflows, Service Level Agreements and CMDB.
For more, see the following:
As mentioned in the previous section, Individuals can be allocated more than one Role. For Users with more than one Role, you can define a Default Portal within their Information screen. When a user has multiple Roles, the Default Role is used to log into the system and the privileges of multiple User Roles are consolidated in one view.
For example, if some Users are assigned Finance, Manager and Supervisor or Technician access, they will be able to view all functionality related to these Roles within the User view.When the User is also assigned Admin and Customer access, the options of Setup and Customer will be displayed next to their login name.
As shown in the following screen, the user Simone is a supervisor and his default portal is User portal. He also has administrator and customer roles. He can switch to admin portal by clicking on setup or to customer portal by clicking on customer.

7.0 System Configuration
Before starting with the system configuration, assess your business requirement and answer the following questions. However, you can tailor them to your organization's unique landscape along with any industry methodology that you might be following, such as ITIL.
-
Who are they and what business function do they have? (customers or end users)
-
What do they need support for? For example, software (CMBD – Items and Services)
-
What types of request they make? For example, X is broken, how do I achieve Y. I need Z.
-
What response are they expecting? For example, if X is broken, then it must be fixed within Y hours (SLAs, OLAs etc).
-
How do they create requests? (through email, or web portal or through phone etc)
After answering the above questions, assess your IT capabilities with some of the following questions?
-
Who is the support staff? (technicians)
-
What can they support? (Services, Configuration Items)
-
What types of request can they deal with? (Such as Incidents, Service requests, Change, and Problem)
-
What response can they deliver? (SLAs, OLAs)
For example, you might come up with something similar to the following:
These are some basic steps that you need to follow to enable your system. These steps require access to the Administrator and Supervisor views. Some of these activities are performed in the Administrator view and some in the Supervisor view.
To customize the application to suit your service environment, follow the recommended steps that are listed below:
7.1 Administrator (Setup) view
Do the following:
-
Review and Enable System Privileges: As a first step in the configuration process, it is suggested that each option be reviewed in the User, Customer, Request and System tabs within the Privileges sub-menu option.However, these can be adjusted in the future.
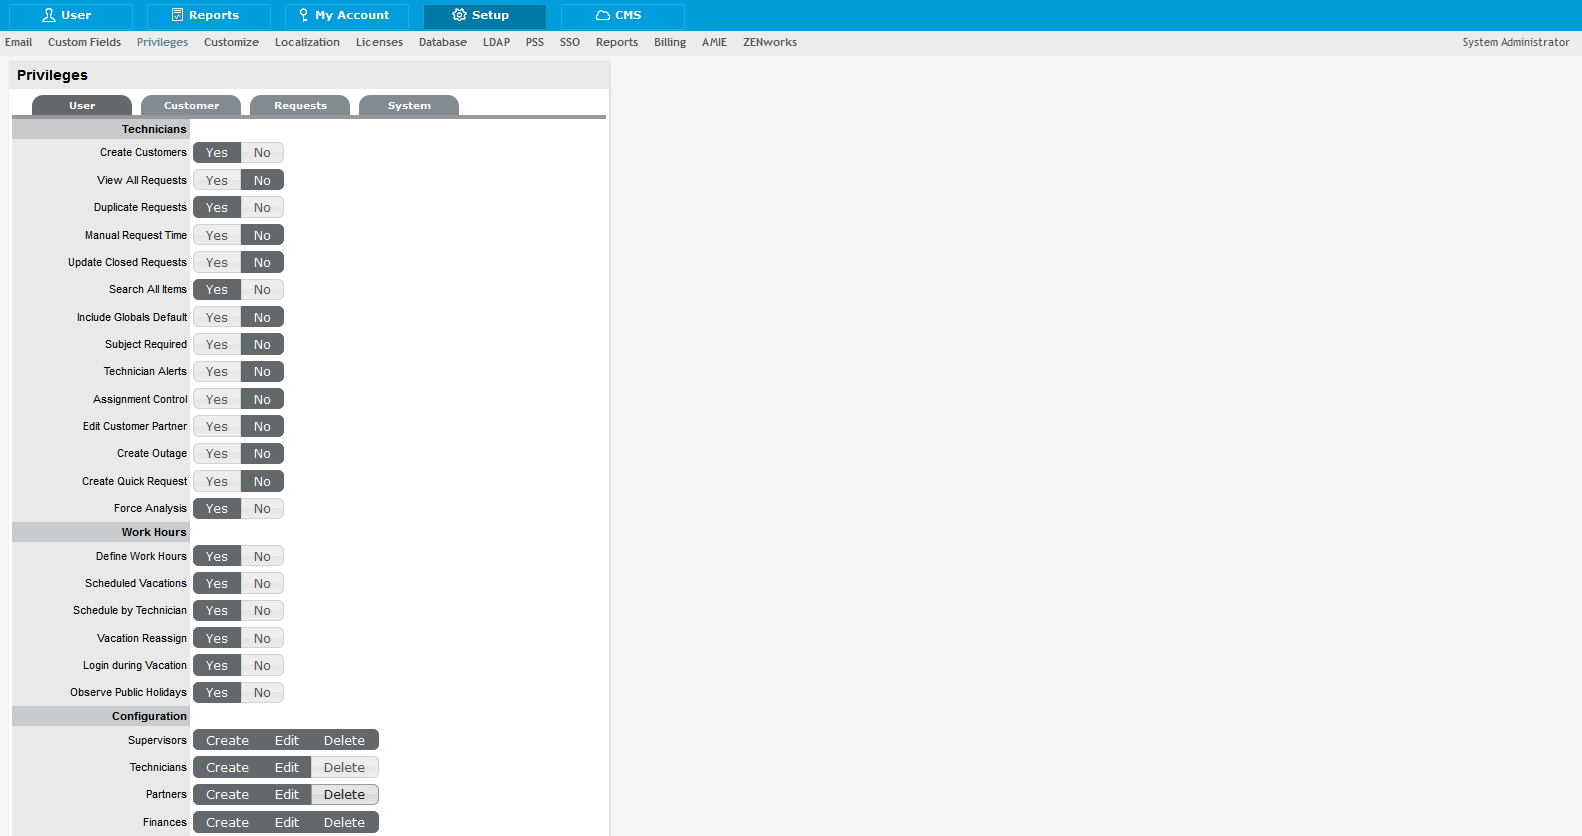
If you are unsure about what an option refers to, select the Help button on the system User Interface, to display the relevant page of the User Guide. Ensure that you set the appropriate Time Zone within the Customers Privilege tab. Set this before importing Customers and Users through an authentication server, to ensure it is correct on all newly created accounts.
For more details, See Setup Tab and Privileges.
-
Create Customers and Users: Users include Supervisor, Technician and Partner accounts. User Accounts are created within the application or imported from one or more authentication servers.
You can import Customer details using LDAP by enabling the option, if required. When the system is setup to synchronize with LDAP, move to the tab and enable the option.
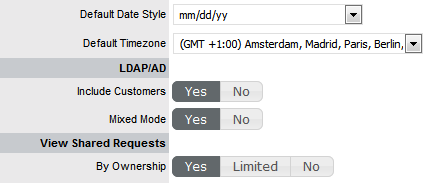
To create Customers using LDAP and the system's internal authentication capability, enable . After you set the Include Customers option to in the Customer Privilege tab, the field is displayed. Set this option to to allow Customers to be created directly in the system and using LDAP.
At this stage, you can also associate Organizational Unit information with Customers or Users, within the tab. If the import includes the name of the Org Unit that matches what is recorded in the system, the details from the internally recorded information will be applied to the Customer or User.
-
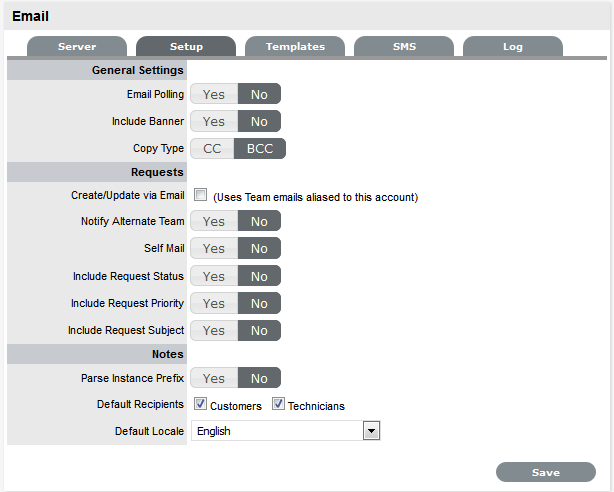
Configure Email Setup and Email Messages: This step allows the system to manage requests through email. After completing the information in the Server and Setup tabs, the content for automated emails sent by this system is customized. This need not be completed at this stage. However, ensure that within the last page of the Templates tab, the Signature is updated to reflect the name of the service organization.
-
Customize Banners, Welcome Page Message and CSS: The Customize menu allows you to brand the application where system banners can be replaced with the appropriate organizational banners. Do this now if the images are available or return to this step at a later stage.
For details, see Setup>Customize, Cascading Style Sheets (CSS).

-
Customize the default Supervisor, user access: Include Incident, Service Level Management and if applicable, Request Fulfillment, Problem and Change Management. Adjust the User Timezone, if applicable. For details, see User.

-
Set up Service Level Agreements: Organizations use SLAs to manage the levels of service expected of the IT and to ensure optimal maintenance of critical business systems and services. If these are unknown at this time, the system includes a default SLA that can be used.
For details, see Service Level Management.

-
Create Operational Level Agreements and/or Underpinning Contracts: You can do this if applicable.This might be an advanced system configuration step at this stage, or might not be relevant to the service organization. However, if OLAs or UCs are in place in the service organization, they can be mapped into the system now. Alternatively, they may be added later.
For details, see OLAs and UCs.
-
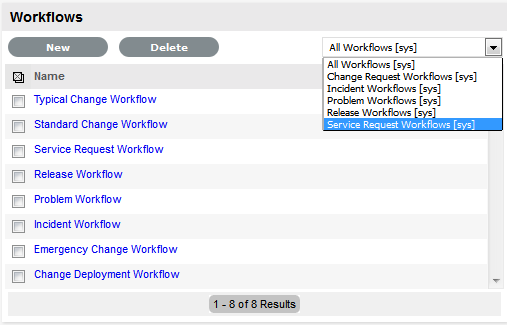
Customize or create Workflows: The system includes default Workflows across all Processes. At this point, the default Workflows might be sufficient or you can customize them to suit the service organization requirements. Alternatively, you can create new Workflows if you are using ITIL edition of ZENworks Service Desk.
For details, see:
-
Create Teams: Now that you have users, technicians, workflows and SLAs in the system, you can start creating teams. By default, the system includes one Process Team and the Unknown Team.
-
You can either edit the existing Process Team or create a new one.
-
Define the way the team works
-
Assign the relevant Technicians
-
Associate the Workflows that the Team will support
-
Set the Technicians to work in the appropriate Escalation Layer(s)
Though it might be relevant to finish one Process first, and return to do the other Processes at a later date, you need to create Teams for all Processes that are to be managed by the system (such as Incident, Problem, Change, Service Request.).
For details, see Teams.

-
-
Assign Default Teams and SLAs within Request Privileges: After creating Teams and SLA’s, you can set the default teams and default SLA. In the Administrator view, navigate to and set the teams.
These settings are applied to all newly created Items and Item Types that result from an AMIE import. For details, Step 11.

-
Configure the CMDB: You need to configure CMDB (Configuration Management Database) that you support. The objective here is to provide a logical model of the IT infrastructure. It identifies controls, maintains and verifies the versions of all Configuration Items (CIs) that form an organization’s IT infrastructure. The system includes fully embedded CMDB that provides access to up-to-the-minute information regarding the state of any infrastructure item.
With the system, the CMDB comprises of Categories, Types and Configuration Items in that order.
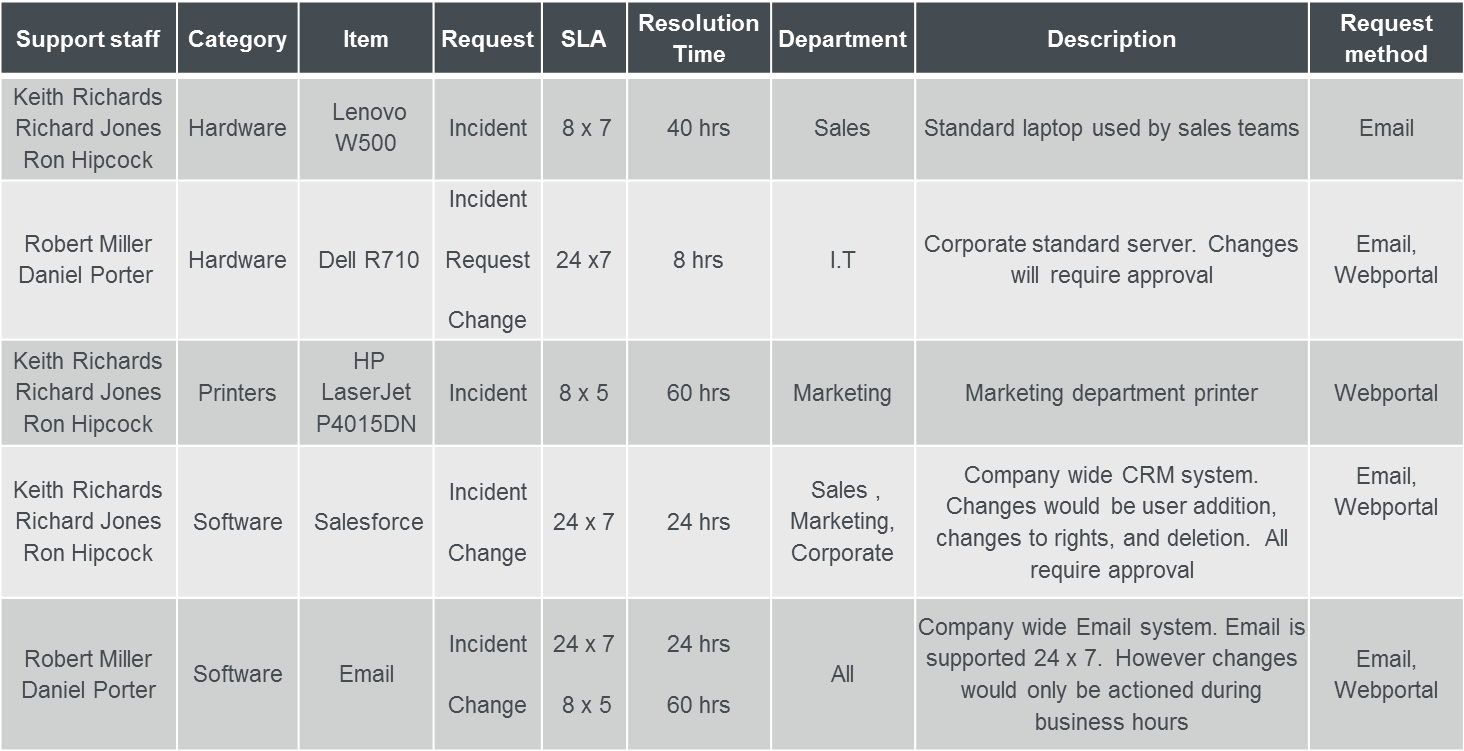
The default templates, set at the Category level are used to cover a broad range of Item Types. Item Types are templates used to create Items. Items are specific instances of Item Types with individual asset detail information. For example, categories, Types and Items can be defined as shown in the following table:

Next, navigate to the Supervisor view and perform the following to configure the CMDB:
-
Navigate to the tab to customize CMDB.The system includes default Categories, which are sufficient for most organizations. You might use those categories or create your own that suits your environment.
Within the category, define the attributes of an Item that are to be recorded in the system, by customizing the field labels. The stages that an Item can move through in its lifecycle are defined within the Life Cycle tab (such as Installed, Pending Configuration and Pending Test).
By default, the system is installed with some pre-defined Lifecycles. If they do not match the requirements of your organization, customize them. The types of issues reported against an Item are then created in the Classifications tab.
Do the following:
-
Configure the Category Details fields. For details, see Configuration Categories.
-
Define the Category's Life Cycle. For details, see Category Lifecycle.
-
Create Category Classifications. For details, see Category Classifications.
-
-
Create Item Types. This is done in the tab. This is where the Category template is associated with the Type template, the default Teams and SLA are set, and the Classifications are refined for issues reported against Items.
For details, see Item Types.
-
Next, create Items directly within the system.
This is completed in the tab. An Item Type template is selected for the new Item, which applies all the default information set within the Categories and Types tabs.
The ownership of the Item is assigned to the new Item. Ownership might belong to Everyone (a Global Item), one or more specific Customers or Organizational Units. The specific attributes of the Item are recorded in the ta. You can create any relationships with other Items in the system within the tab now or in future.
Alternatively you can populate your CMDB through AMIE or .csv import. The Types and Items are created automatically. To do this you need to be in the Administrator view and navigate to the .
For details, see AMIE Import.
CSV Import: To import Items using a .CSV file, download and populat a .CSV template, containing all available fields. For details, see Importing Items using a .CSV File.
The system uses a field mapping Wizard to match fields in the template to those in the system. To download the template go to .
For details, see Downloading an Item .CSV Template.

If you are using Asset Management tools such as ZENworks, you can easily synchronize that data into system’s CMDB using AMIE Import.
For details, see AMIE Import.

Before Importing a CSV File or Doing an AMIE Import: To successfully import an Item, you need to map the Teams and status fields correctly.
The Teams within the.CSV file must be created in the system before they can be associated with an Item as part of import. Teams are created by a Supervisor as mentioned in step 9.
Items are imported based on Category (such as Hardware, Software). These categories are configured by the Supervisor within the tab, before conducting a.CSV import. The Administrator must create separate.CSV files based on the Categories configured and individually upload into the application.
For Items imported with owners, the Username in the.CSV file must match the Username within the support system. If the owner does not exist in the system, the imported Item will become a Global Item.
For Items and Item types created through AMIE import, the default teams set in step 10 will be applied.
NOTE:Review the item status on creating an item or after an AMIE import or import via CSV file. The items or services shall be visible in the customer portal only if the item is set to a customer visible state that is defined in the Category's Life Cycle. For details, see Category Lifecycle.
-
-
Create Service Type templates and Service Items: For service organizations that need to fast-track the capability to manage requests in the system, it is recommended to create Service Items in the Service Catalog. This allows Customers and Technicians to log and manage requests within the application.
-
Create a Type, using the Service Category for each Service being offered, then create the Service Item with the newly created Type template. For the Service to be available in the Catalog, ensure that the Service Item status is set to an Active, non Pre-production State. If the Customers are to access a Service on the Customer Portal, the Service Item Lifecycle State should be set to .
-
Items can be mapped to Services, if required. For details, see Service Catalog.
At this stage, the users are in place, the CMDB is populated, SLAs, Workflows, teams, and Email is in place. You can review the licensing information in Administrator view in .
For details, see Licenses.

-
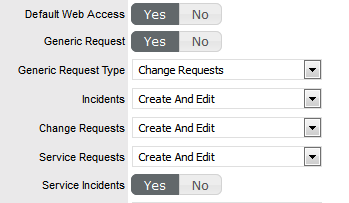
Revisit step 1 (Review & enable System Privileges) and review each option in the User, Customer, Request and System tabs. For example in the Customer tab, you can define whether the Customers have Web access or access to Customer portal. You can also define whether Customers can view, create or edit Incidents, Change Requests or Service Requests.
-
Enable customers to create requests through emails. Each process team can be configured for an incoming email address which the Customers can use directly. This is done in the Supervisor view in Teams. This address should be configured as an alternative to the system support address on the Email Server. In the Administrator view, you need to enable Email Polling (Setup>Email) and Create or Update through Email.
For details, see Email Polling and Request Creation via Email.
-
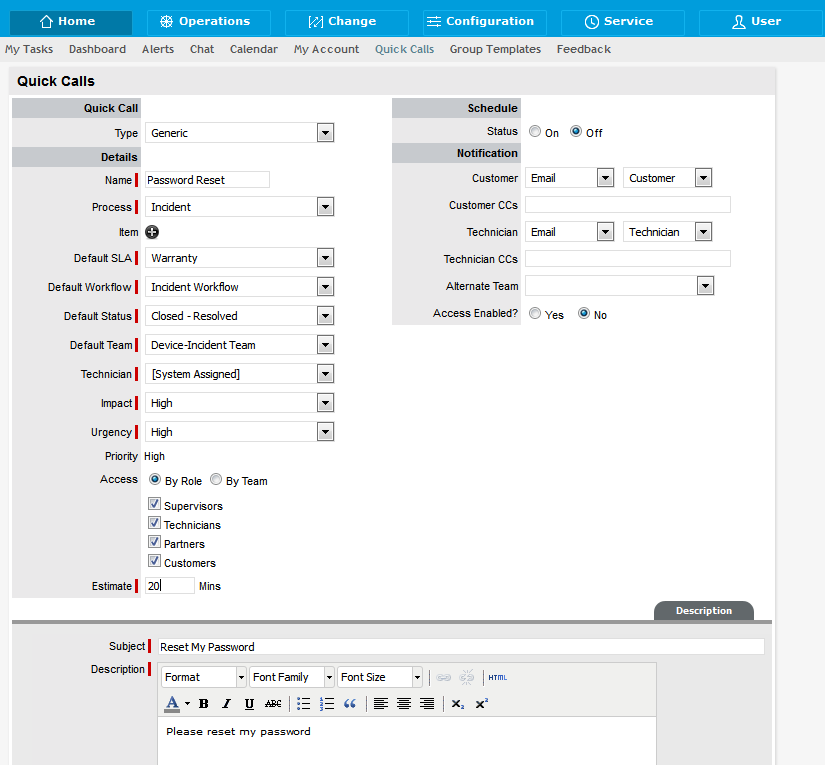
Define templates for common repetitive requests. For details, see Quick Calls. Supervisors can define Quick Call templates by pre-populating the required fields – configuration item, process (such as Incident, Service Request, Problem or Change), SLAs, Workflows, Impact and assignee details. Examples of such requests include Unable to access email or Reset my password or Request for new hardware or Printer paper jam etc. Whenever a technician or a customer wants to create such a request, they can pick the required Quick Call from the list. All fields for the request will be automatically filled as defined by supervisor, allowing the user to add any unique text and submit. The quickcall templates enable you to create request in fewer clicks and save time and effort.
-