1.19 Service Request and Change Management Workflows
Service Request and Change Management Workflows define the sequence of States to be followed by Service Requests and Change Requests (RFC) logged with the Service Desk. These Workflows are unlimited and fully configurable, to cover the diverse range of business change implementations required by an organization.
1.19.3 Editing a Default Workflow
To edit a Service Request or Change Workflow:
-
Select Service>Workflows
The Workflows screen appears.
-
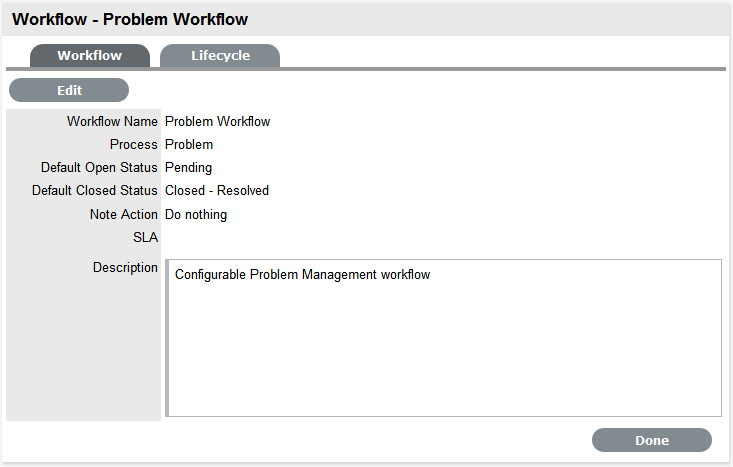
Click the Workflow name hyperlink to modify or duplicate an existing template
Or, select New to create an entirely new Workflow. The Workflow tab appears and is used to select the Process, set the default Open and Closed States for the Workflow. The States available within these lists are all those marked as an Entry or Exit point in the Lifecycle tab.
-
Click Edit
The Duplicate button becomes available, select if relevant.
-
Complete the details for a new Workflow
Enter the Name, select the Process and enter a Description and click Next.
-
In Edit mode amend relevant details within the Workflows tab:
-
Field Name
Description
Workflow Name
Enter a relevant name for the Workflow.
Process
Select from the drop-down options the process type of Change or Service Request Workflow.
Default Open Status
The open state that a Request adopts when it is assigned the Workflow.
Default Closed Status
The closed state that indicates the Request has reached the end of the Workflow Lifecycle.
Email Note Action
This applies to Requests that are in a non-active SLA State (i.e., where the SLA Active option is set to No). The option selected here determines the system behavior, regarding an SLA inactive Request, when an email is received from a Customer.
-
Do Nothing: Means the status of the Request remains the same and the SLA timers are not re-activated. The email is added as a Note and also sent to the Technician.
-
Update Status: Means the status of the Request is changed to an SLA Timer Active State, the email is added as a Note and it also sent to the Technician.
Update Status to
This field is displayed when the Update Status option is selected for the Email Note Action field. It allows the User to set a Next State, which is defined as an SLA Timer Active State, where a request will move to after an email has been received from a Customer regarding a Request in an inactive SLA State.
SLA
Allows the User to assign a SLA to govern the lifecycle period of the Workflow.(See SLAs & Workflows above, for more information.)
Description
Defines the purpose of the Workflow
-
-
Use the Find SLA option to change or add SLAs assigned to the Workflow
Click
 to access the complete list of SLAs in the system. Refer to the above section for more information regarding SLAs and Workflows.
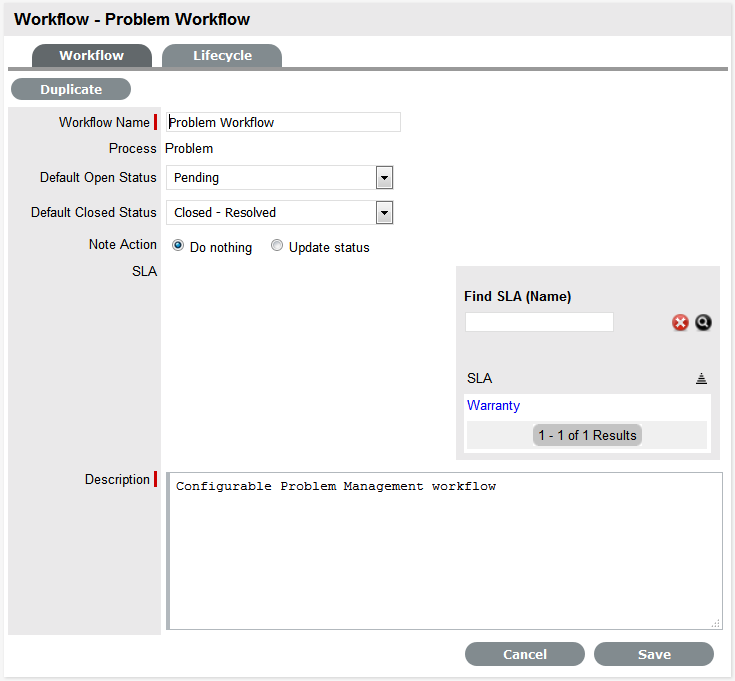
-
NOTE:The Contract Time field is visible when OLAs and/or Underpinning Contracts are associated with the Workflow States
It displays the accumulated amount of time of the OLAs and/or Underpinning Contract associated with the stages of the Workflow. This contract time cannot exceed the resolution time of the SLA assigned to the Workflow.
-
Edit the brief description that explains the purpose of the Workflow, if required
-
Click Save
-
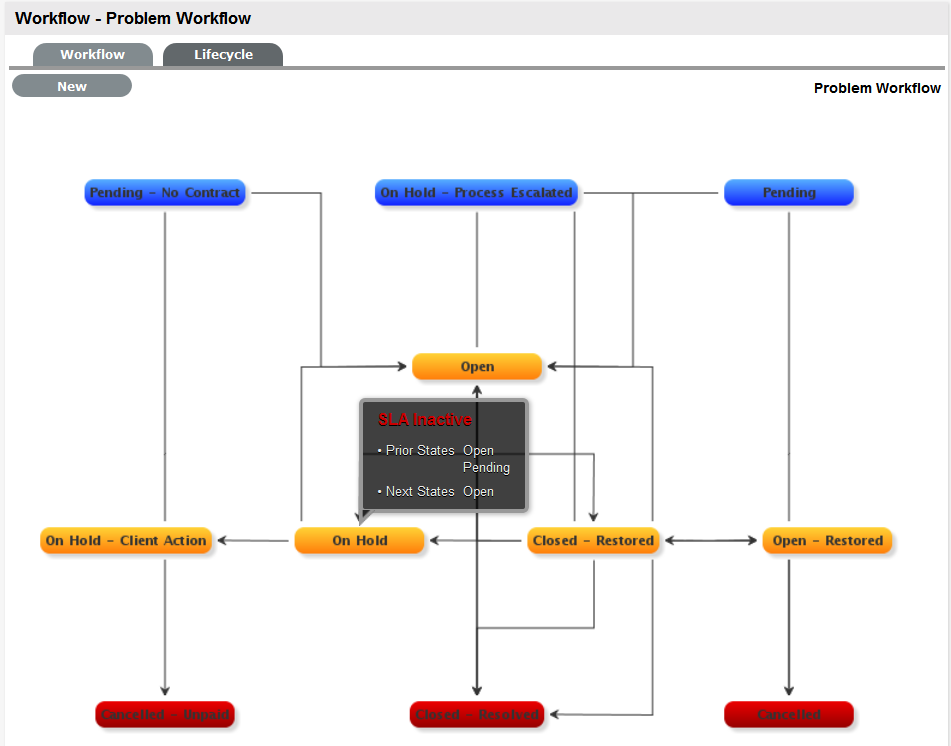
Select the Lifecycle tab to create or modify Workflow States
1.19.4 Adding or editing Workflow States:
-
Click the State field in the Workflow map or State name hyperlink to display the Status information screen
Or, click New to create a new Workflow State.
-
Status
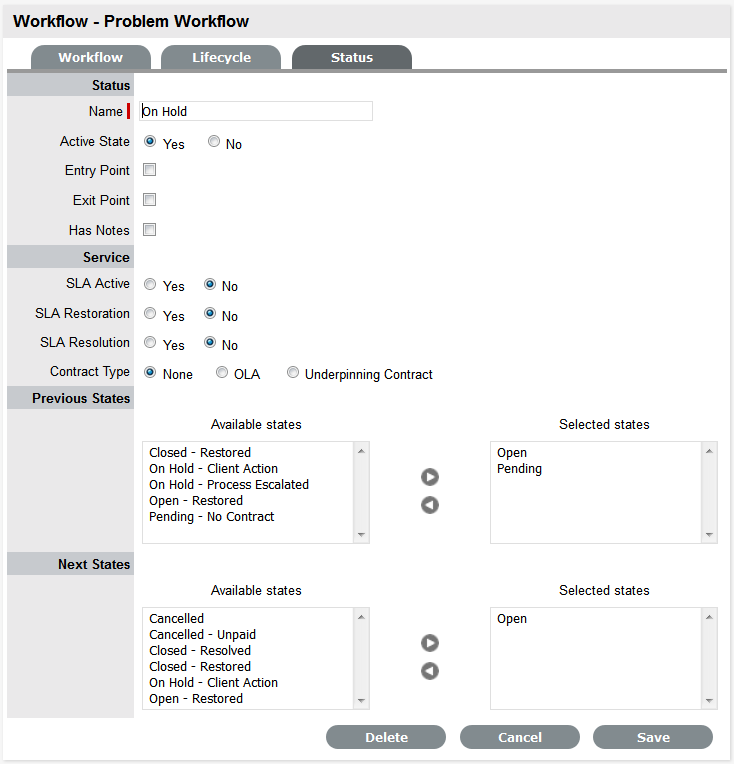
Name
System Required States, the States marked with an asterisk in the States Table, can be re-named if desired. For newly created States, enter a name.
Active State
Assign Yes for requests to be available in the Home tab by default, when assigned to this stage of the Workflow.
Yes should be used for States where the User is actively working on the request or waiting for updates. No generally applies to Workflow exit points and will only be available by default within the relevant Process tab list view.
Approval State
Sets the Status as an Approval State. This allows a Manager User to be assigned to this State, which enables them to approve or reject a Request when it moves into this stage of the Workflow.
NOTE:An Entry/Exit status cannot be an Approval State.
Item Editable
Select this option to allow the details of an Item to be edited when a Request is moved into this State . When this option is enabled for a Workflow State,
 is visible next to the Item Type link in the Summary tab of the Request.
KBA Approval
Enable this option as part of the KBA Approval process, which displays the Accept, Revise and Reject buttons for the User to publish, advise content revision or reject content.
Enabling this option, removes the Next States fields and requires the User to define where the request will move to if the Accept and Reject buttons are selected. If the Revise button is selected, the Request will move to the "On Hold - KBA Rework" system state. See:KBA Content Approval.
Entry Point
An Entry Point is used to indicate the start of a Lifecycle. To make the state Workflow Entry Point, select the Entry Point checkbox.
As the Entry Point is the first state, the Previous States field will be removed.
Exit Point
Select whether the state will be an Exit Point. An Entry Point is used to indicate the end of a Lifecycle.
NOTE:A Workflow can have only one Entry Point but multiple Exit Points.
Has Notes
Allows the Supervisor to include instructions or add relevant details for Requests that move into this State. The information is configured within the Notes tab that is displayed when this option is enabled.
Information and attachments included on the Notes tab, are displayed as a scroll-over when the Request moves into the State.
Listener Class
This field is visible if the Outbound Web Services option is enabled in the Admin>Setup>Privileges>System tab.
Complete this field, if assigning this State to a request is to trigger an event in an external system.
This field should contain the name of a Java class that implements the interface com.livetime.ws.listenWorkflowListener that has been compiled into a jar file and added to the LiveTime classpath. Please contact support for further details.
SLA Active
Links the Status with timing set within SLAs and OLAs. When the option is set to No, the SLA/OLA timers stop and the triggers for reminders, escalations and warnings do not fire.
SLA Restoration
If the 'Yes' option is selected for SLA Restoration, it means that Requests that move into this Stage of the Workflow have met the SLA Restoration Time.
SLA Resolution
If the Yes option is selected for SLA Resolution, it means that Requests that move into this Stage of the Workflow have met the SLA Resolution Time.
Contract Type
Defines if the Workflow State will be managed by an internal (OLA) or external (Underpinning Contract) support agreement. If OLA's or Underpinning Contracts are assigned to a Workflow Lifecycle, the Workflow SLA Resolution Time cannot be exceeded by the sum of Resolution Times for all Contract Types assigned to the Workflow Lifecycle.
Assign SLM
This field is displayed when an UPC is associated with the Workflow State. Use this field to define if the request ownership is to be maintained by the Assigned Technician or moved to the Manager of the SLA associated with the request.
Previous States
If the State is not an Entry Point, Previous States can be assigned to the Workflow stage. Highlight the relevant State and use the arrow button to move Available States to the Previous States field. These options designate the Workflow stages a Request can come from, before it arrives in this Workflow State.
Next States
If the State is not an Exit Point, Next States can be assigned to the Workflow state. Use the arrow button to select the Next States from the Available States. These options are included in the Next Action drop-down menu of a Request.
Accept State
Approval
(Visible when the Approval State or KBA Approval option is Yes.)
Displays the States that a Request can move to when a Request action is Accepted. Select the appropriate State, for the system to automatically route the Request when the Accept option is selected.
-
Customer when selected, means the request will be assigned to the Customer associated with the request to accept/reject request activity. The Customer will be able to access the accept/reject icons in the Customer Portal to process the request.
-
Line Manager, select if the request is to be forwarded to a system user with the Customer Role, who will process the approval in relation to the Customer associated with the request. The Customer/Line Manager will be able to access the accept/reject icons in the Customer Portal to process the request.
-
Team Manager select if a single Manager User assigned to the Team is to process the Request.
-
Team Managers# if selected, set the number of Managers that are required to Approve the Request before the system will automatically apply the defined Accept or Reject State.
-
Team Managers% if selected, set the percentage weighting that must be achieved by Managers voting before the system will automatically apply the defined Accept or Reject State. When selected, define the percentage weighting.
Reject State
(Visible when the Approval State or KBA Approval option is Yes.)
Displays the States that a Request can move to when a Request action is Rejected. Select the appropriate State, for the system to automatically route the Request when the Reject option is selected.
-
-
Delete the State if required, or Name/Rename the State
-
Enter all State information up to the SLA Resolution field
-
Save the updated State details
NOTE:It is recommended that all States that are to be included in the Workflow be added or re-named now
After all States have been entered in the system, the mapping of the Workflow can be more easily achieved.
-
Continue to edit, add or delete States until all relevant States exist for the Workflow
-
To create the Workflow Lifecycle, States need to be assigned to the transitional states of Previous and/or Next
To move Available states to the Previous State or Next State field, open the Status details screen by clicking the State field in the Workflow map or select the State hyperlink in the table beneath the Workflow map.
-
Assign States to be Next and/or Previous States
For the Current Status highlight an option in the Available State list and click the right-pointing arrow to move it to the Selected States field.
NOTE:When a State is used as a Previous and a Next State, it allows a request to move forward and backward in a Lifecycle
An Open State cannot have any previous States and a Closed State cannot have any Next States.
-
Click Save to return to the Workflow map and to access other States to build on the Workflow lifecycle.
-
Repeat Steps 13 to 16 until all transitional stages of the Workflow have been mapped.
NOTE:To successfully save a Workflow, the sum Resolution Time of the individual Contract Types assigned to each transitional state of the Workflow Lifecycle, must be less than or equal to the Workflow's SLA Resolution Time.
-
Click Save.
The visual representation of the Workflow is displayed.