Upgrading Application Objects
The Application objects created for applications hosted on DeFrame terminal servers cannot be used by the ZENworks 6.5 Novell Application Launcher, Novell Application Launcher plug-in, or ZENworks 6.5 Launch gadget. You must upgrade the Application objects by recreating them in eDirectory as Terminal Server Application objects. To do so:
-
In ConsoleOne, right-click the container where you want to create the Application object, click New, then click Object.
-
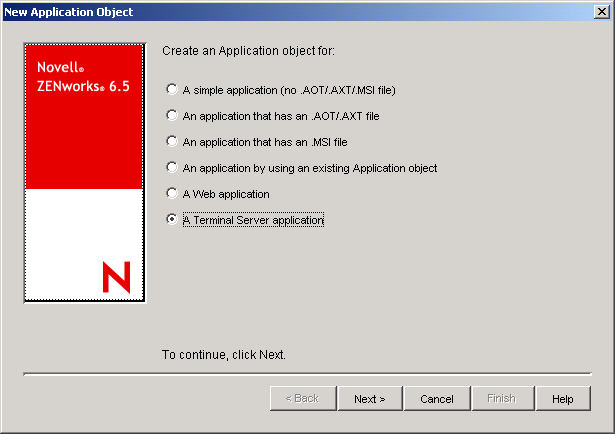
In the New Object dialog box, select Application, then click OK to display the New Application Object dialog box.
-
Select the Terminal Server Application option, then click Next to display the Object Name dialog box.
-
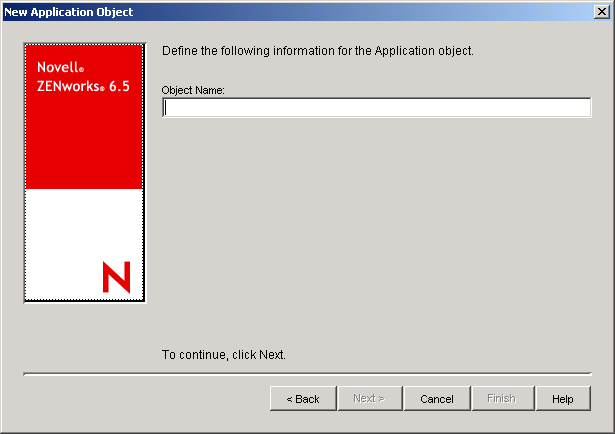
Specify a name for the Application object.
The Application object's name must conform to the following rules:
- The name must be unique in the container.
- Special characters are allowed. However, plus (+), equals (=), and period (.) must be preceded by a backslash (\) if used.
- The following characters are valid in Application object names but are invalid when used in Windows folder and file names:
\ / : * ? " < > |
If you use these characters in the Application object name, they are replaced by an underscore (_) when displayed in locations controlled by Windows and not Novell Application Launcher (for example, on the Windows desktop).
- Uppercase and lowercase letters, as well as underscores and spaces, are displayed as you first entered them, but they aren't distinguished. For example, ZENworks_Desktop_Management and ZENWORKS DESKTOP MANAGEMENT are considered identical.
The name is visible in eDirectory. By default, the Application object's name is also used as the Application object's icon title when displayed by Application Launcher on a user's workstation. You can, if necessary, change the icon title after the Application object has been created (Application object > Identification tab > Icon page).
-
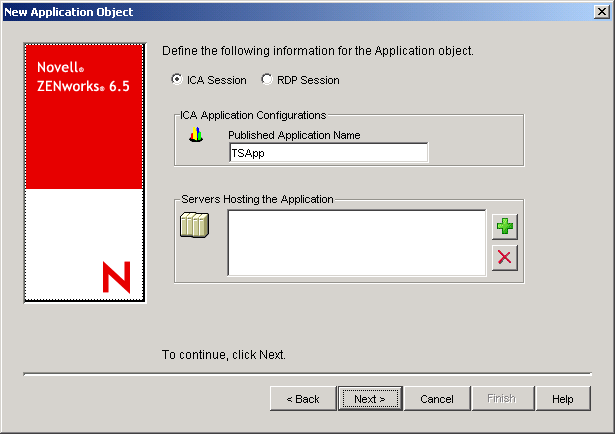
Click Next to display the ICA/RDP Session dialog box.
-
Fill in the following information to configure the ICA or RDP client session in which the application will run.
If you select ICA Session, fill in the following fields:
ICA Session: Select this option if to have the application run in an ICA (Independent Computing Architecture) client session. Citrix MetaFrame requires ICA client sessions.
Published Application Name: By default, this field is populated with the Application object name you entered on the previous page. If the name does not match the application name exactly as it is defined in the Citrix IMA database, change the name to the Citrix published application name.
Servers Hosting This Application: Add the Citrix servers that host the application. To add a server, click the Add button, enter the server's IP address or DNS hostname, then click OK.
The server's you define here are used only when the application is launched from Novell Application Launcher or the Novell Application Launcher plug-in. The ZENworks Launch gadget uses the servers defined in its configuration settings. For information about the ZENworks Launch gadget's configuration settings, see "ZENworks Launch Gadget: Configuring Settings" in "Application Management" in the Novell ZENworks 6.5 Desktop Management Administration Guide.
RDP Session: Select this option if you want the application to run in an RDP (Remote Desktop Protocol) client session. Microsoft Windows Terminal Server requires RDP client sessions. Citrix MetaFrame also supports RDP client sessions.
If you select RDP Session, fill in the following fields:
Terminal Server Address and Port: Specify the terminal server's IP address or hostname. If the terminal server is not using default port 3389, edit the Port field to specify the correct port number.
Server Domain: If the terminal server is part of a Windows NT domain or an Active Directory domain, specify the domain name.
Application Path: Specify the path to the application's executable file. If you are running ConsoleOne on the terminal server, you can browse for and select the file.
Working Directory: Specify the path to the directory where the application can create work files.
-
Click Next, then define the rules that control distribution of the application to a workstation. To do so:
-
Click Add, then select the type of rule you want to define.
-
Fill in the information for the rule (click Help for information about the rule), then click OK to add the requirement to the list.
NOTE: An operating system version (OS Version) rule was required in previous ZENworks versions. It is no longer required.
-
-
Click Next, then associate the Application object with the users or workstations that you want to distribute the application to. To do so:
-
Click Add, then browse for and select User or Workstation objects. You can also select Group objects, Workstation Group objects, and container objects (Organizational Unit, Organization, or Country). If you select a container object, you are given the choice of associating all the container's User and/or Workstation objects with the application.
IMPORTANT: Each workstation to be associated with applications must first be imported into eDirectory as a Workstation object.
-
After you add the user or workstation to the list, select the appropriate check boxes for the user or workstation to set the characteristics (Force Run, App Launcher, Start Menu, Desktop, System Tray, Quick Launch, and Force Cache) you want applied to the application. Click Help for a description of each of these characteristics.
-
-
Click Next, review the Application object settings, then click Finish to create the Application object.