16.1 Epiphany Policy
The Epiphany policy is used to configure the Epiphany Web browser.
To configure the Epiphany policy:
-
In the ZENworks Control Center, click the tab.
-
In the list, click , then click to display the Create New Policy page.
-
In the list, click , then click to display the Policy Name page.

-
Fill in the fields:
-
Policy name: (Required) Provide a unique name for the policy. The name you provide displays in the ZENworks Control Center interface, which is the administrative tool for ZENworks Linux Management.
For more information, see Section C.0, Naming Conventions in the ZENworks Control Center.
-
Folder: (Required) Type the name or browse to the folder that this policy will be created in. Folders display in the ZENworks Control Center.
-
Description: Provide a short description of the policy. This description displays on the policy's Summary page in the ZENworks Control Center interface.
-
-
Click to display the Epiphany Lockdown Settings page.

-
Select the desired options (by default, all options are disabled):
Disable JavaScript control of window chrome: Select this option to disable the JavaScript control and modification of the Epiphany Web browser's window chrome.
The chrome is part of an application window that is positioned outside of the window's content area. A Web page can use JavaScript to control and modify the window chrome. Several elements such as the toolbar, menu bar, progress bar, and title bar are part of the chrome.
Hide menu bar: Select this option to hide the menu bar of the Epiphany Web browser.
Disable automatic download and opening of files: Select this option to prevent users from downloading and opening files automatically.
If you include this setting in the policy, users are always asked if they want to save a file or open it. For example, if users want to download a file, they are prompted to specify the location to save or open the file. If the user clicks , the file is downloaded and opened with the corresponding application.
Disable manual URL entry: Select this option to prevent users from manually entering URLs in the address bar.
Disable bookmark editing: Select this option to prevent users from editing a bookmark.
Disable toolbar editing: Select this option to prevent users from editing the toolbar. A toolbar can contain buttons with images and menus, or a combination of both.
Disable history: Select this option to prevent users from accessing the history, which contains links to pages recently visited.
Disable loading of contents from unsafe protocols. Default safe protocols are HTTP and HTTPS: Select this option to prevent the downloading of data that is transmitted using an unsafe protocol. Unsafe protocols do not encrypt the data sent across a network.
After you check this option, the following buttons are available:
-
Add: To add a protocol to the list, click , specify a protocol name, then click .
-
Remove: To remove a protocol from the list, select the protocol, then click .
-
-
Click to display the Epiphany Configuration Settings page.

-
Select the desired options (by default, all options are disabled).
For each option you enable, provide a value. When you enable an option, it is locked by default. You can unlock the option by clicking
 . The options that are not enabled are excluded from the policy and are not applied to the device.
Homepage URL: Specify the URL to automatically display when users launch the Epiphany Web browser.
Download folder: Specify the directory where you want users to download data. If the folder you specify does not exist, it is created relative to all users' home directories. If you specify an absolute path, ensure that it is at a location where all users have Read and Write access to files.
Allow popups: Select this option to allow or disallow pop-ups to be displayed in the Epiphany Web browser.
Allow Java: Select this option to allow or disallow Java applications to run on the Epiphany Web browser.
Allow JavaScript: Select this option to allow or disallow JavaScript applications to run on the Epiphany Web browser.
Cookies: Select this option to configure how the Epiphany Web browser handles cookies.
A cookie is a piece of information given to a Web browser by a Web server. The browser, in turn, stores this information in a file. The available options are , , and .
Disk space for temporary files: Specify the amount of disk space to allow for storing temporary files for the browser.
-
Click to display the Default System Requirements for Epiphany Policy page.

-
Specify the minimum system requirements that must be satisfied for the Epiphany Web browser policy settings to be effective.
The field displays the minimum version of the Epiphany Web browser required for all policy settings to be effective. Epiphany 1.2.5 is the minimum required version. Policy settings are applied only if the user has the same or later version of the Epiphany Web browser installed. If the user does not have the Epiphany Web browser installed or has an earlier version than the specified version, the policy does not apply.
Even if you do not include this system requirement in the policy, the system checks whether the Epiphany Web browser is installed on a managed device or not. If the system finds that the Epiphany Web browser is installed on a device, it also checks the version. If it finds an earlier version than the specified one, the policy is enforced but a warning message is generated. If the Epiphany Web browser is not installed on a managed device, the policy is not enforced and an error message is generated.
-
Click to display the Summary page.
-
Click to create the policy as configured according to the settings on the Summary page. If you click , the Epiphany policy is created but it does not have devices assigned or a schedule specified. At some point in the future, you need to configure additional options for the policy by continuing with Section 17.4, Assigning Policies.
or
Click to display the Policy Assignment page to perform the following tasks:
-
Specify assignments for this policy
-
Specify the schedule for this policy
-
Specify groups for this policy

-
-
Assign the policy to the devices.
-
Click to browse for and select the appropriate Server or Workstation objects.
-
You can also select Folder or Group objects.
-
Click the down-arrow next to or to expand the list, then click the underlined link in the column to select the desired objects and display their names in the list box.
Assigning a policy to a Group object is the preferred method of assigning the policy. Assigning the policy to a large number of objects (for example, more than 250) might cause increased server utilization.
-
Click .
-
-
Click to display the Policy Schedule page.
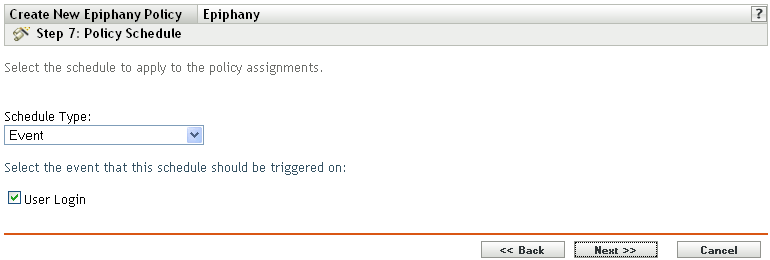
-
Select the schedule to apply to the assignments from the drop-down list, then select the desired options, which vary, depending on the schedule type you select.
The settings you configure on this page determine when the policy is applied to devices.
See Section 15.3, Schedules for information about the available schedules and their options.
-
Click to display the Policy Groups page.

-
(Optional) Click to open the Select Groups dialog box, then click the underlined links in the Name column to select the desired policy groups and display their names in the Selected list box.
Using policy groups eases administration efforts by letting you group several policies so you can use common assignments, schedules, and so forth, rather than configuring these settings for each policy you create. For more information, see Section 17.3, Creating Policy Groups.
-
Click to display the Finish page.
-
Review the information on the Finish page, making any changes to the policy settings by using the button as necessary. Click to create the policy as configured according to the settings on the Finish page.