ZENworks 2017 Update 2 Troubleshooting Full Disk Encryption
This document provides troubleshooting guidelines for common problems related to ZENworks Full Disk Encryption. If, after completing the troubleshooting steps, the problem is not resolved, you should contact Technical Support for additional help.
2.0 The ZENworks PBA is not booting to the Windows operating system
Symptoms: After logging in to the PBA, the user encounters a black screen or GRUB error and the device does not boot the operating system.
After pre-boot authentication occurs, the BIOS or UEFI settings must be correctly set for Windows. With older or unusual hardware configurations, the standard ZENworks PBA boot method and Linux kernel configuration used to provide the BIOS settings might not work, resulting in hardware that does not function correctly or is not recognized by Windows.
To resolve this issue, you need to repair the device’s master boot record (MBR) or GUID partitions tables (GPT) so that the device boots directly to the operating system. You need to then modify the Direct Media Interface (DMI) file provided by ZENworks Full Disk Encryption so that it includes the correct settings to boot the device.
-
Repair the device’s MBR or GPT:
-
Windows 7: Boot the device from a Windows 7 installation disk. When the Windows 7 splash screen displays, click . After the scan completes, select the Windows installation to repair and continue. If you are prompted to repair the problem automatically, select . When the System Recovery Options dialog is displayed, click the option, then enter bootrec.exe /fixmbr at the command prompt. You should see a success message after running the command. Type exit to exit out of the command prompt and continue to boot into Windows.
If you don’t have a Windows 7 installation disk, you can use a Windows 7 system recovery disk. To create the disk on a working Windows 7 machine, click > > > .
-
Windows 8 or Windows 10: Boot the device from a Windows 8 or Windows 10 installation disk, respectively. When the Windows splash screen displays, click . On the next screen, select , then select . From the Advanced options, launch a command prompt, then enter bootrec.exe /fixmbr. When the operation is finished, reboot the device.
If you don’t have a Windows 8 or Windows 10 installation disk, you can use a system recovery disk created from the Windows 8 ADK and the ZENworks WinPE plugin.
-
-
Modify the dmi.ini file settings:
The dmi.ini file provides the boot method to be used to transition from the Linux kernel to the Windows operating system. The file contains a default boot setting and a list of known hardware configurations that require different boot settings. The default setting is applied unless the device’s hardware configuration is in the list. The dmi.ini file’s default setting and first few entries are shown below:
[default]
KICKSTART=FAST

[FUJITSU SIEMENS,LIFEBOOK C1110]
DMI_SYS_VENDOR=FUJITSU SIEMENS
DMI_PRODUCT_NAME=LIFEBOOK C1110
KICKSTART=BIOS

[LENOVO,20021,2959]
DMI_SYS_VENDOR=LENOVO
DMI_PRODUCT_NAME=20021,2959
KICKSTART=BIOS

[LENOVO,0831CTO]
DMI_SYS_VENDOR=LENOVO
DMI_PRODUCT_NAME=0831CTO
KICKSTART=KEXEC
KERNEL_PARAM=pci=snb-enable-ahci-to-legacy
You need to discover the correct settings for your device and add an entry to the dmi.ini file. This discovery is a trial and error process; you will need to try different settings until one enables the machine to boot successfully.
-
On the device, open a command prompt with Administrator privileges, change to the c:\windows\nac\sbs directory, then run the dmiconfig dump command to see the device’s current dmi.ini settings.
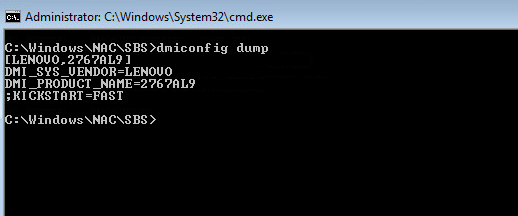
-
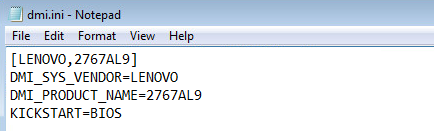
Create a new dmi.ini text file on your desktop and copy the results from the dmiconfig dump into the file. Edit the last line to remove the semicolon and change the KICKSTART value to another boot option (listed below), as shown in the following example:
Finding the correct setting is a trial and error process. The possible DMI settings are listed below in the order we recommend trying them. For some settings, recommendations are given for when to use them.
Setting
Example
KICKSTART=BIOS
This setting is effective in resolving issues where the ZENworks PBA displays the credential or user capture prompt but then fails to boot to Windows.
[LENOVO,2767AL9]
DMI_SYS_VENDOR=LENOVO
DMI_PRODUCT_NAME=2767AL9
KICKSTART=BIOS
KICKSTART=KEXEC
[LENOVO,2767AL9]
DMI_SYS_VENDOR=LENOVO
DMI_PRODUCT_NAME=2767AL9
KICKSTART=KEXEC
KICKSTART=FAST
[LENOVO,2767AL9]
DMI_SYS_VENDOR=LENOVO
DMI_PRODUCT_NAME=2767AL9
KICKSTART=FAST
KICKSTART=KEXECKERNEL_PARAM=pci=snb-enable-ahci-to-legacy
[LENOVO,2767AL9]
DMI_SYS_VENDOR=LENOVO
DMI_PRODUCT_NAME=2767AL9
KICKSTART=KEXEC
KERNEL_PARAM=pci=snb-enable-ahci-to-legacy
KICKSTART=KEXECKERNEL=/boot/bzImage-acpi
This setting is effective in resolving issues where the ZENworks PBA screen displays but the credential or user capture prompt never displays.
[LENOVO,2767AL9]
DMI_SYS_VENDOR=LENOVO
DMI_PRODUCT_NAME=2767AL9
KICKSTART=KEXEC
KERNEL=/boot/bzImage-acpi
KICKSTART=KEXECKERNEL_PARAM=pci=snb-enable-ahci-to-legacyKERNEL=/boot/bzImage-acpi
[LENOVO,2767AL9]
DMI_SYS_VENDOR=LENOVO
DMI_PRODUCT_NAME=2767AL9
KICKSTART=KEXEC
KERNEL_PARAM=pci=snb-enable-ahci-to-legacy
KERNEL=/boot/bzImage-acpi
-
In the c:\windows\nac\sbs directory, make a backup copy of the current dmi.ini file, then copy your edited dmi.ini file to the directory.
-
Open a command prompt with Administrator privileges, change to the c:\windows\nac\sbs directory, then run the dmiconfig import --force command to import the settings from the new dmi.ini file. Run dmiconfig dump to verify the change.

-
Reboot the device. If the device fails to boot to the Windows operating system, repair the MBR, then repeat the above process using another setting.
-
After you find the correct setting, you can edit your Full Disk Encryption policy to add it to the policy’s dmi.ini file (ZENworks Control Center > > Full Disk Encryption policy details > tab > ).
-