Environment
Novell Open Enterprise Server (Linux based)
Enterprise Volume Management System (EVMS)
Situation
Want to expand a native Linux filesystem cluster resource
Resolution
WARNING - Do not follow this TID unless you have updated via the OES Red Carpet channel to the versions available in Dec. 2006 or later.
novell-ncp
novell-ncpserv
novell-nss
evms
novell-cluster-services-km
If you need help updating your OES server go to TID 3045794 or Patching an OES Linux Server
Note: "evmsgui" can be temperamental. If making changes and pressing "Save" in between steps isn't enough (IE: You delete the FS on your EVMS volume and try to add another FS type and it errors out), you may have to SAVE, CLOSE evmsgui, and REOPEN in between certain steps.
Overview
To create a native Linux Cluster Resource for Novell Cluster Services, Enterprise Volume Management System (EVMS) is required. Additionally, in order to have the proper behavior, the resource needs to be created on a private cluster segment.To use a native Linux volume with EVMS as a cluster resource, you need to use the Cluster Segment Manager (CSM) plugin. This plugin manages the ownership of the container. Using the CSM plugin, you can create a private container to host the volume.
There are some differences in working with EVMS volumes compared to NSS volumes.Please make sure you read the Cautions section of this document!
Implementation
Disk Configuration
Novell Cluster Services needs to be running. We will be using 'evmsgui' to do this. Evmsgui should not be left running when not being used -- It locks the evms engine while it runs, potentially blocking other evms actions from taking place.CSM Containers can only be placed on entire devices (ie, a disk or a LUN on a SAN). If you are using multipathing, see KB 3778690,Set up EVMS for use with Multipathing. You cannot create a container on a partition, the whole device must be used. The first thing to do is check to see if the disk is a compatibility volume (you can see it from the volumes tab as /dev/evms/
If the disk is already a compatibility volume (or otherwise has a segment manager on it)
- Right click on the volume, choose Delete ->Recursive Delete
- (If available) Choose to write zeros to the disk.
- (If available) Choose to write the 1024 bytes to the end of the disk
- Go to the Disks tab
- Right Click on the disk you'll be using, choose "Remove Segment Manager from Object..."
- Click "Remove"
- Click the Save icon to commit the changes
- Click on Actions ->Create ->Container
- Select "Cluster Segment Manager", choose Next
- Select the disk(s) you want to be in the container, choose Next
- Configuration Options
- Node should be node you are creating it on
- Type needs to be "private"
- Name should be one word, using standard characters. Name cannot be a reserved word. The following is a list of reserved words that should not be used:
- Plugin
- Disk
- Region
- Segment
- EVMS
- Container
- Volume
- Make the new container active
- Click on the Containter tab
- Right click the new container you just created and choose Modify Properties
- Highlight your container and select Next
- Select Modify
- Click the Save icon to commit the changes
- Click on Actions ->Create ->EVMS Volume
- Select the container we just created, put in a volume name, choose Create
- Click the Save icon to commit the changes
- Go to the volumes tab, right click on the volume we just created, choose "Make File System"
- Select Reiser (or another native Linux filesystem), choose Next
- Enter a volume label, choose "Make"
- Click the Save icon to commit the changes.
Creating a Traditional Linux Volume Cluster Resource
Creating a cluster resource for a traditional Linux volume allows it to be moved or mounted on different servers in the cluster.
Start your Internet browser and enter the URL for iManager.
The URL is http:// server_ip_address/nps/imanager.html. Replace server_ip_address with the IP address or DNS name of an OES server in the cluster that has iManager installed or with the IP address for Apache-based services.
Enter your username and password.
In the left column, locate , then click the link.
iManager displays four links under that you can use to configure and manage your cluster.
Specify the cluster name or browse and select it, then click the link.
Specify Resource as the resource type you want to create by clicking the radio button, then click .
Specify the name of the resource you want to create.
This is the name you will assign the resource for the cluster-enabled volume.
In the Inherit From Template field, specify the Generic_FS_Template.
Select the check box, then continue with Configuring Traditional Linux Volume Load Scripts below.
The resource load script specifies the commands to start the resource (including mounting the file system) on a server in the cluster, and is required for each Linux volume you cluster enable.
If you are creating a new cluster resource, the load script page should already be displayed. You can start with Step 4.
In the left column of the main iManager page, locate then click the link.
Type the cluster name or browse and select it, select the box next to the resource whose load script you want to edit, then click the link.
Click the tab, then click the link.
Edit or add the necessary commands to the script to load the resource on the server.
The generic file system template you specified in Step 7 above contains a load script that you must edit to supply information specific to your file system resource.
The load script from the generic file system template should appear similar to the following example:
#! /bin/bash
. /opt/novell/ncs/lib/ncsfuncs
# define the IP address
RESOURCE_IP=a.b.c.d# define the file system type
MOUNT_FS=reiserfs#define the container name
container_name=name# define the device
MOUNT_DEV=/dev/evms/$container_name/volume_name# define the mount point
MOUNT_POINT=/mnt/mount_point#activate the container
exit_on_error activate_evms_container $container_name $MOUNT_DEV
# mount the file system
ignore_error mkdir -p $MOUNT_POINT
exit_on_error mount -t $MOUNT_FS $MOUNT_DEV $MOUNT_POINT
# add the IP address
exit_on_error add_secondary_ipaddress $RESOURCE_IP
exit 0
The first section of the above load script examplecontains mount point, IP address, container name, and file system type/device variables that you must change to customize the script for your specific configuration.
Specify the t value, then click to save the script or, if you are creating a new cluster resource, click .
The timeout value determines how much time the script is given to complete. If the script does not complete within the specified time, the resource becomes comatose.
In the above example, if you specified
- 123.123.12.12 as the IP address
- reiserfs as the file system type
- cont1 as the container name
- vol_one as the device
- /mnt/vol_onemount as the mount point
your load script would appear like the script below.
#! /bin/bash
. /opt/novell/ncs/lib/ncsfuncs
# define the IP address
RESOURCE_IP=123.123.12.12# define the file system type
MOUNT_FS=reiserfs#define the container name
container_name=cont1# define the device
MOUNT_DEV=/dev/evms/$container_name/vol_one# define the mount point
MOUNT_POINT=/mnt/vol_onemount#activate the container
exit_on_error activate_evms_container $container_name $MOUNT_DEV
# mount the file system
ignore_error mkdir -p $MOUNT_POINT
exit_on_error mount -t $MOUNT_FS $MOUNT_DEV $MOUNT_POINT
# add the IP address
exit_on_error add_secondary_ipaddress $RESOURCE_IP
exit 0
Configuring Traditional Linux Volume Unload Scripts
The resource unload script specifies the commands to stop the resource (including unmounting the file system) on a server in the cluster, and is also required for each Linux volume you cluster enable. If you are creating a new cluster resource, the unload script page should already be displayed. You can start with Step 4.
In the left column of the main iManager page, locate , then click the link.
Type the cluster name or browse and select it, select the box next to the resource whose unload script you want to edit, then click the link.
Click the tab, then click the link.
Edit or add the necessary commands to the script to unload or stop the resource on the server.
The generic file system template you specified in Step 7 above contains an unload script that you must edit to supply information specific to your file system resource.
The unload script from the generic file system template should appear similar to the following example:
#!/bin/bash
. /opt/novell/ncs/lib/ncsfuncs
# define the IP address
RESOURCE_IP=a.b.c.d#define the container name
container_name=name
# define the mount point
MOUNT_POINT=/mnt/mount_point#dismount the volume
exit_on_error ncs_dismount $MOUNT_POINT
# del the IP address
ignore_error del_secondary_ipaddress $RESOURCE_IP
# deport the container
exit_on_error deport_evms_container $container_name
# return status
exit 0
The first section of the above unload script example contains mount point, container name, and IP address variables that you must change to customize the unload script for your specific configuration.
Specify the value, then click to save the script or, if you are creating a new cluster resource, click and continue with Setting Start, failover, and Failback Modes.
The timeout value determines how much time the script is given to complete. If the script does not complete within the specified time, the resource becomes comatose.
In the above example, if you specified
- 123.123.12.12 as the IP address
- cont1 as the container name
- /mnt/vol_onemount as the mount point
Your unload script would appear like the script below.
#!/bin/bash
. /opt/novell/ncs/lib/ncsfuncs
# define the IP address
RESOURCE_IP=123.123.12.12#define the container name
container_name=cont1
# define the mount point
MOUNT_POINT=/mnt/vol_onemount#dismount the volume
exit_on_error ncs_dismount $MOUNT_POINT
# del the IP address
ignore_error del_secondary_ipaddress $RESOURCE_IP
# deport the container
exit_on_error deport_evms_container $container_name
# return status
exit 0
Expanding a volume
There are two supported ways to expand a volume.
Expanding onto a separate disk
- Unmount the filesystem in evmsgui
- From the Volumes tab, right click on the volume, choose "Add Feature"
- Select "Drive Linking Feature", click Next
- Give the drive link a name, Click Add
- Save
- Go to Actions ->Create ->Container
- Select Cluster Segment Manager, Next
- Select the disk you want to expand onto (note: has to be entire disk)
- Use the same settings as the existing container (Same name, private, same owning node).
- Save
- Go to the Volumes tab
- Right click on the Volume, choose Expand
- Select the volume you are expanding, choose Next
- Verify the volume current size and the expandable size (should be the added disk size), choose Next
- Select the storage to expand onto, choose Expand
- Save
- Exit evmsgui, saving changes
Moving the volume to a larger disk
- Unmount the filesystem in evmsgui
- Add a larger disk to the CSM container
- Go to Actions ->Create ->Container
- Select Cluster Segment Manager, Next
- Select the larger disk you want to expand onto (note: has to be entire disk)
- Use the same settings as the existing container (Same name, private, same owning node).
- Exit evmsgui, saving changes
- Restart evmsgui
- Go to the containers tab and expand the container. You should see the new disk as part of the container.
- Right click on the object associated with the disk that currently hosts the volume, choose replace, as shown below.
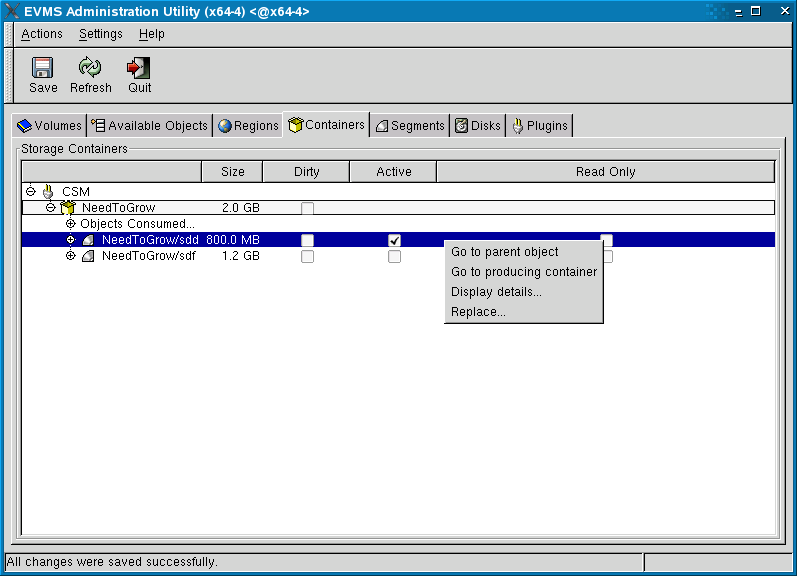
- Select the object to move the disk to, choose next
- Save the changes. This will take some time, depending on several factors.
- Exit evmsgui, saving changes
- Restart evmsgui. You should see the volume under the volumes tab.
- Right click on the volume, choose Check/Repair filesystem, run through the repair.
- Go to the Disks tab
- Right click on the disk object the volume was previously on, select Remove from container.
- Exit evmsgui, saving changes
- The volume is now moved, you should be able to use it normally from here.
Cautions
Special instructions for comatose resource
If a native Linux resource goes comatose, it is important to verify the volume is not mounted on any node before bringing the resource online again. Failure to do so may result in corruption.Clustering software needs to be running
Using Cluster Segment Manager (CSM) containers requires that cluster management software be running on all the nodes that use the container. Don't try to make any modifications to the EVMS objects without NCS running.Shut off evms utilities when not actively being used
The EVMS administration utilities (evms, evmsn, evmsgui) should not be left running when not being used. They lock the evms engine while running, potentially blocking other evms related actions from taking place. This affects NSS volume actions as well as native linux volume actions.Migrating resources
Cluster resources (native linux or NSS) should not be migrated while the EVMS administration utilities (evms, evmsn, and evmsgui) are running.Status
Top IssueAdditional Information
If you run into problems, check KB 3670562,Unable to manage EVMS through EVMS administration tools.
