Environment
Situation
The following message is returned to the end user when attempting to install an iPrint printer from Windows XP, Vista, or 7 workstations using Internet Explorer. This problematic situation does not exist with FireFox. Note: The iPrint client *is* installed.
The iPrint client is not installed. Do you want to install it now?
A banner is also displayed across the top of the browser, referencing the 'iPrint ActiveX' Control from 'Novell, Inc'.
Once the ActiveX control is enabled using one of the methods listed in the resolution section of this TID, the following message is returned in place of the "iPrint client is not installed" message:
Error:
iPrint Client - You need to restart the browser and "Run as Administrator" to perform this task.
Note: This "Run as Administrator" condition does not exist with Windows XP.
Resolution
Download the updated novell-iprint-server and novell-iprint-client RPM from here.
Copy the RPMs to the iPrint server's /tmp directory
Install the RPMs using the following commands:
cd /tmp
rpm -Uvh novell-iprint-server-6.7.0.20150218-0.6.5.x86_64.rpm
rpm -Uvh novell-iprint-client-6.7.0.20150328-0.6.1.noarch.rpm
rcapache2 restart
rcnovell-idsd restart
rcnovell-ipsmd restart
Update the iPrint Client to version 6.0.0 or later on the workstation.iPrint Appliance 1.1:After installing the novell-iprint-client RPM listed above, click the "Install iPrint Client" link from the /ipp page.
Apply the iPrint Appliance 1.1 Patch 1 update to the appliance.
Update the iPrint Client to version 6.0.0 or later on the workstation.
After installing the Patch 1 listed above, click the "Install iPrint Client" link from the /ipp page.
Additional Information
Click the banner which appears along the top of the the web page and choose to enable the ActiveX control.
This method has the advantage of simplicity and is a quick action. However, as an administrator, you may not want to rely on end users to know to do this. For those in environments with many users, you may want to consider "Method 2".
Workaround 2: Automate the Enabling of the ActiveX Control (for iPrint Client for Windows 5.32 and earlier)
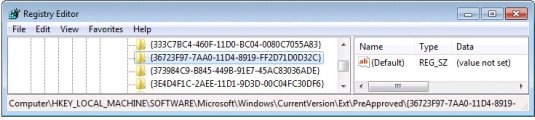
Create a registry key with the name of:
{36723F97-7AA0-11D4-8919-FF2D71D0D32C} in the following location:
32 bit
\\HKLM\SOFTWARE\Microsoft\Windows\CurrentVersion\Ext\PreApproved\
\\HKLM\SOFTWARE\Microsoft\Windows\CurrentVersion\Ext\PreApproved\
and
\\HKLM\\Software\\Wow6432Node\Microsoft\Windows\CurrentVersion\Ext\PreApproved\
Note: Both methods 1 and 2 are valid for XP, Vista, and Windows 7.
Method 1: Change AllowUserPrinters to 3
Within the iprint.ini, change AllowUserPrinters to the value of 3. No services need to be restarted. This change appears to have the most positive effect on scenarios where the "Run as Administrator" message is shown through Internet Explorer version 9.
Linux: /var/opt/novell/iprint/htdocs/iprint.ini
Method 2: Manually run Internet Explorer in 'Administrator mode' and add /ipp page to 'Compatibility mode'
Right-click Internet Explorer (not the quick launch icon) and choose "Run as Administrator"
Add the iPrint server address to the compatibility view list within IE.
or
Tools -> Internet Options -> Security -> uncheck "Enable Protected Mode (requires restart Internet Explorer)"
Method 4: Manually add the iPrint /ipp page as Trusted Site to the browser.
Internet Explorer -> Tools -> Internet Options -> Security -> Highlight Trusted Sites -> Sites -> http://[IP-or-DNS-of-iPrintServer] -> Add -> Restart the Browser
Method 5: Use iprntcmd utility to add the iPrint server address as a Trusted Site to the browser.
iprntcmd -w [IP-or-DNS-of-iPrintServer]
The above message can also occur because the iprint.js file is missing the Windows 7 support information.
Linux: /var/opt/novell/iprint/htdocs/scripts/iprint.js
WIN_9X_NT4_INSTALLER = "./clients/win-9x-nt4/nipp.exe";
WIN_2K_INSTALLER = "./clients/win-2k/nipp.exe";
WIN_XP_INSTALLER = "./clients/win-xp/nipp.exe";
WIN_VISTA_INSTALLER = (navigator.userAgent.indexOf("Win64") > -1 ||
navigator.userAgent.indexOf("WOW64") > -1 ||
navigator.userAgent.indexOf("x64") > -1 ||
navigator.userAgent.indexOf("x86_64") > -1) ?
"./clients/win-vista/x86_64/nipp.exe" :
"./clients/win-vista/x86/nipp.exe";
WIN_7_INSTALLER = (navigator.userAgent.indexOf("Win64") > -1 ||
navigator.userAgent.indexOf("WOW64") > -1 ||
navigator.userAgent.indexOf("x64") > -1 ||
navigator.userAgent.indexOf("x86_64") > -1) ?
"./clients/win-7/x86_64/nipp.exe" :
"./clients/win-7/x86/nipp.exe";