Environment
Novell Kanaka for Mac
Novell Open Enterprise Server 2 (OES 2) Linux Support Pack 3
Novell Open Enterprise Server 11 (OES 11) Linux Support Pack 1
Situation
This Technical Information Document (TID) builds off of section 3.5 of the Novell Kanaka documentation.
The purpose of this TID is to provide instruction on how to create, sign, install, and utilize a self-signed certificate in order to enable Apple Macintosh (MAC) clients to connect to the Kanaka 2.8 engine.
Resolution
SERVER CONFIGURATION
-
Create a Certificate Signing Request (CSR) utilizing the following OpenSSL command:
openssl req -newkey rsa:2048 -keyout private.key -out server.csr -
When prompted, answer each of the questions pertaining to the certificate:QuestionExplanationCountry Name (two-letter code)The ISO 3166 two-letter country code pertaining to the country where Kanaka Engine is located.State or Province (full name)The complete name of your state or province.Locality Name (such as the city)The complete name of your city.Organization NameThe name of your company or organization.Organizational UnitThe name of your department (optional).Common Name*The name of your server as resolved by DNS.Email AddressThe email address of the certificate administrator.Challenge PasswordGenerally optional, but required by some third-party certificate providers.
*Emphasis added. Please see corresponding "Explanation" field. -
Copy the server.csr file to the desktop of the workstation or server that iManager will be launched from.
-
Open iManager > Novell Certificate Server > Issue Certificate. Browse the the server.csr file previously copied. Click Next.
-
Utilize the following, basic settings (minimum). Select SSL or TLS and leave the other default settings:
-
On Step 3 of 6, leave the default settings and click NEXT
-
On Step 4 of 6, choose the "Validity Period" desired and click NEXT
-
On Step 5 of 6, choose the DER format to export the signed certificate in and click NEXT
-
On Step 6 of 6 click FINISH and download the certificate (server.der)
-
Copy the server.der to the directory where your CSR was stored.
-
At the command line, convert the certificate to PEM format:
openssl x509 -inform DER -outform PEM -in server.der -out kanaka.pem -
Remove the passphrase or password from the certificate:
openssl x509 -in kanaka.pem -out insecure.kanaka.pem -
Decrypt the private key (The private key is encrypted by default and needs to be decrypted for the Kanaka Engine to use):
openssl rsa -in private.key -out decrypted.private.key
NOTE: You will be prompted for your pass phrase that was used to setup the private key -
Remove the passphrase or password from the certificate:
openssl rsa -in decrypted.private.key -out insecure.decrypted.private.key -
Create the server.pem file with both the private key and certificate files:
cat insecure.decrypted.private.key insecure.kanaka.pem > server.pem -
Copy the server.pem file to the following location and start the kanaka engine:
/etc/opt/novell/kanaka/engine/config
Certificate configuration on the server is now complete. Client configuration is next.
CLIENT CONFIGURATION
The cert.der must now be exported via iManager and copied to the MAC clients. A unique method of copying the file to the clients will be demonstrated.
Export trusted root certificate for Novell eDirectory CA
-
Open iManager > NOVELL CERTIFICATE ACCESS > SERVER CERTIFICATES
-
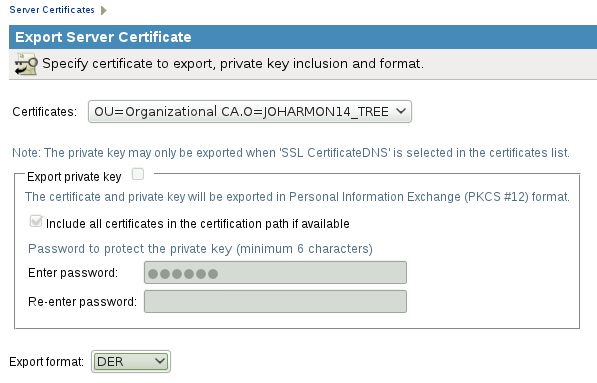
Check the box next to "SSL CertificateDNS" and click "Export"
-
In the CERTIFICATES pull-down menu, select "O=<treename>.OU=Organizational CA". This will automatically deselect the "Export private key" option:
-
Choose the default export format of "DER" > NEXT > SAVE THE EXPORTED CERTIFICATE. Note the name and location of the exported trusted root certificate file.
Import trusted root certificate into MAC's System Keychain
-
From the MAC, open the keychain access.app
-
Click on FILE > IMPORT ITEMS
-
Navigate to the location of the exported trusted root certificate file.
-
Select the file and for the DESTINATION KEYCHAIN be sure to select SYSTEM.
-
Click OPEN, accept the defaults and click
-
Locate the root certificate authority in the SYSTEM KEYCHAIN called "Organizational CA"
-
Ensure that it says "Root certificate authority" and "This certificate is marked as trusted for all users"
-
Reboot